
| “This site contains affiliate links for which OEMDTC may be compensated” |
NHTSA ID Number: 10167305
Manufacturer Communication Number: 19N06
Summary
Customer Satisfaction Program 19N06
Certain 2018-2019 Model Year F-150-F-550 Vehicles
Door Latch Freezing Concerns
11 Affected Products
Vehicles
FORD | F-150 | 2018-2019 |
| FORD | F-250 | 2019 |
| FORD | F-250 SD | 2018 |
| FORD | F-350 SD | 2018-2019 |
| FORD | F-450 SD | 2018-2019 |
| FORD | F-550 | 2019 |
| FORD | F-550 SD | 2018-2019 |
October 1, 2019
TO: All U.S. Ford and Lincoln Dealers
SUBJECT: Customer Satisfaction Program 19N06
Certain 2018-2019 Model Year F-150-F-550 Vehicles
Door Latch Freezing Concerns
PROGRAM TERMS
This is a one-time repair program for vehicles that exhibit a door latching concern. Affected vehicles are eligible for this repair through October 31, 2029, regardless of vehicle mileage or warranty start date. Coverage is automatically transferred to subsequent owners. This program will expire October 31, 2029.
VEHICLES COVERED BY THIS PROGRAM
| Vehicle | Model Year | Assembly Plant | Build Dates |
| F-150 | 2018-2019 | Dearborn | April 13, 2018 through February 26, 2019 |
| Kansas City | April 4, 2018 through March 4, 2019 | ||
| F-250 – F-550 | Kentucky | April 22, 2018 through March 5, 2019 | |
| OHAP | April 18, 2018 through March 11, 2019 |
Affected vehicles are identified in OASIS.
REASON FOR PROVIDING EXTENDED WARRANTY COVERAGE
In the affected vehicles, water entering the doors in cold temperatures may cause the outside door handle cable to freeze at the handle end. Frozen water in the cable can cause the exterior door handle cable not to return to the home position holding the door latch open. Ford is offering this no charge service to customers that have experienced a door latching concern to perform robustness actions on the front doors of all vehicles and on the rear doors of crew cab vehicles, which will prevent water intrusion and door latch freezing.
SERVICE ACTION
If an affected vehicle has exhibited a frozen latch, dealers are to perform robustness actions to the front doors and crew cab rear doors such as sealing the doors and door latches, lubricating door cables and installing a wiper clip on the exterior door handle cable ends. This service must be performed at no charge to the vehicle owner.
OWNER NOTIFICATION AND MAILING SCHEDULE
Due to the large volume of vehicles affected by this program, owners of affected vehicles will be notified in three separate mailings. Mailing will begin the week of October 14, 2019, and is expected to complete by the end of October. Dealers should repair any affected vehicles that experience a frozen door latch whether or not the customer has received a letter.
ATTACHMENTS
Attachment I: Administrative Information
Attachment II: Labor Allowances and Parts Ordering Information
Attachment III: Technical Information
Attachment IV: Instructional Video Links
Owner Notification Letters
QUESTIONS & ASSISTANCE
For questions and assistance, contact the Special Service Support Center (SSSC) via the SSSC Web Contact Site. The SSSC Web Contact Site can be accessed through the Professional Technician Society (PTS) website using the SSSC link listed at the bottom of the OASIS VIN report screen or listed under the SSSC tab.
Sincerely,
David J. Johnson
ATTACHMENT I
Customer Satisfaction Program 19N06
Certain 2018-2019 Model Year F-150-F-550 Vehicles
Door Latch Freezing Concerns
OASIS ACTIVATION
OASIS will be activated on October 1, 2019.
FSA VIN LISTS ACTIVATION
FSA VIN Lists will not be activated for this service action.
SOLD VEHICLES
- Only owners with affected vehicles that exhibit the covered condition will be directed to dealers for repairs.
- Dealers are to prioritize repairs of customer vehicles over repairs of new and used vehicle inventory.
STOCK VEHICLES
Do not perform this program unless the affected vehicle exhibits the covered condition.
TITLE BRANDED / SALVAGED VEHICLES
Affected title branded and salvaged vehicles are eligible for this service action.
OWNER REFUNDS
Refunds are not approved for this program.
RENTAL VEHICLES
The use of rental vehicles is not approved for this program.
ADDITIONAL REPAIR (LABOR TIME AND/OR PARTS)
Additional repairs identified as necessary to complete the FSA should be managed as follows:
- For related damage and access time requirements, refer to the Warranty and Policy Manual – Section 6 – Ford & Lincoln Program Policies / General Information & Special Circumstances for FSA’s / Related Damage.
- For vehicles within new vehicle bumper-to-bumper warranty coverage, no SSSC approval is required.
- Ford vehicles – 3 years or 36,000 miles
- Ford
- For vehicles outside new vehicle bumper-to-bumper warranty coverage, submit an Approval Request to the SSSC Web Contact Site prior to completing the repair.
CLAIMS PREPARATION AND SUBMISSION
- Claim Entry: Enter claims using Dealer Management System (DMS) or One Warranty Solution (OWS) online.
- When entering claims, select claim type 31: Field Service Action. The FSA number 19N06 is the sub code.
- For additional claims preparation and submission information, refer to the Recall and Customer Satisfaction Program (CSP) Repairs in the OWS User Guide.
- Related Damage/Additional labor and/or parts: Must be claimed as Related Damage on a separate repair line from the FSA with same claim type and sub code as described in Claim Entry above.
IMPORTANT: Click the Related Damage Indicator radio button.
- Provision for Locally Obtained Supplies: Includes XG-13, XG-16, XL-6, TA-30, Cotton Swabs/Q-Tips®, Isopropyl Alcohol, brushes, disposable gloves, syringe, eye dropper or a similar applicator and Motorcraft® Premium Windshield Wash Concentrate (ZC-32-B2) or a 99% Methyl Hydrate (Methanol) product.
NOTE: The listed chemicals and locally obtained supplies can be used on multiple vehicles.
- Program Code: 19N06 o Misc Expense: OTHER o Amount: Actual cost up to $11.00
- PROGRAM TERMS: This program will be in effect through October 31, 2029. There is no mileage limit for this program.
ATTACHMENT II
Customer Satisfaction Program 19N06
Certain 2018-2019 Model Year F-150-F-550 Vehicles
Door Latch Freezing Concerns
LABOR ALLOWANCES
| Description | Labor Operation | Labor Time |
| Perform Robustness Actions On Front Doors
(All Regular Cab and Super Cab) | 19N06B | 1.8 Hours |
| Perform Robustness Actions On All Doors (Crew Cab) | 19N06C | 3.4 Hours |
| * Additional Time For Replacement Of Interior Door Handle Release Cable(s) – Only if an interior door handle release cable is found to be kinked. | MT19N06
0.6 Hours Per Affected Door (Up To 2.4 Hours for 4 doors on a crew cab) | |
* Less than 5% vehicles are expected to require a cable replacement.
PARTS REQUIREMENTS / ORDERING INFORMATION
| Description | Part Number | Order Quantity | Claim Quantity |
| Front Door Kit | FL3Z-16308-P | 1 | 1 |
| Rear Door Kit (Crew Cab Only) | FL3Z-16308-Q | 1 | 1 |
| Exterior Door Handle Cable Wiper Clip (One Piece per Package) | LL3Z-15264B28-A | 2 Req. Reg/Sup Cab 4 Req. Crew Cab | |
| Motorcraft® Low Temperature Grease* | XG-16 | MISC. OTHER | |
| Motorcraft® Door Latch Grease* | XG-13 | ||
| Motorcraft® Silicone Spray* | XL-6 | ||
| Motorcraft® Silicone Sealant* | TA-30 | ||
| Motorcraft® Premium Windshield Wash
Concentrate (All Markets Except Canada)* | ZC-32-B2 | ||
| Methyl Hydrate Or Equivalent Product
Containing 99% Methanol (Canada Only) * | Obtain Locally | ||
| Cotton Swabs/Q-Tips®* | |||
| Isopropyl Alcohol* | |||
| Brushes* | |||
| Disposable Gloves* | |||
| Syringe, Eye Dropper or a Similar Applicator* | |||
* The listed chemicals and locally obtained supplies can be used on multiple vehicles.
Parts Requirements / Ordering Information Continued On The Next Page
PARTS REQUIREMENTS / ORDERING INFORMATION (Continued)
| Part Number | Description | Part Number | Order Quantity | Claim Quantity |
| (RH Front – All Vehicles Except F-150 with Gas Engine) | Interior Door Handle Release Cable
| HC3Z-15221A00-B | As Required *
| |
| (LH Front – All Vehicles Except F-150 with Gas Engine) | HC3Z-15221A01-B | |||
| (LH/RH Front – Only F-150 with Gas Engine) | FL3Z-15221A00-B | |||
| (LH/RH Rear – All Vehicles Crew Cab Doors) | FL3Z-1540180-A | |||
* Less than 5% vehicles are expected to require a cable replacement.
Order your parts requirements through normal order processing channels. To guarantee the shortest delivery time, an emergency order for parts must be placed.
DEALER PRICE
For latest prices, refer to DOES II.
PARTS RETENTION AND RETURN
Follow the provisions of the Warranty and Policy Manual, Section 1 – WARRANTY PARTS RETENTION AND RETURN POLICIES.
EXCESS STOCK RETURN
Excess stock returned for credit must have been purchased from Ford Customer Service Division in accordance with Policy Procedure Bulletin 4000.
ATTACHMENT III
CERTAIN 2018-2019 MODEL YEAR F-150-F-550 VEHICLES — DOOR LATCH FREEZING CONCERNS
OVERVIEW
In the affected vehicles, water entering the doors in cold temperatures may cause the outside door handle cable to freeze at the handle end. Frozen water in the cable can cause the exterior door handle cable not to return to the home position holding the door latch open. Ford is offering this no charge one-time repair extended coverage through October 31, 2029 to customers who have experience a door latching concern, regardless of vehicle mileage or warranty start date. Dealers will perform robustness actions, such as sealing the doors and door latches, lubricating door cables & installing wiper clips on the exterior door handle cable, on the front doors of all vehicles and on the rear doors of crew cab vehicles. This service must be performed at no charge to the vehicle owner.
NOTE: Please read this procedure in its entirety, prior to performing repairs. Additionally, instructional videos are available to assist with the repair. Please refer to ATTACHMENT IV: Instructional Video Links to view the videos.
SERVICE PROCEDURE
Unique Tool List:
| General Tools | |
| Plastic Trim Removal Tools | Brushes |
| Blowgun | Industrial Grade Heavy Duty Scissors |
| Bungee Cords | Shop Towel |
| Utility Knife | Disposable Gloves |
| Tape Measure | Paint Pen |
| Zip Tie | Ruler/Straight Edge |
| Caulk Gun | Needle Nose Pliers |
| Cotton Swab | Locally Obtained Syringe, Eye Dropper or Similar Applicator |
Front Door Service Procedure (All Vehicles)
NOTE: Not all the parts in the kit will be used.
NOTE: The parts being installed in this procedure are not labeled. Refer to Figure 1 for component identification.
NOTE: Procedure to be performed on both front doors.
NOTE: The window must be in the closed (up) position when performing this procedure.
NOTICE: Do not allow the door trim panel or exterior door handle to hang by the door handle cables or damage to the cable and door may occur.
1. Remove the front exterior door handles. Please follow the Workshop Manual (WSM) procedures in Section 501-14.
NOTE: The interior grab handle cover clips can be reused for this repair. Only replace if damaged.
2. If a cable wiper clip is present on the exterior door handle cable end, remove and discard the cable wiper clip. See Figure 2.
NOTE: Front passenger door shown, all doors similar.
3. Inspect the interior door handle to latch release cable for kinking. See Figure 3.
– Were any kinks visible on the interior door handle release cable?
Yes – Proceed to Step 4.
No – Proceed to Step 7.
NOTE: The front door latch of some vehicles is equipped with a small flexible plastic water shield located over the exterior door handle cable attachment point. Note the water shield position and orientation for reassembly.
NOTE: Certain vehicles are equipped with an interior door handle release cable retaining bracket on the front door latch. The interior door handle release cable is serviced in a similar manner as shown in Figure 5 whether or not a cable retaining bracket is present.
4. Remove the front door latch. Please follow Steps 1, 3, 7 – 9 and 11 – 14 of the WSM procedures in Section 501-14. Then proceed to Step 5.
5. Replace the interior door handle release cable. See Figure 5.
a. Detach the interior door handle release cable from the retaining bracket.
b. Remove the interior door handle release cable from the latch.
c. Install the new interior door handle release cable by reversing the cable replacement and the front door latch removal steps, then proceed to Step 6.
NOTE: Do not reinstall the door panel, watershield or the exterior door handle at this time.
CAUTION: Use caution not to kink the cables during reassembly of the door latch.
6. Reassemble and reinstall the front door latch. Complete by reversing Step 4 (above). Please follow the WSM procedures in Section 501-14. Then proceed to Step 7.
7. Remove and discard the rubber drain plug and clean any obstructions, debris, foreign material and residual water from all of the door drain holes using compressed air and a tool such as a plastic trim tool or a zip tie. See Figure 6.
NOTE: Front passenger door shown, all doors similar.
8. Using compressed air, blow out any debris or residual water from the door latch assembly, exterior door handle mechanism and cables for 30 seconds. Drying these components with compressed air for 30 seconds is critical to remove as much moisture as possible. See Figure 7.
9. Lower the front door window glass to the fully down position.
10. Remove the inner belt moulding and position aside the latch side of the door glass top run. See Figure 8.
11. If present, remove and discard the two pieces of foam on the driver and passenger side outer belt moulding (also known as upper belt moulding) as shown in Figures 9 and 10.
NOTE: Passenger door shown, driver door similar.
12. Clean the highlighted area of the outer belt moulding with isopropyl alcohol and a clean shop towel. See Figure 11.
NOTE: Make sure to clean past the second clip.
13. Apply a small bead of Motorcraft® TA-30 silicone sealant onto the highlighted area of the outer belt moulding, ensuring the two belt moulding clips shown in Figures 11 and 12 are completely covered.
Using your finger, smooth out the sealant to establish an even surface. See Figure 12.
NOTE: A proper seal around the belt moulding clips shown in Figures 11 and 12 is crucial.
14. Using a small plastic trim removal tool, install Foam A to the outer belt moulding on top of the bead of silicone that was previously applied in Step 13. Both outer belt moulding clips need to be covered by the Foam A. See Figures 13 and 14.
NOTE: It is crucial that both outer belt moulding clips are covered by Foam A and that the end of Foam A wraps around the outer belt moulding as shown.
15. Using a clean towel and isopropyl alcohol, remove any excess silicone in visible areas on the outer belt moulding.
16. Install the door glass run funnel (157 mm funnel wings) ensuring that the lower tab is situated in the door glass run and the funnel sides sit at a 90° angle above the door glass run. See Figure 15.
NOTE: Ensure the funnel sides are at a 90° angle upon installation. It may be necessary to bend the sides of the funnel back to a 90° angle before installation.
17. Reinstall the latch side of the front door glass top run and the inner belt moulding. See Figure 8.
NOTICE: When installing the rear door glass top run make sure not to bend or damage the door glass run funnel. Check through the exterior door handle opening to verify that the funnel is positioned correctly.
18. Raise the front door window glass to the fully up position.
19. Using a clean shop towel and isopropyl alcohol clean the area where the Foam Tape will be applied, from any dirt, dust or debris, then install the Foam Tape in the location shown, from though the exterior door handle opening, to hold the funnel in place. See Figure 16.
20. Using a clean shop towel and isopropyl alcohol clean the top portion of the door and neatly apply Motorcraft® TA-30 silicone sealant to the indicated/highlighted area in order to completely fill the gap as shown in Figure 17.
- Do not close the door until the silicone is cured.
NOTE: Proper application of the sealant is crucial to properly water seal the door and also avoid appearance concerns.
NOTE: Top of driver front door shown, passenger front door similar.
21. On the driver’s side door only, apply Motorcraft® XG-13 door latch grease to the area where the key lock rod attaches to the key lock rod lever. See Figure 18.
22. On the driver’s side door only, install the rubber grommet onto the key lock rod over the key lock rod lever. Position the rubber grommet as shown in Figure 18. The rubber grommet will sit sideways when properly installed.
NOTE: This grommet may already be present on some vehicles. If present, it will likely be in the correct position and no action is necessary.
NOTE: Door latch assembly shown out of vehicle for clarity.
23. Unseat the interior door handle release cable rubber grommet and release any cable retaining clips. Hold the end of the cable in the upright position and spray Motorcraft® XL-6 lubricant for 5 seconds into the cable. See Figure 19.
NOTE: If the Motorcraft® XL-6 lubricant container is not equipped with an applicator nozzle that can accommodate a straw, swap the applicator nozzle from another Motorcraft® chemical such as: XL-5 Multi-Purpose Grease Spray, XL-5-A Multi-Purpose Grease Spray or ZC-30-A Silicone Gasket Remover so a straw can be used. Spray a small amount to clear the applicator nozzle and straw prior to spraying the cable.
24. Using a bungee cord or other suitable device, secure the interior door handle release cable to the door in an upright position to allow the lubricant time to run down into the cable until the interior door handle release cable is reinstalled later in this procedure. See Figure 20.
25. Towel dry the exterior door handle cable to absorb any residual moisture. Using a bungee cord or other similar device secure the exterior door handle cable to the door in an upward position as shown in Figure 21, to allow the undiluted Motorcraft® Premium Windshield Wash Concentrate (ZC-32-B2) or a 99 percent methyl hydrate (methanol) product time to run down into the cable, until the exterior door handle cable is reinstalled later in this procedure.
CAUTION: The use of disposable gloves is required for the following step.
NOTICE: Place a shop towel around the exterior door handle cable, while performing this procedure, to prevent dripping onto the vehicle which could cause paint damage.
NOTE: Do not use a product that contains isopropyl alcohol. Only use a product containing methanol or a mix of methanol and ethylene glycol.
26. The use of disposable gloves is required for this step. Using a locally obtained syringe, eye dropper, or other suitable applicator draw 10 ml of the undiluted Motorcraft® ZC-32-B2 Concentrate or a 99 percent methyl hydrate (methanol) product into the applicator. With the cable pulled out and the tip of the applicator positioned inside the arrowhead cable end fitting, inject 2 ml between the cable shield and the cable then cycle the cable 5 times in and out of the cable shield. Repeat injecting fluid and cycling the cable a total of 5 times.
NOTE: Rear door shown, front door similar.
27. If a foam gasket is present around the perimeter of the exterior door handle, thoroughly remove the foam gasket. Using a clean shop towel and isopropyl alcohol, clean the highlighted mating surface area of the exterior front door handle. See Figure 22.
28. Using a clean shop towel and isopropyl alcohol clean inside the dotted lines on the mating surface area of the front exterior door handle opening. See Figure 23.
29. Install a new Foam E around the perimeter of the exterior door handle.
NOTE: Foam E will not wrap around the entire perimeter of the exterior door handle.
NOTE: Proper placement of Foam E is crucial for proper sealing and to avoid appearance concerns.
A. Lay out Foam E on the exterior door handle and mark center as shown in Figure 24.
B. Remove Foam E from the door handle and remove the back center portion of the adhesive backing then cut the protective backing in half. See Figure 24.
C. Align the marks made on the Foam E and exterior door handle and adhere the back center portion to the exterior door handle as shown in Figure 25.
D. Lay one side of Foam E down on the exterior door handle and without stretching the foam pull off the adhesive backing as you adhere Foam E to the exterior door handle as shown in Figure 25.
E. Remove the protective backing from the other side of Foam E as shown in Figure 25.
F. Without stretching the foam adhere it to the exterior door handle ensuring that both sides of Foam E are of equal length once secured. See Figure 26.
30. Using a clean shop towel and isopropyl alcohol, clean the handle plunger then using a brush apply a light film of Motorcraft® XG-16 low temperature grease to all four sides of the exterior door handle plunger and to the mechanisms in the areas shown in Figures 27 and 28.
31. Apply a bead of Motorcraft® TA-30 silicone sealant to the latch side area of the front door exterior handle opening metal surface. Make sure that the sealant overlaps with the Foam E on the exterior door handle. See Figure 29.
NOTE: Proper placement of the Motorcraft® TA-30 silicone sealant is crucial for proper sealing and to avoid appearance concerns.
NOTE: Driver door shown, passenger door similar.
32. Remove the bungee cords, or the similar devices, used to hold the interior and exterior door handle cables up, seat the rubber grommet and if equipped, reinstall the interior door handle release cable retaining clips.
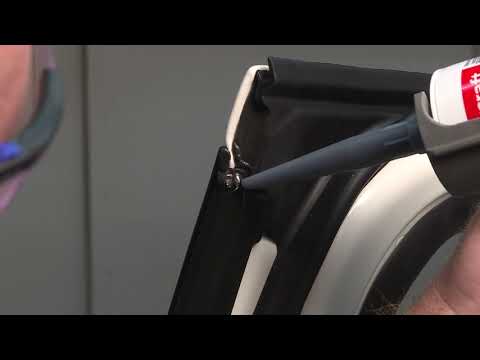
33. Reconnect the exterior door handle cable to the door handle and lubricate the door handle cable end with Motorcraft® XG-16 low temperature grease, as shown in Figure 30.
34. Install a new handle cable wiper clip on the exterior door handle cable end. See Figure 31.
35. Reinstall the front exterior door handles. Please follow the WSM procedures in Section
NOTICE: Reinstall the exterior door handle cable and retaining clips in the original factory position.
36. Clean any excess silicone around the exterior door handle perimeter using isopropyl alcohol, cotton swabs and a clean shop towel to avoid appearance concerns.
37. Is the vehicle a crew cab?
Yes – Proceed to Page 24 – Rear Door Service Procedure (Crew Cab Vehicles).
No – Repair is complete.
Rear Door Service Procedure (Crew Cab Vehicles)
Complete Rear Door Part Kit
NOTE: Not all the parts in the kit will be used
NOTE: The parts being installed in this procedure are not labeled. Refer to Figure 32 for component identification.
NOTE: Procedure to be performed on both rear doors.
NOTE: The window must be in the closed (up) position when performing this procedure.
NOTICE: Do not allow the door trim panel or exterior door handle to hang by the door handle cables or damage to the cable and door may occur.
1. Remove the rear exterior door handles. Please follow the Workshop Manual (WSM) procedures in Section 501-14.
NOTE: The interior grab handle cover clips can be reused for this repair. Only replace if damaged.
2. If a cable wiper clip is present on the exterior door handle cable end, remove and discard the cable wiper clip. See Figure 33.
NOTE: Front passenger door shown, all doors similar.
3. Inspect the interior door handle to latch release cable for kinking. See Figure 34.
– Were any kinks visible on the interior door handle release cable?
Yes – Proceed to Step 4.
No – Proceed to Step 7.
4. Remove the rear door latch. Please follow Steps 2, 3 and 5 – 11 of the WSM procedures in Section 501-14. Then proceed to Step 5.
5. Replace the interior door handle release cable. See Figure 35.
a. Detach the interior door handle release cable from the retaining bracket.
b. Remove the interior door handle release cable from the latch.
c. Install the new interior door handle release cable by reversing the cable replacement and the front door latch removal steps, then proceed to Step 6.
NOTE: Do not reinstall the door panel, watershield or the exterior door handle at this time.
CAUTION: Use caution not to kink the cables during reassembly of the door latch.
6. Reassemble and reinstall the rear door latch. Complete by reversing Step 4 (above). Please follow the WSM procedures in Section 501-14. Then proceed to Step 7.
7. Remove and discard the rubber drain plug and clean any obstructions, debris, foreign material and residual water from all of the door drain holes using compressed air and a tool such as a plastic trim tool or a zip tie. See Figure 36.
NOTE: Front passenger door shown, all doors similar.
8. Using compressed air, blow out any debris or residual water from the door latch assembly, exterior door handle mechanism and cables for 30 seconds. Drying these components with compressed air for 30 seconds is critical to remove as much moisture as possible. See Figure 37.
9. Lower the rear door window glass to the fully down position.
10. Remove the rear door inner belt moulding and position aside the latch side of the door glass top run. See Figure 38.
11. If present, remove and discard the the two pieces of foam on the driver and passenger side outer belt moulding at the location shown in Figures 39 and 40.
NOTE: Passenger door shown, driver door similar.
12. Using a clean towel and isopropyl alcohol, clean the area of the outer belt moulding shown in Figure 41. This is where the foam and silicone will be applied. See Figure 41.
NOTE: Make sure to clean past the second clip.
13. Apply a small bead of Motorcraft® TA-30 silicone sealant onto the highlighted area of the outer belt moulding, ensuring the two belt moulding clips shown in Figures 42 and 43 are completely covered.
Using your finger, smooth out the sealant to establish an even surface. See Figures 42 and 43.
NOTE: A proper seal around the belt moulding clips shown in Figure 42 is crucial.
14. Install Foam H to the C-pillar end of the outer belt moulding. See Figure 44.
15. Remove any excessive silicone in visible areas on the outer belt moulding with isopropyl alcohol and a clean shop towel.
16. On vehicles built on or before 8-Jun-2018, modify the rear door glass top run. See Figure 45.
a. Measure 15 mm (0.59 in) from the inboard bottom corner of the door glass top run.
b. Starting at the bottom outboard corner of the rear door glass top run, cut a 45° notch using the previous measurement as a guide.
17. If present, remove and discard the felt on the rear door glass top run. See Figure 46.
18. Using a clean towel and isopropyl alcohol, clean the highlighted area of the rear door glass top run. See Figure 47.
19. Install Foam N to the area of the rear door glass top run as shown in Figure 48a. Make sure Foam N is under the C-pillar notch shown in Figure 48a. Foam H and Foam N must cover the gap shown in Figure 48b.
20. With the rear door latch side door glass top run still positioned aside, raise the rear door window glass three quarters of the way up. See Figure 49.
NOTICE: Use care not to pinch the door glass top run or scratch the glass when raising the window glass.
21. Apply Motorcraft® TA-30 silicone sealant in and over the mating area of the water shields to the door from the front to the outboard corner. Using light finger pressure, smooth the bead of silicone. See Figure 50.
22. Lower the rear door window glass to the fully down position.
23. Install the door glass run funnel (132mm funnel wings), ensuring the lower tab is situated in the door glass run and the funnel sides sit at a 90° angle above the door glass run. See Figure 51.
NOTE: Ensure the funnel sides are at a 90° angle upon installation. It may be necessary to bend the sides of the funnel back to a 90° angle before installation.
24. Reinstall the rear door glass top run and inner belt moulding. See Figure 38.
NOTICE: When installing the rear door glass top run make sure not to bend or damage the door glass run funnel. Check through the exterior door handle opening to verify that the funnel is positioned correctly.
25. Raise the front door window glass to the fully up position.
26. Using a clean shop towel and isopropyl alcohol clean the area where the Foam Tape 1 will be applied, from any dirt, dust or debris, then install Foam Tape 1 in the location shown, from though the exterior door handle opening, to hold the funnel in place. See Figure 52.
27. Unseat the interior door handle release cable rubber grommet and if equipped, release any cable retaining clips. Hold the end of the cable in the upright position and spray Motorcraft® XL-6 lubricant for 5 seconds into the cable. See Figure 53.
NOTE: If the Motorcraft® XL-6 lubricant container is not equipped with an applicator nozzle that can accommodate a straw, swap the applicator nozzle from another Motorcraft® chemical such as: XL-5 Multi-Purpose Grease Spray, XL-5-A Multi-Purpose Grease Spray or ZC-30-A Silicone Gasket Remover so a straw can be used. Spray a small amount to clear the applicator nozzle and straw prior to spraying the cable.
28. Using a bungee cord or other suitable device, secure the interior door handle release cable to the door in an upright position to allow the lubricant time to run down into the cable until the interior door handle release cable is reinstalled later in this procedure. See Figure 54.
29. Towel dry the exterior door handle cable to absorb any residual moisture. Using a bungee cord or other similar device secure the exterior door handle cable to the door in an upward position as shown in Figure 55, to allow the undiluted Motorcraft® Premium Windshield Wash Concentrate (ZC-32-B2) or a 99 percent methyl hydrate (methanol) product time to run down into the cable, until the exterior door handle cable is reinstalled later in this procedure.
CAUTION: The use of disposable gloves is required for the following step.
NOTICE: Place a shop towel around the exterior door handle cable, while performing this procedure, to prevent dripping onto the vehicle which could cause paint damage.
NOTE: Do not use a product that contains isopropyl alcohol. Only use a product containing methanol or a mix of methanol and ethylene glycol.
30. The use of disposable gloves is required for this step. Using a locally obtained syringe, eye dropper or other suitable applicator, draw 10 ml of the undiluted Motorcraft® ZC-32-B2 Concentrate or a 99 percent methyl hydrate (methanol) product into the applicator. With the cable pulled out and the tip of the applicator positioned inside the arrowhead cable end fitting, inject 2 ml between the cable shield and the cable then cycle the cable 5 times in and out of the cable shield. Repeat injecting fluid and cycling the cable a total of 5 times.
31. If a foam gasket is present around the perimeter of the exterior rear door handle, thoroughly remove the foam gasket. Using a clean shop towel and isopropyl alcohol, clean the highlighted mating surface area of the exterior door handle. See Figure 56.
32. Using a clean shop towel and isopropyl alcohol, clean inside the dotted lines on the mating surface area of the exterior door handle opening. See Figure 57.
33. Install a new Foam K around the perimeter of the exterior door handle.
NOTE: Foam K will not wrap around the entire perimeter of the exterior door handle.
NOTE: Proper placement of Foam K is crucial for proper sealing and to avoid appearance concerns.
A. Lay out Foam K on the exterior door handle and mark center as shown in Figure 58.
B. Remove Foam K from the door handle and remove the back center portion of the adhesive backing then cut the protective backing in half. See Figure 58.
C. Align the marks made on the Foam K and exterior door handle and adhere the back center portion to the exterior door handle as shown in Figure 59.
D. Lay one side of Foam K down on the exterior door handle and without stretching the foam pull off the adhesive backing as you adhere Foam K to the exterior door handle as shown in Figure 59.
E. Remove the protective backing from the other side leg of Foam K as shown in Figure 59.
F. Without stretching the foam adhere it to the exterior door handle ensuring that both sides of Foam K are of equal length once secured. See Figure 60.
34. Using a clean shop towel and isopropyl alcohol, clean the handle plunger then, using a brush, apply a light film of Motorcraft® XG-16 low temperature grease to all four sides of the exterior door handle plunger and to the mechanisms in the areas shown in Figures 61 and 62.
35. Apply a bead of Motorcraft® TA-30 silicone sealant to the latch side area of the rear door exterior handle opening metal surface. Make sure that the sealant overlaps with the Foam K on the exterior door handle. See Figure 63.
NOTE: Proper placement of the Motorcraft® TA-30 silicone sealant is crucial to ensure proper sealing and avoid appearance concerns.
NOTE: Driver door shown, passenger door similar.
36. Remove the bungee cords or the similar devices used to hold the interior and exterior door handle cables. Seat the interior door handle release cable rubber grommet and, if equipped, reinstall the interior door handle release cable retaining clips.
37. Reconnect the exterior door handle cable to the door handle and lubricate the door handle cable end with Motorcraft® XG-16 low temperature grease as shown in Figure 64.
38. Install a new handle cable wiper clip on the exterior door handle cable end. See Figure 65.
39. Reinstall the rear exterior door handles. Please follow the WSM procedures in Section
NOTICE: Reinstall the exterior door handle cable and retaining clips in the original factory position.
40. Clean any excess silicone around the exterior door handle perimeter using isopropyl alcohol, cotton swabs and a clean shop towel to avoid appearance concerns.
Crew Cab vehicle repair is complete.
ATTACHMENT IV
Customer Satisfaction Program 19N06
Certain 2018-2019 Model Year F-150-F-550 Vehicles
Door Latch Freezing Concerns
INSTRUCTIONAL VIDEO LINKS
Video Links: F-150 shown, F-250-F-550 is similar.
IMPORTANT: Always refer to the dealer bulletin and the technical information for latest parts requirements and repair procedures.
NOTE: The videos below are also used in Field Service Action (FSA) 18N03 and have some components or contents that may be different from the repair in this program. These differences do not affect the installation or performance or the parts in this FSA.
NOTE: Some videos show the same procedure performed on a vehicle as well as on a bench for demonstration purposes.
Video 1: Front Door Glass Top Run And Outer Belt Moulding Sealing Procedure
Video 2: Door Glass Run Funnel And Door Glass Top Run Installation Procedure – Rear Door Shown, Front Door Similar

Video 3: Front Door Latch Sealing Procedure

Video 4: Exterior Door Handle Sealing Procedure – Rear Door Shown, Front Door Similar

Video 5: Rear Door Glass Top Run and Outer Belt Moulding Sealing Procedure

Video 6: Rear Door Latch Sealing Procedure

Customer Satisfaction Program 19N06
October 1, 2019
 Loading...
19-2081
21 March 2019
Loading...
19-2007

- Non-Corrosive Formula - Ultra Black Maximum Oil Resistance Silicone Gasket Maker Is Sensor-safe; With A Non-Corrosive Formula Designed For Superior Adhesion To Oily Surfaces And Long Term Durability
- Superior Resistance - Powertrain Fluids Including Engine Oil, Transmission Fluid, Gear Lube And Coolants To Keep Your Application Locked In Place To Create A Strong Long Lasting Seal
- High Flexibility - Ultra Black Silicone Gasket Maker Retains High Flexibility And Oil Resistant Properties And Can Be Used To Replace Pre Cut Gaskets Or Be Used As A Gasket Maker Or Gasket Sealant
- Long-lasting And Durable - Ultra Black Resists Aging, Weathering And Thermal Cycling Without Hardening, Shrinking Or Cracking. With A Temperature Range Of -65°f To 500°f (-54°c To 260°c) Intermittent
- Suggested Applications: Valve Covers And Valve Guides, Oil Pans, Transmission Pans, Intake Manifold End Seals, Timing Gear Covers, And Differential Covers

- Professional Formula - This Clear Silicone Adhesive Sealant is a Sensor-Safe, General Purpose Clear RTV Sealant that can be used inside or outside for all your jobs
- Do It All- Seal, Bond, Repair, Mend And Secure Glass, Metal, Plastics, Fabric, Vinyl, Weather Stripping, Vinyl Tops, And More With This Clear Rtv Silicone Sealant
- Resist The Elements- Permatex Clear Silicone Adhesive Sealant Is Waterproof And Flexible, Resists Water, Weather, And Vibration On All Your Applications
- Multipurpose Formula- With A Temperature Range From : -75°f To 400°f (-59°c To 204°c) Clear RTV Silicone Can Be Used All Around And Can Be Used To Protect And Repair Electrical Wiring
- Suggested Applications- Door Frames, Seams And Roofs, Vinyl Tops, Windshields, Housings And Coverings, (Not Recommended For Engine Gasket Applications)

- High Performance Formula - Ultra Grey Silicone Gasket Maker is Sensor-Safe, With a Non-Corrosive Formula Designed to Provide Reliable “Formed-in-Place” Gaskets for Mechanical Assemblies
- Vibration Resistant - Permatex Ultra Grey Offers Maximum Vibration Resistance, Withstanding High Torque Loads While Creating a Tough, Flexible, Silicone Rubber Gasket
- Long-Lasting Durable Silicone Gasket - Resists Aging, Weathering, and Thermal Cycling Without Hardening, Shrinking, or Cracking with Temperature Resistance from -65°F to 500°F (-54°C to 260°C).
- Multi-Purpose Gasket Material - Ultra Grey Silicone Gasket Maker Retains High Torque and Vibration Resistance and Can Be Used to Replace Pre Cut Gaskets or Be Used as a Gasket Maker or Gasket Sealant
- Suggested Applications: Valve Covers, Water Pump Housings, Intake Manifold End Seals, Thermostat Housings, Timing Gear Covers, Transmission Pans, and Oil Pans

- Professional Formula - This Black Silicone Adhesive Sealant Is A Sensor-safe, General Purpose Black RTV Sealant That Can Be Used Inside Or Outside For All Your Jobs
- Do It All- Seal, Bond, Repair, Mend And Secure Glass, Metal, Plastics, Fabric, Vinyl, Weather Stripping, Vinyl Tops, And More With This Black RTV Silicone Sealant
- Resist The Elements- Permatex Black Silicone Adhesive Sealant Is Waterproof And Flexible; Resists Water, Weather, And Vibration On All Your Applications
- Multipurpose Formula- With A Temperature Range From -75°f To 450°f (-59°c To 232°c) Black RTV Silicone Can Be Used All Around And Can Be Used To Protect And Repair Electrical Wiring
- Suggested Applications- Door Frames, Electrical Connections, Seams And Roofs, Vinyl Tops, Weather Stripping, Housings And Coverings, (not Recommended For Engine Gasket Applications)
- High flexibility and oil resistance
- Sensor-safe, non-corrosive formula
- Resist to powertrain fluids
- Eliminates the need for pre-formed, pre-cut gaskets
- OEM specified and approved for dealership warranty requirements

- Clear Silicone Sealant & Adhesive: Is A General Purpose Sealant Adhesive, Rtv (Room Temperature Vulcanized)Silicone Designed For Use In Household Or Mechanical Assembly Applications.

- 100% WATERPROOF: This 100% silicone formula offers ultimate protection from water damage, providing a reliable seal in areas prone to consistent water exposure
- UV Protection and 50 Years Durability Guarantee: No Yellow No Color Change
- No Odor = No Smell
- 30-MINUTE WATER-READY: Ready for water exposure in as little as 30 minutes
- SHRINK & CRACK-PROOF: Withstands extreme expansion or contraction associated with temperature fluctuations

- Formulated For Hi-Temp Applications, Or Heavy-Duty Use
- Replaces Almost Any Cut Gasket, And Coats Pre-Cut Gaskets To Increase Reliability
- Makes Reliable 'Formed-In-Place' Gaskets That Resist Cracking, Shrinking And Migrating
- Temperature Range Of -65F To 650F Intermittent

- Adhesives & Sealants
- Country of manufacture: United States
- Manufacturer: Pro-Seal
- Package Weight: 0.11 kilograms

- J-B Weld Hi-Temp Red Silicone Gasket Maker and Sealant is an RTV Silicone gasketing material, designed for use in mechanical assemblies where the existence of higher, continuous temperatures up 650°F.
- Upon curing, which occurs when the product is exposed to the moisture in air, the silicone forms a tough, waterproof seal on most surfaces.
- It will not shrink or crack, resists weathering, and is great for many automotive applications.
- Great for oil pans, valve covers, exhaust manifolds, differential covers and more
Last update on 2025-05-10 / Affiliate links / Images from Amazon Product Advertising API
This product presentation was made with AAWP plugin.