| “This site contains affiliate links for which OEMDTC may be compensated” |
NHTSA Campaign Number: 12V193
Component(s): POWER TRAIN
Potential Number of Units Affected: 27,000
Manufacturer: FORD MOTOR COMPANY
SUMMARY:
FORD IS RECALLING CERTAIN MODEL YEAR 1998-2003 WINDSTAR VEHICLES MANUFACTURED FROM SEPTEMBER 1, 1997, THROUGH JULY 3, 2003, AND CURRENTLY REGISTERED OR ORIGINALLY SOLD IN VIRGINIA. OVER TIME, CORROSION CAN WEAKEN THE REAR AXLE MAKING IT SUSCEPTIBLE TO TORSIONAL STRESS.
CORROSION AND STRESS CAN LEAD TO CRACKS WHICH, IF UNDETECTED, CAN INCREASE AND RESULT IN A COMPLETE FRACTURE OF THE AXLE.
CONSEQUENCE:
A FRACTURED AXLE CAN AFFECT VEHICLE HANDLING AND INCREASE THE RISK OF A CRASH.
REMEDY:
FORD WILL NOTIFY OWNERS, AND DEALERS WILL INSPECT AND INSTALL REAR AXLE REINFORCEMENT BRACKETS, OR REPLACE THE AXLES, AS NECESSARY.
THIS SERVICE WILL BE PERFORMED FREE OF CHARGE.
THE RECALL BEGAN ON JUNE 19, 2012.
OWNERS MAY CONTACT FORD AT 1-866-436-7332.
NOTES:
FORD’S RECALL CAMPAIGN NUMBER IS 10S13.
CUSTOMERS MAY CONTACT THE NATIONAL HIGHWAY TRAFFIC SAFETY ADMINISTRATION’S VEHICLE SAFETY HOTLINE AT 1-888-327-4236 (TTY: 1-800-424-9153); OR GO TO HTTP://WWW.SAFERCAR.GOV.
Check if your Vehicle has a Recall
September 7, 2016
TO: All U.S. Ford and Lincoln Mercury Dealers
SUBJECT: Safety Recall 10S13 – Supplement #13
Certain 1998-2003 Model Year Windstar Vehicles Operated in Corrosion States
Rear Axle Inspection and Repair
REF: Safety Recall 11S16 – Supplement #9
Certain 1999-2003 Model Year Windstar Vehicles Operated in Corrosion States
Subframe Front Lower Control Arm Rear Attaching Flanges and Rear Body Mount Attachments Inspection and Repair
Dated May 1, 2012
REASON FOR THIS SUPPLEMENT
Dealers must perform safety recall 11S16 prior to performing safety recall 10S13.
AFFECTED VEHICLES
Certain 1998 through 2003 model year Windstar vehicles built at the Oakville Assembly Plant from September 1, 1997 through Job Last 2003 and originally sold in, or currently registered in the following states:
| Connecticut | Iowa | Michigan | New York | Vermont |
| Delaware | Kentucky | Minnesota | Ohio | Virginia |
| District of Columbia | Maine | Missouri | Pennsylvania | West Virginia |
| Illinois | Maryland | New Hampshire | Rhode Island | Wisconsin |
| Indiana | Massachusetts | New Jersey | Utah |
Affected vehicles are identified in OASIS. In addition, for a list of vehicles assigned to your dealership, visit https://web.fsavinlists.dealerconnection.com. This information will be available on May 1, 2012.
REASON FOR THIS SAFETY RECALL
In some of the affected vehicles, the rear axle could potentially fracture when operated in high corrosion areas (where salt is used on the roadways during winter months) for an extended period of time. If the rear axle should completely fracture, vehicle handling may be affected which could increase the risk of a crash.
SERVICE ACTION
NOTE: If a vehicle is affected by both safety recalls 10S13 and 11S16, dealers must perform 11S16 prior to performing 10S13.
Dealers are to clean and inspect the rear axle beam for cracks or perforations (holes). Based on the results of the inspection, dealers will perform one of the following service actions:
- Rear Axle Beam PASSED the Inspection: Install axle reinforcement parts per Attachment III – Technical Information and return the vehicle to the owner.
NOTE: It is critical that the reinforcement brackets are installed in the correct locations and the adhesive is applied as directed in these instructions.
NOTE: In order for the bracket to properly bond to the rear axle, the vehicle must remain on the hoist until the axle reinforcement adhesive has cured. The following guidelines must be followed:
- 2 hour cure time at 21°C (70° F) or higher shop temperature
- 3 hour and 15 minute cure time at 16°C (60° F) shop temperature
- If the shop temperature is lower than 16°C (60° F), the adhesive will need to cure overnight
- DO NOT USE HEAT LAMPS TO REDUCE CURE TIME AS EXCESSIVE TEMPERATURES WILL AFFECT BOND STRENGTH OF THE ADHESIVE
We recommend dealers schedule late afternoon repairs if hoist availability will be a concern. By installing the brackets at the end of the day, dealers will have the flexibility to allow the adhesive to properly cure overnight while the vehicle is on the hoist. Customers are eligible for a rental vehicle if needed. Refer to “Rental Vehicles” in Attachment I.
- Rear Axle Beam DID NOT PASS the Inspection: Install replacement axle per Attachment III – Technical Information and return the vehicle to the owner.
This service must be performed on all affected vehicles at no charge to the vehicle owner.
IMPORTANT NOTES
- Taxes and local surcharges associated with rental vehicles are eligible for reimbursement by Ford for Safety Recall 10S13. This is a very specific exception to apply only to 10S13.
- If a vehicle is not included in OASIS, and an owner believes it should be included in the recall (due to evidence of a crack, perforation, or having been operated in a corrosion environment), contact the Special Service Support Center (SSSC) via the SSSC Web Contact Site to request approval of coverage by Safety Recall 10S13.
- Rental vehicles will be claimed under a separate program (79M01).
OWNER NOTIFICATION MAILING SCHEDULE
Owner Letters for the expanded population of vehicles are expected to be mailed the week of June 18, 2012. Dealers should perform an inspection on any affected vehicles identified in OASIS that arrive at their dealerships, whether or not the customer has received a letter.
ATTACHMENTS
Attachment I: Administrative Information
Attachment II: Labor Allowances and Parts Ordering Information
Attachment III: Technical Information
Attachment IV: Dealer Q & A
Owner Notification Letter
Recall Reimbursement Plan
QUESTIONS & ASSISTANCE
For questions and assistance, contact the Special Service Support Center (SSSC) via the SSSC Web Contact Site. The SSSC Web Contact Site can be accessed through the Professional Technician Society (PTS) website using the SSSC link listed at the bottom of the OASIS VIN report screen or listed under the SSSC tab.
ATTACHMENT I
Safety Recall 10S13 – Supplement #13
Certain 1998-2003 Model Year Windstar Vehicles Operated in Corrosion States
Rear Axle Inspection and Repair
OASIS ACTIVATED?
Yes, OASIS will be activated on November 30, 2010.
FSA VIN LIST ACTIVATED?
Yes, FSA VIN list is available through https://web.fsavinlists.dealerconnection.com. Owner names and addresses will be added on June 29, 2012.
NOTE: Your FSA VIN list may contain owner names and addresses obtained from motor vehicle registration records. The use of such motor vehicle registration data for any purpose other than in connection with this recall is a violation of law in several states, provinces, and countries.
Accordingly, you must limit the use of this listing to the follow-up necessary to complete this recall.
STOCK VEHICLES
Inspect and repair all affected units in your used vehicle inventory before delivery.
SOLD VEHICLES
- Owners of affected vehicles will be directed to dealers for repairs.
- Correct other affected vehicles identified in OASIS which are brought to your dealership.
TITLE BRANDED / SALVAGED VEHICLES
Affected title branded and salvaged vehicles are eligible for this recall.
ADDITIONAL LABOR TIME AND/OR PARTS
Submit a request to the SSSC Web Contact Site prior to the repair if you have any of the following:
- Damage that you believe was caused by the covered condition.
- A condition that requires additional labor and/or parts to complete the repair.
- Aftermarket equipment or non-Ford modifications to the vehicle which might prevent the repair of the covered condition.
Requests for approval after completion of the repair may not be granted. Ford Motor Company reserves the right to deny coverage for related damage in cases where the vehicle owner has not had this recall performed on a timely basis. Additional related damage parts are subject to random selection for return to the Ford Warranty Parts Analysis Center (WPAC).
OWNER REFUNDS
- This safety recall must still be performed, even if the owner has paid for a previous repair. Claiming a refund will not close the recall on the vehicle.
- Ford Motor Company is offering a refund for owner-paid repairs covered by this recall if the repair was performed prior to the date indicated in the reimbursement plan, which is posted with this bulletin. Owners are directed to seek reimbursement through authorized dealers or, at their option, directly through Ford Motor Company at P.O. Box 6251, Dearborn, MI 481216251.
- Dealers are also authorized to refund owner-paid emergency repairs that were performed away from an authorized servicing dealer after the end date specified in the reimbursement plan. Non-covered repairs, or those judged by Ford to be excessive, will not be reimbursed.
- Refunds will only be provided for the cost associated with the repair or replacement of a cracked or perforated rear axle.
RENTAL VEHICLES
- Ford Motor Company will pay for a one day vehicle rental, except for fuel, which will be at the owner’s expense. Rentals will only be reimbursed for the day the vehicle is at the dealership for axle or bracket reinforcement installation. Prior approval for more than one rental day is required. Contact the SSSC via the SSSC Web Contact Site.
- Due to the previous long term rental needs unique to 10S13, the maximum daily rental rate was increased to $38 a day to cover costs associated with the vehicle and insurance, when required. Ford will pay for a one day vehicle rental, except for fuel, which will be at the owner’s expense. Taxes and local surcharges associated with rental vehicles are eligible for reimbursement by Ford. This is a very specific exception to apply only to 10S13.
- ALL RENTAL EXPENSES, TAXES, AND LOCAL SURCHARGES MUST BE CLAIMED ON A SEPARATE REPAIR ORDER FROM 10S13 UNDER PROGRAM CODE 79M01.
- Claims for rental reimbursement should continue to be submitted under 79M01 and must be submitted within 30 days of the repair date.
CLAIMS PREPARATION AND SUBMISSION
- Enter claims using Direct Warranty Entry (DWE).
- Refer to ACESII manual for claims preparation and submission information.
- Related damage must be claimed on a repair line that is separate from the repair line on which the FSA is claimed. Related damage requires prior approval from the Special Service Support Center.
- “MT” labor should be submitted on a separate repair line with the related damage flag checked. “MT” labor requires prior approval from the Special Service Support Center.
- Refund Claiming Information (Submit on separate repair line.)
- Program Code: 10S13 – Expense: ADMIN
- Misc. Expense: REFUND – Misc. Expense: 0.2 Hrs.
- Rental Expenses: Must be claimed on a separate repair order from 10S13 under program code 79M01. Dealers must submit for rental reimbursement (up to $38 per day) within 30 days of the repair date. Contact the SSSC if you have a customer with unique transportation issues.
- Program Code: 79M01
- Expense: RENTAL
- Expense: Total amount
- Rental Taxes and Local Surcharges: Must be claimed on a separate repair order from 10S13 under program code 79M01. (When possible, these expenses should be claimed on a different line of the same repair order that the Rental Expense was claimed.)
- Program Code: 79M01
- Expense: RTAXES
- Expense: Total amount
- Axle Reinforcement Repair: Claiming information for cleaning and application tools – applies to Labor Operation 10S13D. (Submit on same repair line as repair.)
- Program Code: 10S13
- Expense: OTHER
- Expense: $10.00
PROCESS OVERVIEW

ATTACHMENT II
Safety Recall 10S13 – Supplement #13
Certain 1998-2003 Model Year Windstar Vehicles Operated in Corrosion States
Rear Axle Inspection and Repair
LABOR ALLOWANCES
PASSED INSPECTION
| Description | Labor Operation | Labor Time |
| Clean and inspect, apply Great Stuff Gaps & Cracks, install axle reinforcement parts, apply Anti-Corrosion Coating, and return vehicle to owner | 10S13D | 1.8 Hours |
DID NOT PASS INSPECTION
| Description | Labor Operation | Labor Time |
| Clean and inspect, axle cracked or perforated, replace rear axle | 10S13B | 1.5 Hours |
TOOL REQUIREMENTS
TA-10, Dual Cartridge Applicator Gun, is required to install the axle reinforcement brackets. Each dealer will be provided one applicator gun at no charge. Applicator guns will be shipped in two phases. The first phase has already been shipped and should have arrived at all dealerships with eight or more affected vehicles on their FSA VIN List. The second phase will be shipped to all remaining dealerships by December 7, 2010. The box will be labeled with the Motorcraft part number
(TA-10 Dual Cartridge Applicator Gun) and a yellow label that states “ATTENTION SERVICE MANAGER – Special Tools for Safety Recall 10S13.”
If your dealership wishes to order additional applicator guns at the dealer’s expense, you should place an order for TA-10 using the DOES ll system. Additional guns will be available beginning December 7, 2010.
A Preval Spray Gun is required to apply PM-13-A Anti-Corrosion Coating. One spray gun cartridge will complete four axle reinforcement repairs. Obtain from local hardware stores, home centers, etc. Research indicates spray gun is available at most Sherwin-Williams stores and some Home Depot stores. Reimbursement for spray gun is included in Axle Reinforcement Repair allowance. See Attachment I, Claims Preparation and Submission section.
PARTS REQUIREMENTS / ORDERING INFORMATION
Parts can be ordered through normal order processing channels.
Axle Not Cracked or Perforated – Axle Reinforcement Parts
| Part Number | Description | Claim Quantity |
|---|---|---|
| 3F2Z-5F057-A | Bracket and Fastener Kit | 1 |
| PM-28-W |
Adhesive and Anti-Corrosion Coating Kit
Note: One package contains four cartridges of adhesive and one bottle of PM-13-A Anti-Corrosion Coating.
|
1 |
| Great Stuff –
Gaps & Cracks |
Urethane Foam made by Dow Chemical Company
(Obtain from local hardware stores, home centers, etc.) |
Claim as MISC OTHER |
Note: Four (4) kits of 5F5057 and one (1) kit of PM-28-W will repair four (4) vehicles.
Axle Cracked or Perforated
A small percentage of vehicles will require an axle replacement.
| Part Number | Description | Quantity |
|---|---|---|
| 2F2Z-4B435-AB |
Rear Axle | 1 |
The DOR/COR number for this recall is 50423.
Questions regarding parts should be directed to the SSSC, or E-mailed to: Ford@Renkim.com.
DEALER PRICE
For latest prices, refer to DOES II.
PARTS RETENTION AND RETURN
Affected axles are subject to random selection for return to the Ford Warranty Parts Analysis Center (WPAC). Refer to your daily PEARS (Parts Entry and Return System) register for part disposition and return instructions.
Follow the provisions of the Warranty and Policy Manual for “Parts Retention and Return Procedures.”
EXCESS STOCK RETURN
Excess stock returned for credit must have been purchased from Ford Customer Service Division in accordance with Policy Procedure Bulletin 4000.
ATTACHMENT III
CERTAIN 1998-2003 MODEL YEAR WINDSTAR VEHICLES OPERATED IN CORROSION STATES – REAR AXLE INSPECTION AND REPAIR
REASON FOR THIS SUPPLEMENT
Dealers must perform safety recall 11S16 prior to performing safety recall 10S13.
OVERVIEW
In some of the affected vehicles, the rear axle could potentially fracture when operated in high corrosion areas (where salt is used on the roadways during winter months) for an extended period of time. If the rear axle should completely fracture, vehicle handling may be affected which could increase the risk of a crash.
NOTE: If a vehicle is affected by both safety recalls 10S13 and 11S16, dealers must perform 11S16 prior to performing 10S13.
Dealers are to clean and inspect the rear axle beam for cracks or perforations (holes). Based on the results of the inspection, dealers will perform one of the following service actions:
- Rear Axle Beam PASSED the Inspection: Install axle reinforcement parts per Attachment III – Technical Information and return the vehicle to the owner.
PLEASE NOTE: In order for the bracket to properly bond to the rear axle, the vehicle must remain on the hoist until the axle reinforcement adhesive has cured. The following guidelines must be followed:
- 2 hour cure time at 21°C (70° F) or higher shop temperature
- 3 hour and 15 minute cure time at 16°C (60° F) shop temperature
- If the shop temperature is lower than 16°C (60° F), the adhesive will need to cure overnight
- DO NOT USE HEAT LAMPS TO REDUCE CURE TIME AS EXCESSIVE TEMPERATURES WILL AFFECT BOND STRENGTH OF THE ADHESIVE
We recommend dealers schedule late afternoon repairs if hoist availability will be a concern. By installing the brackets at the end of the day, dealers will have the flexibility to allow the adhesive to properly cure overnight while the vehicle is on the hoist. Customers are eligible for a rental vehicle if needed. Refer to “Rental Vehicles” in Attachment I.
- Rear Axle Beam DID NOT PASS the Inspection: Install new axle per Attachment III – Technical Information and return the vehicle to the owner.
TABLE OF CONTENTS
AXLE REINFORCEMENT BRACKET INSTALLATION
Important Repair Information
Tech Tips – Reducing Exposure to Adhesive Fumes
Applying Urethane Foam
Cleaning Rear Axle Beam and Brackets
Preparing Adhesive Cartridge
Installing Axle Reinforcement Brackets
Adhesive Cure Time
Removal
Installation
REPAIR FLOWCHART

REAR AXLE BEAM CLEANING
- With the gear selector in NEUTRAL, position the vehicle on a hoist and lift the vehicle. For additional information, refer to the WSM, Section 100-02.
- Using a hammer, dry fit both sets of axle reinforcement brackets 13 mm (1/2 in) from the top of the axle weld. Using a paint pen or marker, outline the outer edges of the axle reinforcement brackets. See Figure 1.
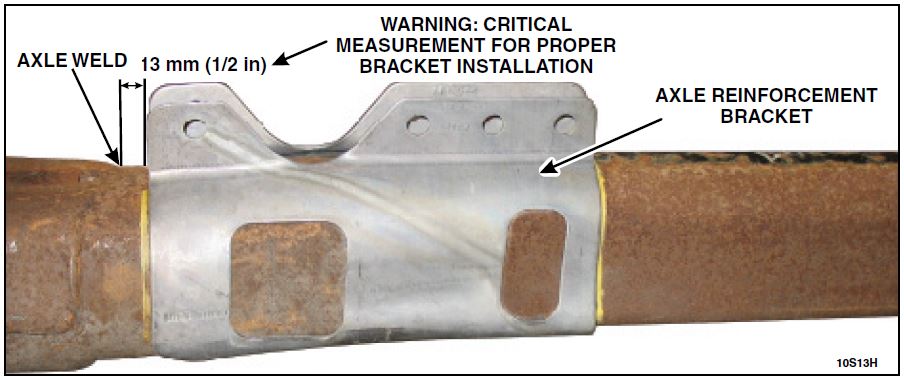 FIGURE 1
CAUTION: Wear safety glasses and proper body protection while grinding or using any chemicals.
- NOTE: It is very important to clean the front, rear and inside surfaces of the rear axle beam in the marked areas to expose bare metal without reducing metal thickness.
Remove the axle reinforcement brackets and use a 36z to 40z flap disc or equivalent to clean the outside surfaces of the rear axle in the marked areas. Remove all E-coat and rust. See Figure 2. Using a knot wire cup brush approximately 25 mm (1 in) in diameter, clean the inside of the rear axle beam.
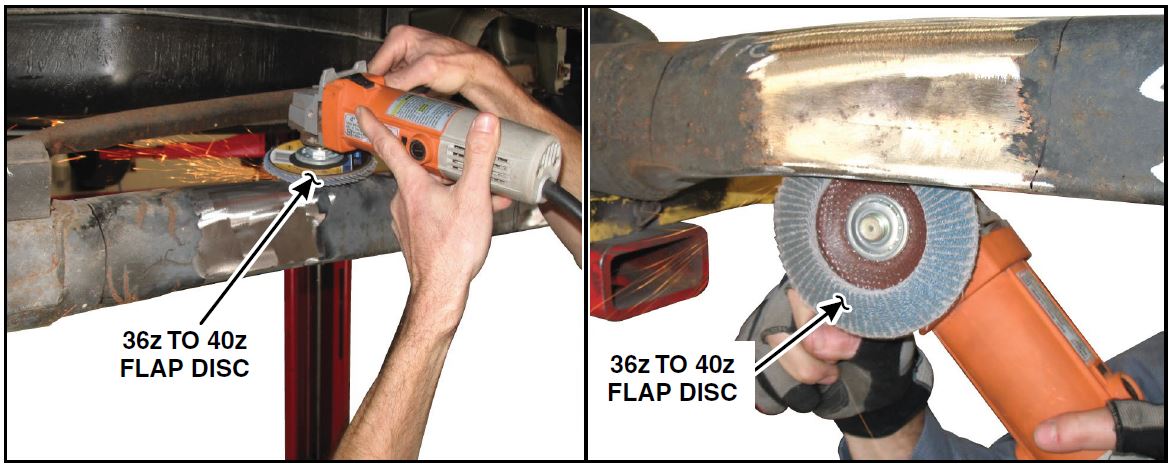 FIGURE 2
REAR AXLE BEAM INSPECTION
- Visually inspect the entire rear axle beam for cracks or perforations (holes). See Figures 1 and 2.
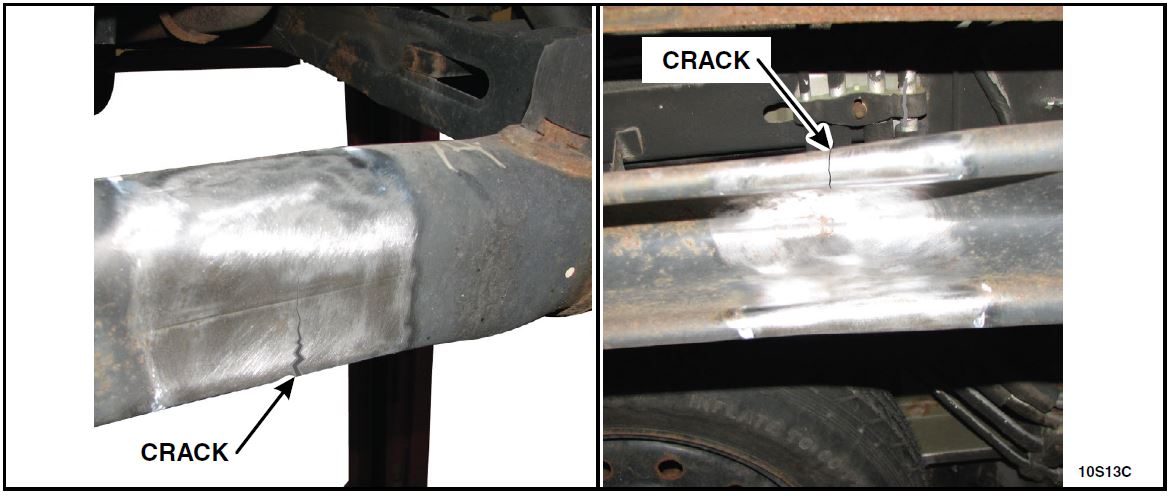 FIGURE 1
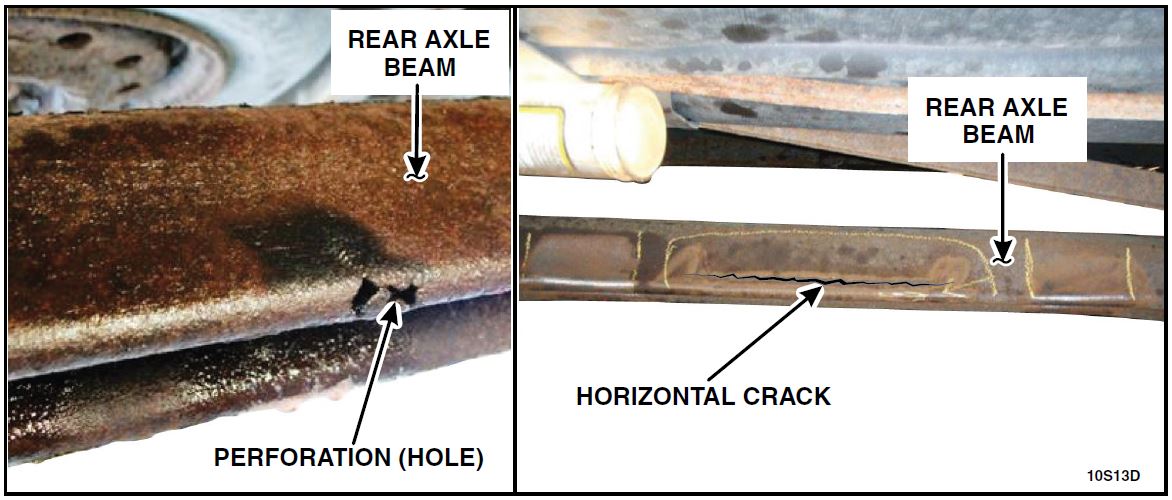 FIGURE 2
NOTE: The manufacturing fixture tool marks are present on every rear axle beam.
When inspecting the rear axle beam, please be aware that surface marks, tool marks, or coating imperfections are acceptable. See Figures 3 and 4.
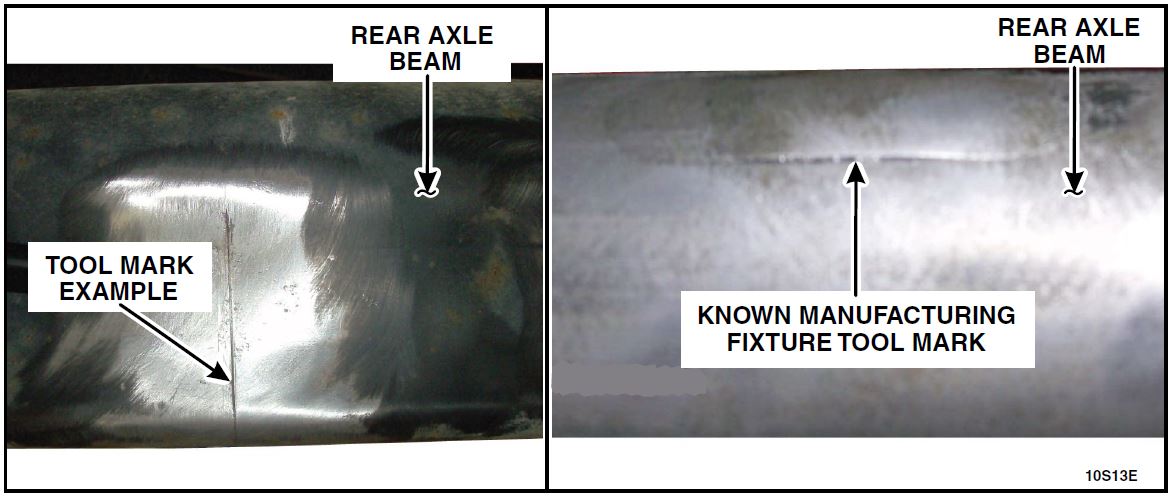 FIGURE 3
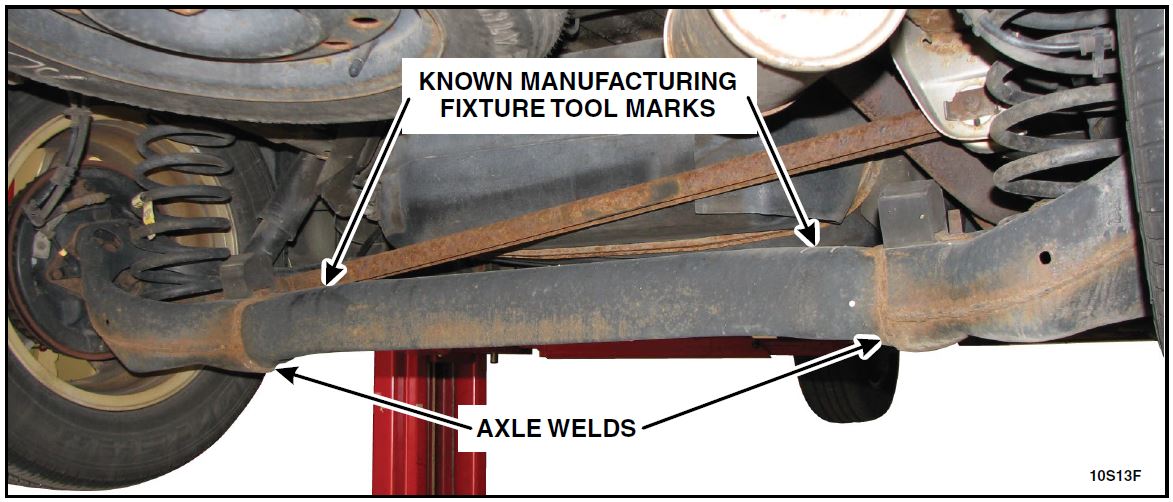 FIGURE 4
- Rear axle beam inspection results:
AXLE REINFORCEMENT BRACKET INSTALLATION
Important Repair Information
Several of the specified chemical products applied to the reinforcement brackets require special handling as indicated on the product packaging. Please ensure your Parts and Service department personnel access the Material Safety Data Sheets for guidance, and take the necessary precautions.
Metal bonding adhesive is used to secure the reinforcement brackets to the axle. Please read ALL of the Important Repair Information steps below before attempting any repair.
- The adhesive will only bond to clean, bare metal. When grinding the axle, all rust and E-coat must be removed. Metal should be shiny in appearance. Do not try to remove deep pits. This may affect the strength of the axle.
- After grinding the axle, clean the axle and reinforcement brackets with Motorcraft Metal Brake Parts Cleaner. Other brands of brake cleaner may leave a residue which could affect the bond strength of the adhesive.
- The adhesive starts to cure as soon as it is mixed. For this reason, you should only apply the adhesive and install the brackets on one side of the axle at a time. Install a new mixing tip before applying adhesive to the second set of brackets.
- When applying adhesive, spread it evenly over the reinforcement brackets and make sure there is enough applied to fill gaps between the bracket and axle. When applied correctly, there should be adhesive “squeeze out” from all edges of the bracket when the bolts are tightened.
- Install the axle reinforcement bracket bolts with the head toward the front of the vehicle and the stud pointing away from the fuel tank.
- After the bolts are tightened, use a brush to spread and smooth the adhesive. Make sure all gaps and voids are filled with adhesive.
- Use only Motorcraft PM-13-A for corrosion protection. Some corrosion protection chemicals and undercoating materials will prevent the adhesive from curing properly.
- Obtaining the proper adhesive cure is a critical part of the rear axle reinforcement repair. To ensure the adhesive cures properly, please review the following items.
- Cure Time and Hoist Availability: In order for the bracket to properly bond to the rear axle, the vehicle must remain on the hoist until the adhesive used to install the axle reinforcement brackets has cured. The following guidelines must be followed:
- 2 hour cure time at 21° C (70° F) or higher shop temperature
- 3 hour and 15 minute cure time at 16° C (60° F) shop temperature
- If the shop temperature is lower than 16° C (60° F), the adhesive will need to cure overnight
- DO NOT USE HEAT LAMPS TO REDUCE CURE TIME AS EXCESSIVE TEMPERATURES WILL AFFECT BOND STRENGTH OF THE ADHESIVE
- Cure Time and Axle Load: The adhesive needs time to cure before load can be placed on the axle. If the weight of the vehicle is placed on the axle before the adhesive has fully cured, the axle may twist (as it is designed to do) and cause movement in the bonding area. If this movement occurs before the adhesive is fully cured, it may affect the strength of the axle reinforcement repair.
- Adhesive Hardness and Anti-Corrosion Coating: The consistency of fully cured Metal Bonding Adhesive will be hard but not brittle. It will be softer than body filler. By spraying Anti-Corrosion Coating over the adhesive immediately, the tacky surface is avoided.
- Cure Time and Hoist Availability: In order for the bracket to properly bond to the rear axle, the vehicle must remain on the hoist until the adhesive used to install the axle reinforcement brackets has cured. The following guidelines must be followed:
Tech Tips – Reducing Exposure to Adhesive Fumes
Several of the specified chemical products applied to the reinforcement brackets require special handling as indicated on the product packaging. Please ensure your Parts and Service department personnel access the Material Safety Data Sheets for guidance, and take the necessary precautions.
In addition, to reduce exposure to the fumes released while using the adhesive, we suggest that technicians consider the following tips:
- Since the majority of fumes are released while applying and spreading adhesive on reinforcement brackets, position shop exhaust vent hose(s) next to the work area to remove these fumes.
- After installing the reinforcement brackets on the axle, position shop exhaust vent hose(s) next to the installed axle brackets to remove fumes while the adhesive is curing.
- If possible, slightly open a shop door to increase air circulation or perform the repair in an area of the shop that is well ventilated.
- During the repair, clean up excess adhesive that may have dripped on the floor. Also, discard used mixing tips and brushes immediately or wrap them so fumes are contained.
CAUTION: Wear safety glasses and proper body protection while grinding or using any chemicals.
Applying Urethane Foam
- Check to see if urethane foam was previously applied. If urethane foam was already applied, go to step 5. If not, go to step 2.
- Using a hammer, tap on each end of the axle around the entire circumference between the axle weld and spring pocket to loosen rust scale and debris.
- Using an air gun, remove loose debris from inside the axle.
- Obtain one (1) can of Great Stuff Gaps & Cracks. Follow the instructions on the can for application. Insert nozzle in tooling hole at bottom of spring seat as far as possible. Pull trigger and remove nozzle in circular pattern. Stop application about 25 mm (1 in) from tooling hole. See Figure 1.
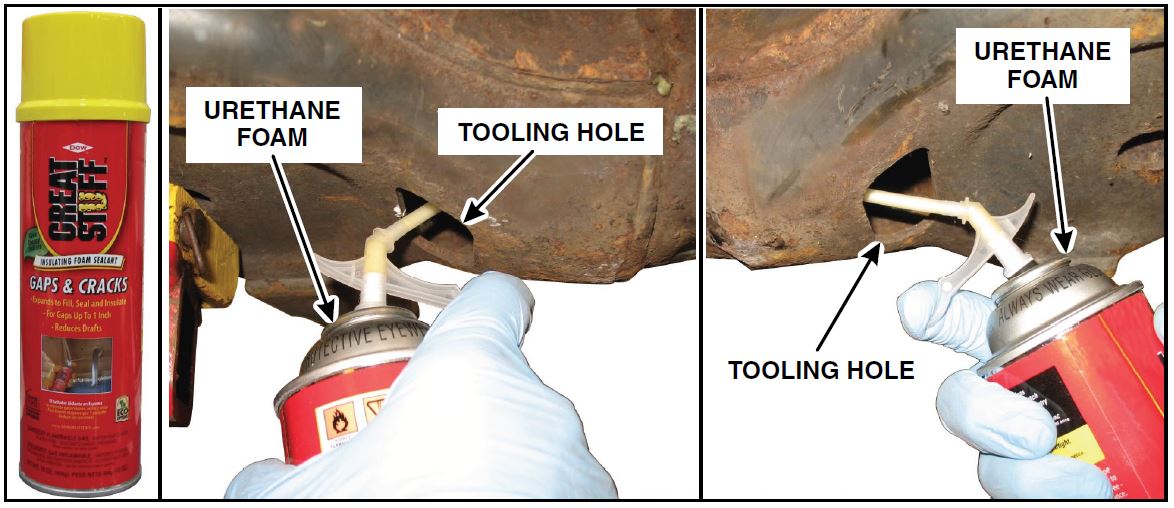 FIGURE 1
Cleaning Rear Axle Beam and Brackets
- Brackets are stamped “LHFRT RHRR” and “LHRR RHFRT”. Bracket A can be used on the Left-Hand Front or Right-Hand Rear of the axle. Bracket B can be used on the Left-Hand Rear or the Right-Hand Front of the axle. See Figure 2.
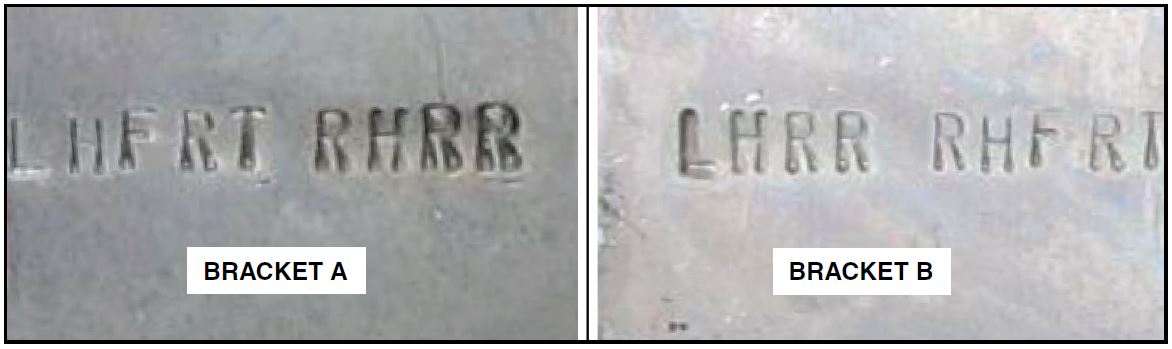 FIGURE 2
- Using a hammer, dry fit both sets of axle reinforcement brackets over the previously cleaned area 13 mm (1/2 in) from the top of the axle weld. See Figure 3.
FIGURE 3
- NOTE: Before removing the brackets, pull the top flange of both brackets backwards by hand (away from the axle) to slightly distort the bracket. This will allow the bracket to be installed without using a hammer.
Remove the brackets.
- Wipe the axle reinforcement brackets and the ground surfaces of the axle with Motorcraft Metal Brake Parts Cleaner using a clean paper towel.
Preparing Adhesive Cartridge
Position the applicator gun, adhesive cartridge, axle reinforcement brackets, bolts, nuts, channel lock pliers, impact wrench [with no more than 82 Nm (60 lb-ft) of torque], socket and wrench near the work area.
- Prepare the applicator gun and adhesive cartridge for use.
- Make sure the 2:1 plunger is installed on the applicator gun with the arrows pointing toward each other.
- Remove the black retaining nut and nose plugs from the adhesive cartridge. Insert the adhesive cartridge into the applicator gun.
- Squeeze out a small amount of adhesive to ensure both sides of the adhesive cartridge are flowing equally. See Figure 5A.
- Attach the mixing tip and replace the black retaining nut. Dispense a mixing tip length of adhesive onto a piece of scrap cardboard to ensure the product is evenly mixed and the color is consistent. The mixed adhesive should be grayish in color. See Figure 5B.
- NOTE: The entire adhesive cartridge should be used to service one vehicle.
Using a marker, make a mark on the adhesive cartridge ½ the distance from the plunger to the end of the adhesive cartridge tube. Then divide each section in ½ and mark once more. These marks divide the adhesive cartridge into four (4) equal parts for use on the four (4) brackets.
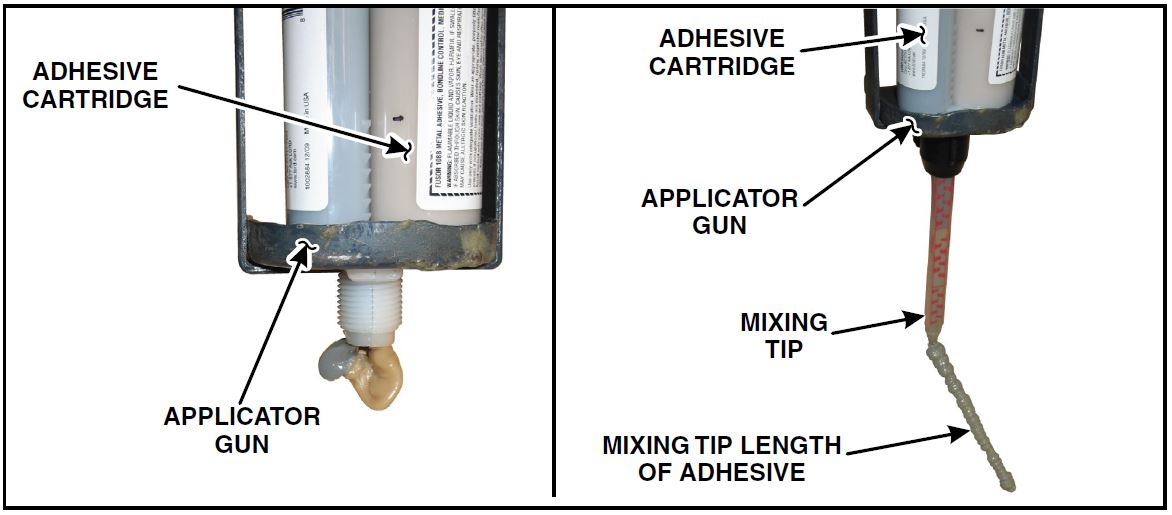 FIGURE 5A FIGURE 5B
Applying Adhesive
NOTE: Proper application of adhesive as directed below is critical to this repair.
- NOTE: DO NOT ATTEMPT TO INSTALL BOTH AXLE REINFORCEMENT BRACKET SETS AT THE SAME TIME. Only install one set of axle reinforcement brackets (two mating brackets) at a time.
On the side of the axle that you are installing the first set of axle reinforcement brackets, apply a 10 mm (3/8 in) bead of adhesive along the top of the axle beam in the previously marked area. Spread the adhesive evenly with an acid brush. See Figure 6.
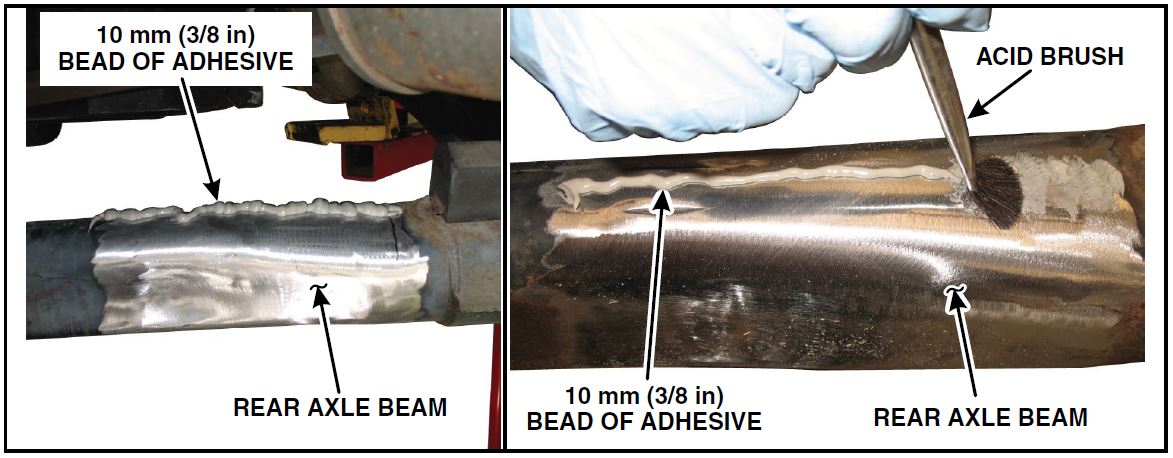 FIGURE 6
- Using 10 mm (3/8 in) beads, dispense 1/4 of the adhesive cartridge onto each of two mating axle reinforcement brackets. Make sure to run a bead around the perimeter of each axle reinforcement bracket. Spread the adhesive evenly with an acid brush. See Figure 7.
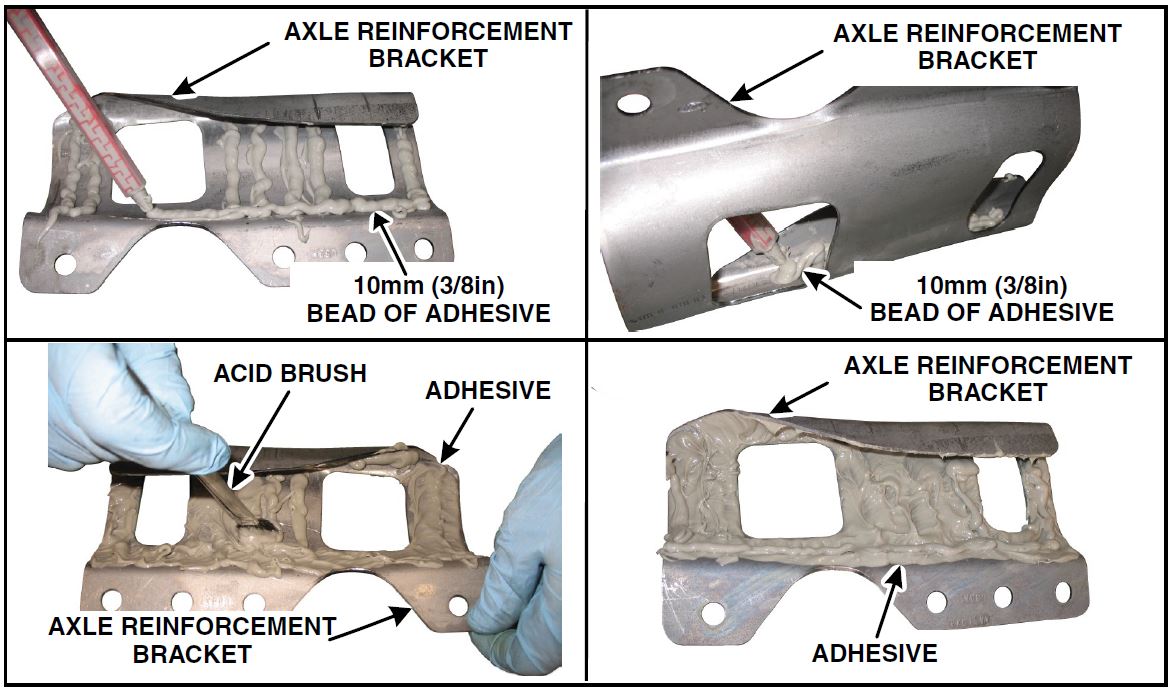 FIGURE 7
Installing Axle Reinforcement Brackets
- NOTE: If repositioning is necessary, use a small hammer to move the axle reinforcement bracket to the left or right while maintaining contact between the two surfaces. If the adhesive has turned a greenish color, it is too late to reposition the brackets.
Place the first axle reinforcement bracket onto the axle and align 13 mm (1/2 in) from the top of the axle weld. After the axle reinforcement bracket has been positioned, do not pull the axle reinforcement bracket away from the axle. See Figure 8.
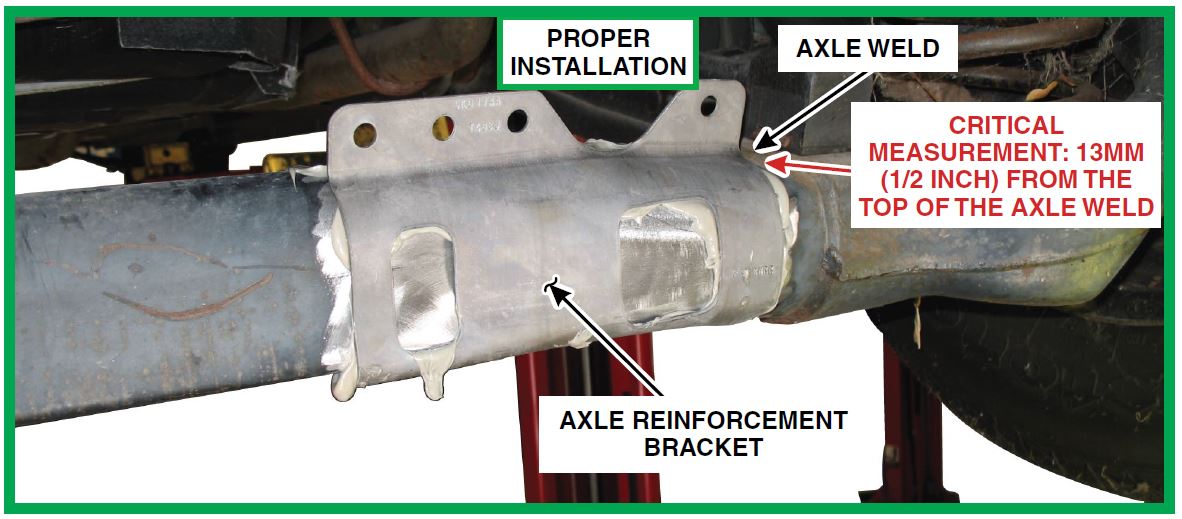 FIGURE 8
IMPORTANT: Ensure the axle reinforcement bracket is positioned 13 mm (1/2 in) from the axle weld. See Figure 8.
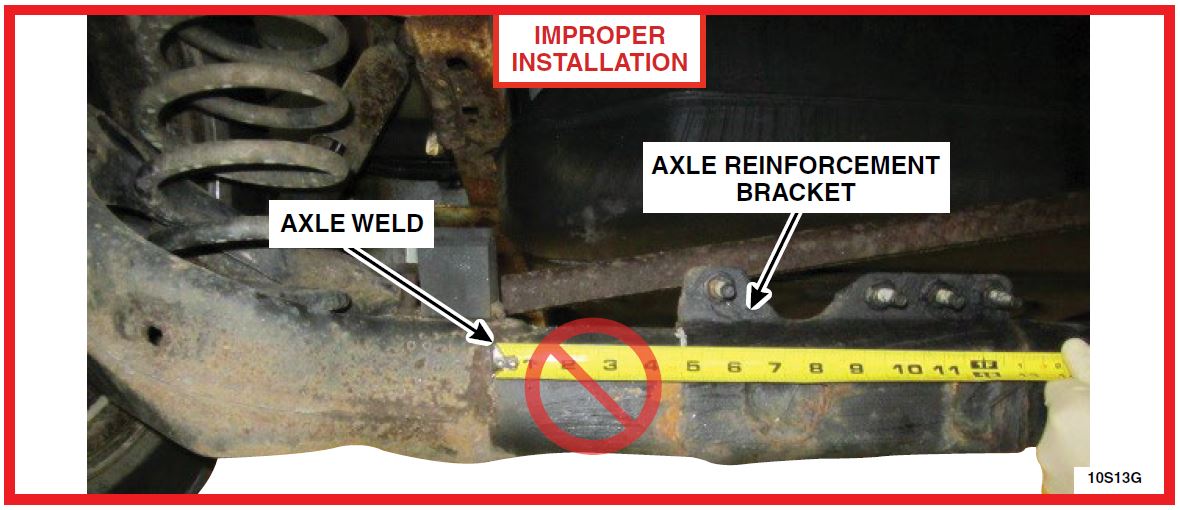 FIGURE 9
- Place the mating axle reinforcement bracket opposite the first axle reinforcement bracket.
- Pinch the axle reinforcement bracket flanges together and insert bolts from the front, pointing away from the fuel tank. Finger tighten nuts. See Figure 10.
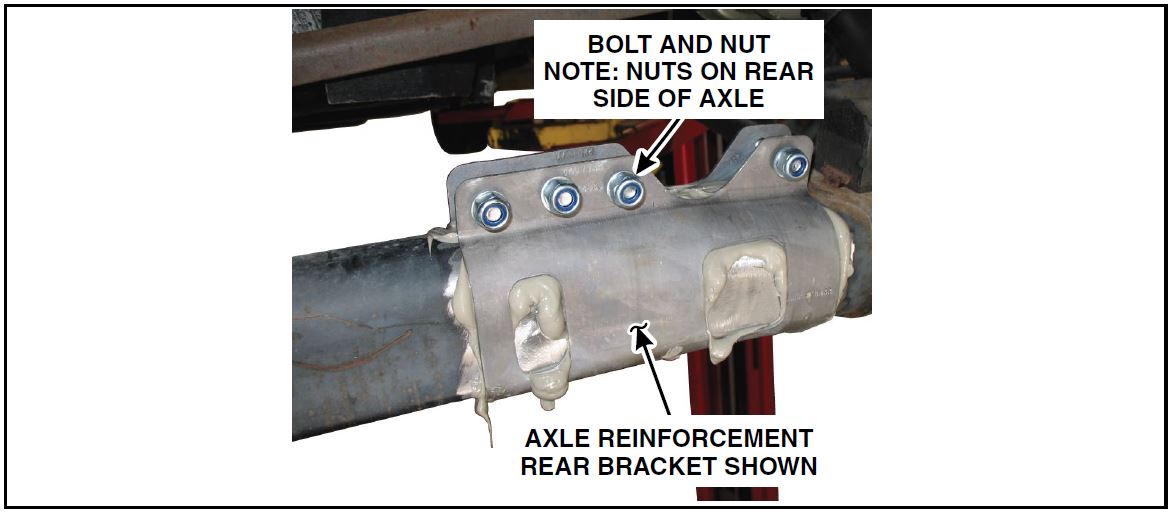 FIGURE 10
- Using an impact wrench with no more than 82 Nm (60 lb-ft) of torque, immediately tighten the nuts evenly on the axle reinforcement brackets. Tighten until the axle reinforcement bracket flanges are mated flush together.
- Brush the squeezed out adhesive around all edges of the axle reinforcement brackets with an acid brush to ensure all openings are completely sealed. See Figure 11.
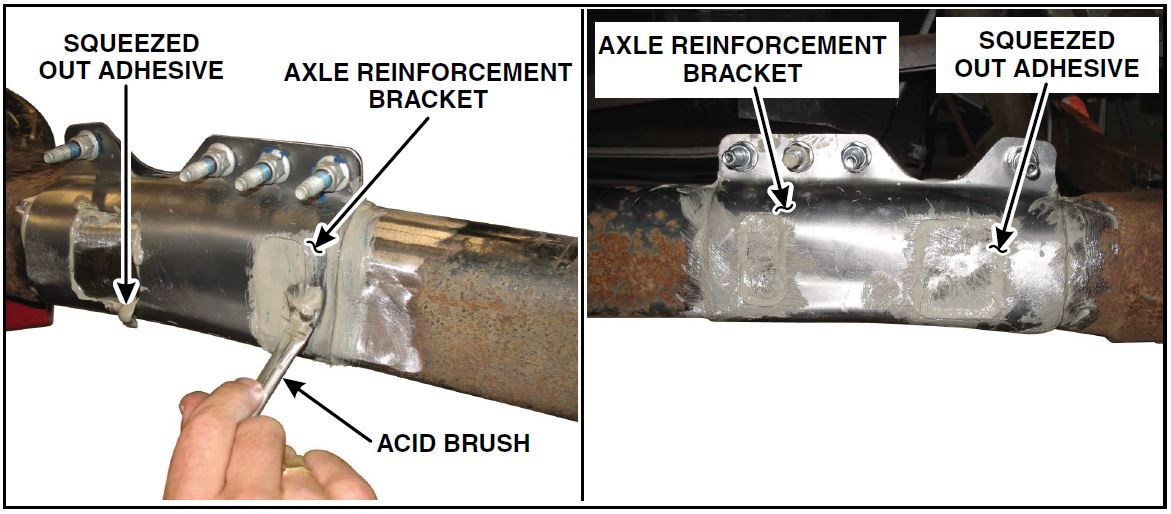 FIGURE 11
- Install a new mixing tip on adhesive cartridge. Dispense a mixing tip length of adhesive onto a piece of scrap cardboard to ensure the product is evenly mixed and the color is consistent. The mixed adhesive should be grayish in color. Repeat steps 11 through 17 on the other end of the axle.
NOTICE: Use only Motorcraft PM-13-A Anti-Corrosion Coating for this repair. Other products may affect the cure time and strength of the adhesive and may not provide adequate corrosion protection.
- Obtain one (1) can of PM-13-A Anti-Corrosion Coating and a Preval sprayer.
- Vigorously shake the can of PM-13-A Anti-Corrosion Coating.
- NOTE: Do not shake the Preval sprayer once fluid has been added to the container.
Pour 118mL (4oz) of PM-13-A Anti-Corrosion Coating into the Preval container. - NOTE: Observe all warnings and cautions included with the Preval sprayer.
While the adhesive is still “wet”, spray PM-13-A Anti-Corrosion Coating on the brackets ensuring all bare metal and adhesive is coated. [Apply 59mL (2oz) of PM-13-A Anti-Corrosion Coating on each side.] See Figure 12.
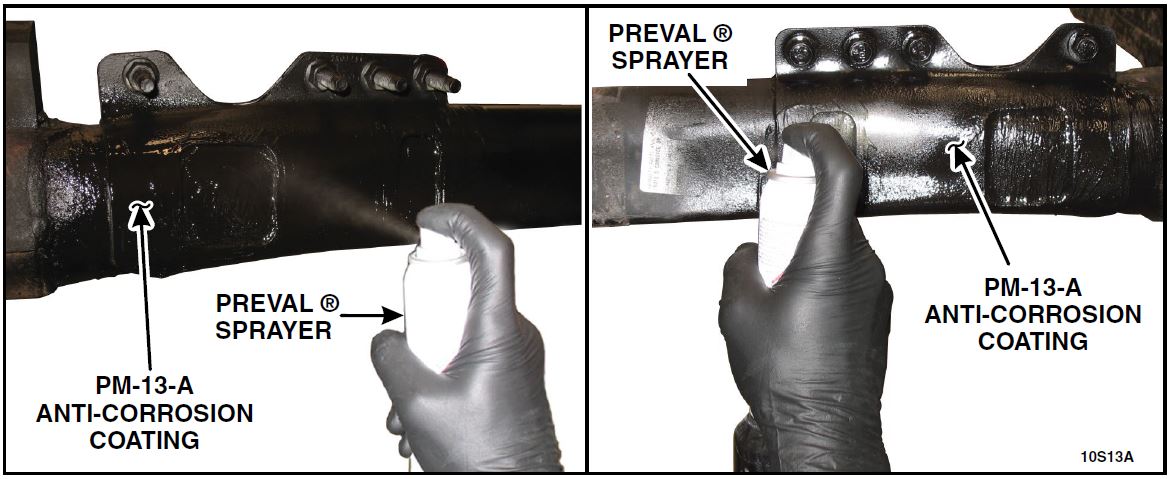 FIGURE 12
- Clean Preval sprayer with brake cleaner.
Adhesive Cure Time
- NOTICE: VEHICLE MUST REMAIN ON THE HOIST UNTIL THE ADHESIVE HAS CURED
In order for the bracket to properly bond to the rear axle, the vehicle must remain on the hoist until the adhesive used to install the axle reinforcement brackets has cured. The following guidelines must be followed:
- 2 hour cure time at 21° C (70° F) or higher shop temperature.
- 3 hour and 15 minute cure time at 16° C (60° F) shop temperature.
- If the shop temperature is lower than 16° C (60° F), the adhesive will need to cure overnight.
- DO NOT USE HEAT LAMPS TO REDUCE CURE TIME AS EXCESSIVE TEMPERATURES WILL AFFECT BOND STRENGTH OF THE ADHESIVE.
- Once the Anti-Corrosion Coating has been applied and adhesive has cured per the guidelines, return the vehicle to the customer.
REAR AXLE REPLACEMENT
Removal
NOTICE: Suspension fasteners affect performance of vital components and systems. The failure of suspension fasteners can result in major service expense. If replacement is necessary, they must be replaced with the same part number, or an equivalent part. Do not use are placement part of lesser quality or substitute design. Torque values must be used as specified during reassembly to ensure proper retention of these parts.
NOTE: The following rear axle replacement procedure is different than the procedure described in the Workshop Manual. The procedure was revised because the emergency brake cable and service brakes do not need to be disconnected in order to remove and replace the rear axle.
- NOTE: To prevent the brake drum from sliding off the hub, reinstall one wheel nut on each hub. Remove both rear wheel and tire assemblies. For additional information, refer to the WSM, Section 204-04.
- Remove the parking brake cable bracket nuts and position the parking brake cable brackets aside. See Figure 1.
 FIGURE 1
- Secure the rear axle to High Lift Transmission Jack 014-00942 or equivalent.
- Disconnect the track bar from the rear axle. See Figure 2.
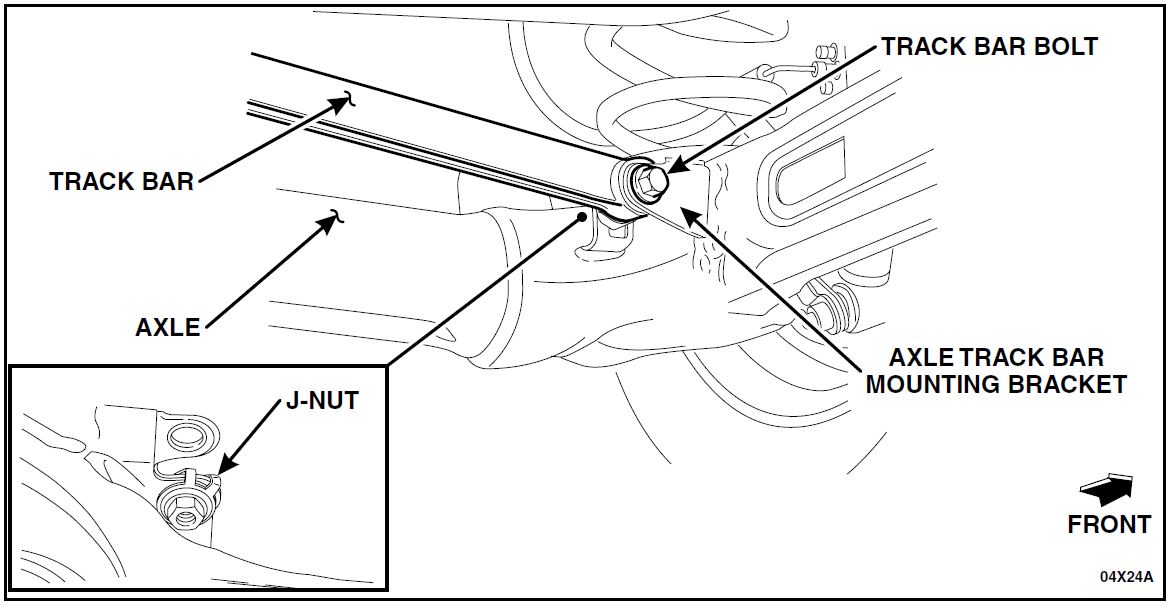 FIGURE 2
- Remove the shock absorber lower bolts.
- NOTE: The spring insulators may come out with the spring when the spring is removed.
Carefully lower the rear axle assembly enough to remove the rear springs. See Figure 3.
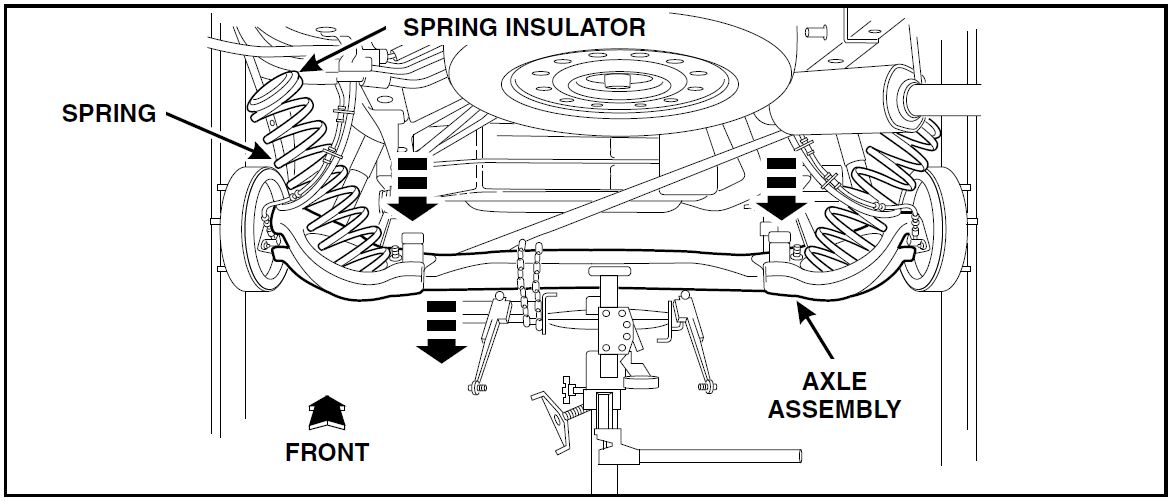 FIGURE 3
- Remove the four spindle retaining nuts. See Figure 4.
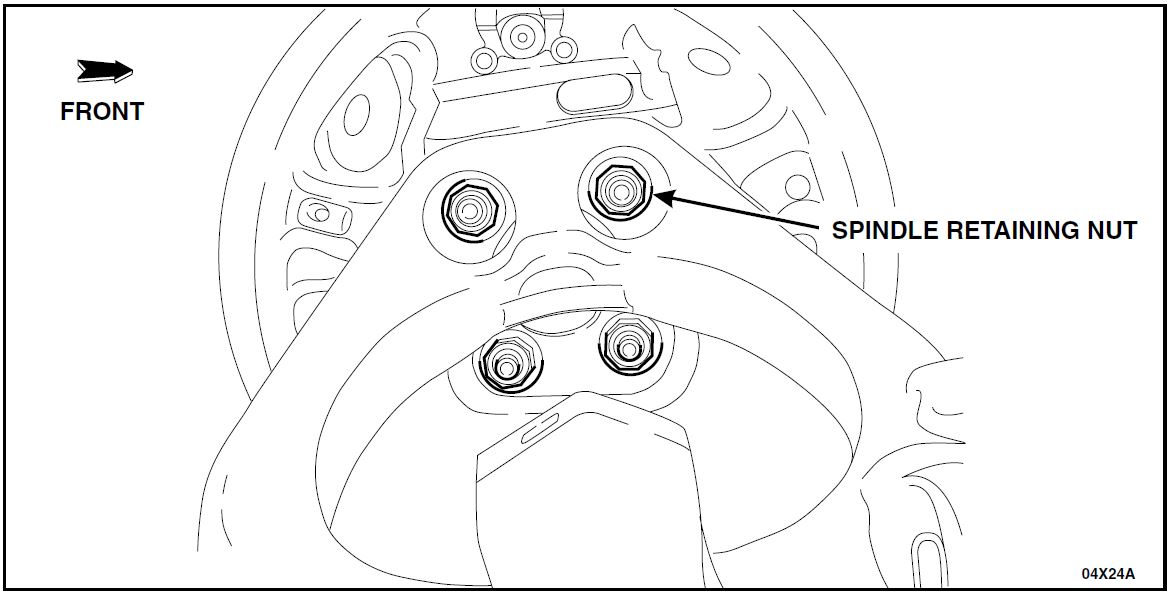 FIGURE 4
- NOTICE: When removing the spindle, hub and brake assembly, never allow it to hang from the brake caliper flexible hose. To prevent damage to the flexible hose, provide suitable support.
Position the spindle, hub and brake assemblies aside. See Figure 5.
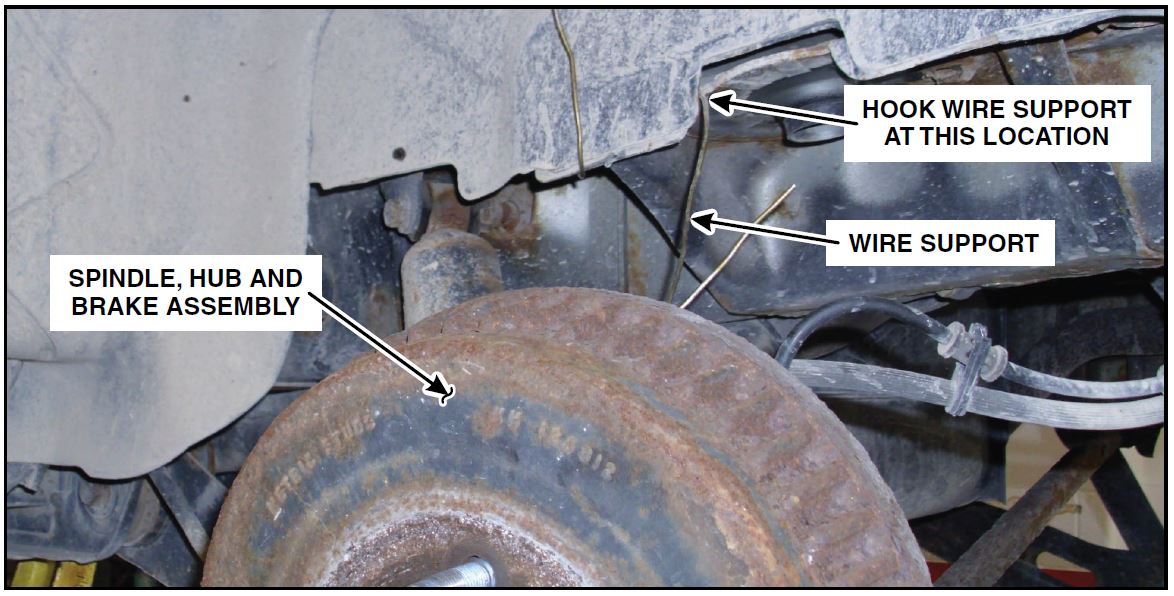 FIGURE 5
- Remove the trailing arm-to-subframe bolts. See Figure 6.
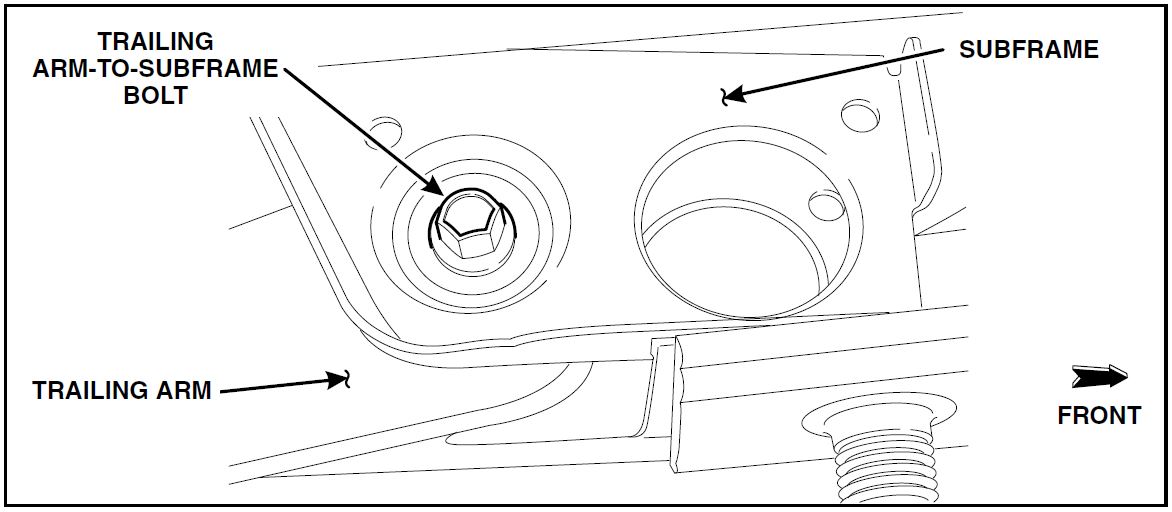 FIGURE 6
- Carefully lower the rear axle and remove it from the vehicle.
- NOTE: If the spring lower insulators did not come out with the springs, remove the insulators from the rear axle assembly.
Remove the jounce bumper bolts and bumpers, and if necessary, the spring lower insulators. The jounce bumpers and the spring lower insulators will be reused with the new rear axle.
Installation
NOTICE: Do not tighten the rear suspension fasteners until the rear axle has been raised and the rear suspension has been loaded. By lifting the rear axle and loading the rear suspension, it will simulate the vehicle’s ride height. Failure to follow these instructions may result in incorrect clamp load and bushing damage may occur.
- Install the jounce bumpers, and if necessary, the spring lower insulators on the new rear axle.
- Tighten to 25 Nm (18 lb-ft).
- Using a High Lift Transmission Jack 014-00942 or equivalent, raise the rear axle assembly in position and install the trailing arm-to-subframe bolts. See Figure 6.
- Position the spindle, hub and brake assemblies in place.
- Install the four spindle retaining nuts. See Figure 4.
- Tighten to 70 Nm (52 lb-ft).
- NOTE: Make sure the spring upper insulators are positioned correctly on the springs.
Install the springs on the rear axle assembly. Make sure the springs are correctly seated. - Raise the rear axle assembly and position the shock absorbers on the rear axle. Install the shock absorber lower bolts.
- Install the J-nut on the rear axle track bar mounting bracket. Position the track bar on the rear axle track bar mounting bracket and install the track bar bolt. See Figure 2.
- Load the rear suspension by raising the axle assembly. Once the rear suspension has been loaded, tighten the following components:
- Tighten the trailing arm-to-subframe bolts to 133 Nm (98 lb-ft).
- Tighten the shock absorber lower bolts to 80 Nm (59 lb-ft).
- Tighten the track bar bolt to 80 Nm (59 lb-ft).
- Remove High Lift Transmission Jack 014-00942 or equivalent.
- Position the parking brake cable brackets in place and install the parking brake cable bracket nuts. See Figure 1.
- Tighten to 25 Nm (18 lb-ft).
- Install both rear wheel and tire assemblies. For additional information, refer to the WSM Section 204-04.
- Lower the vehicle.
ATTACHMENT IV
Safety Recall 10S13 – Supplement #13
Certain 1998-2003 Model Year Windstar Vehicles Operated in Corrosion States
Rear Axle Inspection and Repair
DEALER Q & A
Q1. Does Ford have any recommendations on how technicians can reduce their exposure to the adhesive fumes?
- In addition to special handling as indicated on product packaging, to reduce exposure to the fumes released while using the adhesive, we suggest that technicians consider the following tips:
- Since the majority of fumes are released while applying and spreading adhesive on reinforcement brackets, position shop exhaust vent hose(s) next to the work area to remove these fumes.
- After installing the reinforcement brackets on the axle, position shop exhaust vent hose(s) next to the installed axle brackets to remove fumes while the adhesive is curing.
- If possible, slightly open a shop door to increase air circulation or perform the repair in an area of the shop that is well ventilated.
- During the repair, clean up excess adhesive that may have dripped on the floor. Also, discard used mixing tips and brushes immediately or wrap them so fumes are contained.
Q2. How does Ford plan to address hoist availability concerns since the vehicle must remain on the hoist for several hours until the adhesive has cured?
- We recommend dealers schedule late afternoon repairs if hoist availability will be a concern. By installing the brackets at the end of the day, dealers will have the flexibility to allow the adhesive to properly cure overnight while the vehicle is on the hoist. Customers are eligible for a rental vehicle if needed. Refer to “Rental Vehicles” in Attachment I.
Q3. Can I order more adhesive applicator guns?
- 1If your dealership wishes to order additional applicator guns at the dealer’s expense, you should place an order for TA-10 using the DOES ll system. Additional guns will be available beginning December 6, 2010.
Q4. Do I need prior approval to initiate a rental vehicle for a customer?
- Ford Motor Company will pay for a one day vehicle rental, except for fuel, which will be at the owner’s expense. Rentals will only be reimbursed for the day the vehicle is at the dealership for axle or bracket reinforcement installation. Prior approval for more than one rental day is required from the Special Service Support Center.
Q5. How will customers with unique transportation issues (handicap or other extenuating circumstances) be handled?
- Dealers should contact the Special Service Support Center for assistance.
Q6. What is the problem?
- Ford is voluntarily recalling 1998-2003 Model Year Windstar vehicles produced between September 1, 1997 through Job Last to address concerns relating to rear axle corrosion. In some of the affected vehicles, the rear axle could potentially fracture when operated in high corrosion areas for an extended period of time. If the rear axle should fracture, vehicle handling may be affected which could increase the risk of a crash.
Q7. What should I do if an owner believes their vehicle has been operated in a high corrosion environment and requests their vehicle be inspected?
- If the vehicle is not in the program, but is a 1998 through 2003 model year Windstar produced between September 1, 1997 and Job Last, contact the Special Service Support Center at to request approval to be covered by Safety Recall 10S13.
Q8. After the Metal Bonding Adhesive and the Anti-Corrosion Coating is applied, can the vehicle be taken off the hoist?
- No. The adhesive needs time to cure before load can be placed on the axle. See “Adhesive Cure Time” in Attachment III.
Q9. Why do we have to leave the vehicle on the hoist until the Metal Bonding Adhesive has fully cured?
- If the weight of the vehicle is placed on the axle, the axle may twist (as it is designed to do) and cause movement in the bonding area. If this movement occurs before the adhesive is fully cured, it may affect the strength of the axle reinforcement repair.
Q10. What is the consistency of the Metal Bonding Adhesive supposed to be like once it has fully cured?
- The adhesive will be hard but not brittle. It will be softer than body filler. Also, if AntiCorrosion Coating is not applied immediately, the surface of the adhesive will react with oxygen as it cures and form a tacky film over the surface of the adhesive. This tacky surface may lead a person, who is not familiar with this product, to believe that the adhesive is not curing properly.
Q11. What is the minimum temperature (vs. time) that will allow the Metal Bonding Adhesive to cure properly?
- If the shop temperature is lower than 16°C (60° F), the adhesive will need to cure overnight.
Q12. Why is the application of urethane foam being added to the repair?
- The application of urethane foam inside the ends of the axle housing is intended to form a barrier against water intrusion.
Q13. Where can I find more information about the adhesive and the PM-13-A Anti-Corrosion Coating?
- Access the following web sites and review the MSDS sheets.
- For the adhesive in the PM-28-W kit, go to https://www.lord.com/Products-AndSolutions/Adhesives/Metal-Bonding.xml/143/6 and look up the MSDS sheet for metal bonding adhesive 108B.
- For PM-A-13, go to FMCDealer/Motorcraft Distributors/Parts Information/Material Safety Data Sheets (MSDS). The MSDS sheet is located under the Collision and Body section.
September 2015
Safety Recall Notice 10S13
Mr. John Sample
123 Main Street
Anywhere, USA 12345
Your Windstar Vehicle Identification Number (VIN): 12345678901234567
URGENT SAFETY NOTICE
Ford Motor Company has previously attempted to contact registered owners of Windstar vehicles to inform them of a safety defect that exists in the rear axle. Our records indicate that repairs on your vehicle have not been completed.
The rear axle on your vehicle could fracture when operated in high corrosion areas (where salt is used on the roadways during winter months) for an extended period of time. If the rear axle should completely fracture, vehicle handling and stability may be affected which could increase the risk of a crash.
Your Ford dealer will clean and visually inspect the rear axle for cracks or perforations. If your vehicle passes inspection, reinforcement brackets will be installed and additional anti-corrosion coating will be applied to the rear axle. If your vehicle’s rear axle does not pass inspection, your Ford dealer will install a new replacement axle. The rear axle inspection and repair will be performed free of charge (parts and labor).
Please call your dealer without delay and request a service date for Safety Recall 10S13 and provide the dealer with the VIN of your vehicle.
If your Ford dealer needs to keep your vehicle at the dealership overnight for this repair, your dealer can provide a rental vehicle for your personal transportation at no charge, except for fuel and insurance. Please see your dealer for guidelines and limitations.
If you have concerns that have not been resolved by your Ford dealership, please contact Ford Motor Company at 866-436-7332. For the hearing impaired call 1-800-232-5952 (TDD).
If you are still having difficulty getting your vehicle repaired in a reasonable time or without charge, you may write the Administrator, National Highway Traffic Safety Administration, 1200 New Jersey Ave. S.E., Washington, D.C. 20590 or call the toll free Vehicle Safety Hotline at 1888-327-4236 (TTY: 1-800-424-9153) or go to www.safercar.gov. Reference NHTSA Safety Recall 12V-193.
Thank you for your attention to this important matter.
Ford Customer Service Division
 Loading...


