| “This site contains affiliate links for which OEMDTC may be compensated” |
| TECHNICAL SERVICE BULLETIN Excessive Panel Gap Between Rear Bumper Cover And Rear Quarter Panels – Built On Or Before 26-Feb-2018 | 18-2107 29 March 2018 |
Model:
Issue: Some 2015-2018 Mustang GT350 vehicles built on or before 26-Feb-2018 may exhibit an excessive panel gap where the rear bumper cover meets the rear quarter panels on either side of the vehicle. This may be due to the method used to fasten the rear bumper cover to the vehicle.
Action: Follow the Service Procedure steps to correct the condition.
Parts
| Description | Quantity | Part Number |
| GT350 Rear Bumper Cover Kit | 1 | JR3Z-17N775-A |
Warranty Status: Eligible Under Provisions Of New Vehicle Limited Warranty Coverage Warranty/ESP coverage limits/policies/prior approvals are not altered by a TSB. Warranty/ESP coverage limits are determined by the identified causal part and verified using the OASIS part coverage tool.
Labor Times
| Description | Operation No. | Time |
2015-2018 Mustang GT350: Replace The Side And Outer Rear Brackets And Install Compression Wedges Following The Service Procedure Includes Time To Remove And Install The Rear Bumper Cover (Do Not Use With Any Other Labor Operations) GT350: Replace The Side And Outer Rear Brackets And Install Compression Wedges Following The Service Procedure Includes Time To Remove And Install The Rear Bumper Cover (Do Not Use With Any Other Labor Operations) | 182107A | 1.7 Hrs. |
Repair/Claim Coding
| Causal Part: | 17K835 |
| Condition Code: | 07 |
| Drive | Tool Name |
| 1/4″ | Power Tool |
| 1/4″ | Ratchet |
| 1/4″ | 3″ Extension |
| 1/4″ | 6″ Extension |
| 1/4″ | 7 mm Socket |
| 1/4″ | 8 mm Socket |
| 1/4″ | 10 mm Socket |
| 1/2″ | Power Tool |
| 1/2″ | 21 mm Socket |
| 1/2″ | Torque Socket Accutorq |
| 7 mm Wrench | |
| Medium Trim Tool | |
| Drill | |
| 13/64″ Drill Bit | |
| Rivet Gun |
Service Procedure
- Remove the rear bumper cover. Refer to Workshop Manual (WSM), Section 501-19.
(1). To assist in removal of the bumper cover, allow the vehicle to reach room temperature if possible. Removing the bumper cover when it is cold may increase the possibility of breaking the retention clips during removal.
(2). Once all fasteners have been removed, disengage the clips holding the bumper cover to the vehicle as follows:
- Apply slight upward pressure on the bumper cover and pull outwards from either side of the vehicle to disengage the clips along the sides of the vehicle.
- Apply slight upward pressure on the bumper cover and pull rearwards on the bumper cover to disengage the clips along the rear of the vehicle.
- Remove the side brackets and outer rear brackets that were clipped to the bumper cover. Refer to WSM, Section 501-19.
(1). It is not necessary to remove the center rear bracket.
- Install the revised side brackets and outer rear brackets.
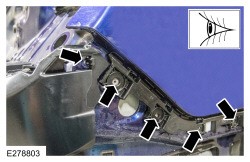
(1). Make sure the fastener holes in the side brackets are centered in relation to the fasteners that go through them. (Figure 1)
(2). Make sure the tabs on the outer rear brackets are properly inserted into the holes in the body of the vehicle when installing these brackets.
Figure 1
- Use the provided templates to drill a 13/64” hole in each side of the bumper cover.
(1). To locate where the holes should be before drilling, align the cutout corner of the template with the notch along the front edge of this part of the fascia. (Figure 2, right side shown)
Figure 2
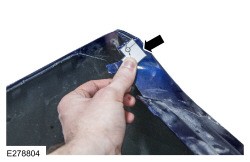
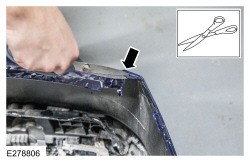
- Using scissors or a pair of side cutters, trim the tabs off of each side of the rear bumper cover. (Figures 3 – 4, left side shown)
(1). These tabs are located just outboard of the holes drilled in Step 4.
(2). Do not trim these tabs completely flush. Only trim away enough to allow the compression wedges to fit into the proper place in the bumper cover with no obstruction. (Figures 3 – 4)
Figure 3
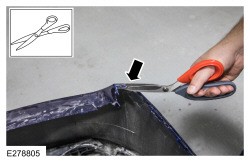
Figure 4
- Using the alcohol swabs provided in the kit, clean the area on both sides of the bumper cover where the compression wedges will adhere.
- Install the compression wedges to the bumper cover.
(1). Remove the backing from the double-sided tape on the compression wedges and install them into the bumper cover.
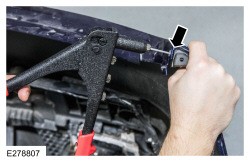
(2). Insert the rivet through the holes in the bumper cover and the holes in the compression wedges.
(3). Fasten the rivets with a rivet gun, holding the compression wedge in place to make sure each one is seated and the double-sided tape adheres properly. (Figure 5, left side shown.)
Figure 5
- Loosely fit the rear bumper cover back onto the vehicle by snapping the bumper cover attachment tabs to the outer rear brackets first, then the side brackets.
(1). Do not strike the bumper cover with force when attempting to snap it onto the brackets. This may bend or damage the clips or tabs on the bumper cover or brackets. Only firm, steady pressure is required to engage the bumper cover onto the clips. If it seems like more force is required, this is an indication the clips or tabs on the bumper cover or brackets may be bent or out of place.
(2). While installing the bumper cover, listen for audible clicks indicating the bumper cover tabs have been properly seated onto the clips on the brackets. The bumper cover clips should be heard when engaging on both the rear outer brackets and the side brackets.
(3). If the bumper cover cannot be easily fitted onto the vehicle, remove the bumper cover and make sure the side brackets and rear outer brackets are properly positioned. It may be necessary to loosen the brackets and shift their position slightly to allow the tabs on the bumper cover to better line up with the clips on the brackets.
- Align the top hole of the compression wedges to the hole that is present on the rear outer bracket. An assistant may be necessary to lift up on the bumper cover to allow the holes to line up. Using the provided bolts, install one on each side. Start the bolts by hand, but do not tighten. (Figures 6 – 7, left side shown)
Figure 6
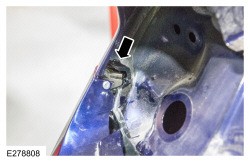
Figure 7
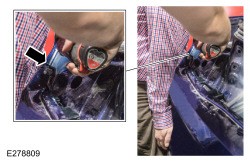
- Once the bumper cover is loosely installed, visually align the bumper cover on the vehicle for the best appearance and fit. While having an assistant lift up on the bumper cover, tighten the bolts installed in Step 9 to 1.5 Nm (13 lb–in).
(1). If the panel gap between the bumper cover and body is still excessive, this may be caused by bent or broken tabs/clips on the bumper cover and connecting brackets or mis-positioned brackets.
- Finish the installation of the bumper cover following normal WSM procedures. Refer to WSM, Section 50119.
18-2107
29 March 2018
 Loading...
- PREPS SURFACE: Pre-waxing glaze that prepares the surface for wax while offering deep reflections and high gloss. Fit Type: Universal Fit
- BEST CAR GLOSS: Conditioning oils add depth of color and maximum gloss prior to waxing, especially on dark colored cars
- REMOVE SWIRLS: Quickly and gently removes fine swirls and towel marks for mirror-like reflections
- SAFE FOR CLEAR COATS: Safe and on all glossy paints, including clear coats
- FLEXIBLE APPLICATION: Safe and effective by hand or dual action polisher like Meguiar's MT300 Dual Action Polisher
- BUFF OUT IMPERFECTIONS: Meguiar's Ultimate Compound removes scratches, swirls & oxidation for a clear, perfect finish
- SHOWROOM SHINE: Advanced car compound removes scratches, swirls, oxidation & water spots and restores color & clarity for a showroom shine in minutes
- CLEAR COAT SAFE: Auto compound safely removes scratches and other defects without hazing on clear coats & all gloss paints. Easy DIY fix by hand or da polisher
- LIKE-NEW SHINE: Meguiar's exclusive micro-abrasive technology quickly removes scratches & restores clarity and shine for a stunning, swirl-free finish.
- FAST & FLAWLESS: Meguiar's Ultimate Compound cuts fast, removes scratches and swirls without hazing, leaving a pro-detailer finish.
- 3-IN-ONE CERAMIC TECHNOLOGY: One 16 fl oz bottle of Nu Finish Once a Year Polish and Sealant, a car polish and paint sealant with 3-in-1 Ceramic Technology to repair, seal and repel
- REPAIRS SCRATCHES AND RENEWS SHINE: Long-lasting auto polish that helps repair fine swirls, scuffs and scratches while renewing the shine on paint and chrome, leaving a glossy, wet finish without any wax
- PREVENTS FUTURE SCRATCHES: Innovative Ceramic Technology forms an effective, durable protective barrier that helps prevent future scratches from forming and delivers extreme water beading for easier maintenance
- NO RUBBING OR BUFFING: Unique liquid polish that requires no rubbing or buffing and can even be applied in direct sunlight, unlike conventional car wax
- THE ONCE A YEAR CAR POLISH AND SEALANT: With just one application, you can polish and protect your car’s paint for an entire year* (*Based on U.S. average automatic car washes per year)
- EXCEPTIONAL RESULTS: Advanced technology formula provides a deep gloss and rich, swirl-free results, ensuring the luxury your vehicle deserves. This mirror glaze goes above and beyond to produce a high gloss finish with no defects left behind.
- NO MORE SWIRLS: Meguiar's M20508 Mirror Glaze Ultra Finishing Polish permanently and efficiently removes swirls and light defects from all paint in favor of a deep gloss. This powerful car polish gets the job done and leaves a lasting finish.
- STUNNING SHINE: Ultra Finishing Polish produces deep reflections and high gloss without leaving a mess behind. Treat your ride to a stunning shine with a professional polish that achieves an impeccable shine and gloss.
- EASY-TO-USE: Whether working by rotary, DA polisher, or hand, this professional polishing compound goes on and wipes off easily for a quick and easy cleanup. This Finishing Polish is the perfect way to enhance and refine paint and increase gloss.
- MULTIPLE WAYS TO APPLY: Formulated for use by hand, DA polisher, or rotary buffer. It's the perfect product to follow a more aggressive compound like Ultra Cut Compound M105 and before applying paint protection, like Pro Hybrid Ceramic Sealant M27.
- Advanced Formula 3-in-1. Our fortify quick coat is your all-in-one ceramic coating hydrophobic spray. Shine Armor Fortify Quick Coat ceramic car wax provides a waterless wash, coat, and shine, all-in-one convenient product.
- No Streaking, Smearing Or Scratching. Shine Armor Fortify Quick Coat premium formula ceramic car coating is a gentle and effective car polish for any vehicle! Get a clean, shiny finish without hurting your car's paint.
- Cuts Dirt, Grime & Grease. Our Quick Coat ceramic wax car sealant eliminates dirt, grime & grease instantly! Our signature 3-in-1 formula gives you a waterless car wash, coat and shine for a clean, showcase look.
- Safe For All Surfaces. Use this car wax spray-on automobiles, boats, motorbikes, RVs, four-wheelers and more! This spray wax is the perfect blend of surfactants and SiO2 ceramic-coating science.
- Superior Products. This means superior shine for your cars! Our ceramic quick coat also works as a sealer to give your vehicle a clear shield of protection while also providing a beautiful gloss. Which makes our ceramic spray the perfect Christmas Gift for the gearhead in your life!
- DEFECT REMOVAL: M105 Ultra-Cut Compound is the perfect addition to your car cleaning supplies as it removes moderate to heavy paint defects like scratches, oxidation, swirls, acid rain, and even cuts through up to 1200 grit sanding marks
- ULTRA-FAST COMPOUNDING: Ultra-fast cutting ability removes 1200 grit or finer sanding marks, while micro-abrasives minimize further swirling for superior car cleaning while boosting gloss and shine
- ENHANCE GLOSS & SHINE: M205 Ultra Finishing Polish is a professional polish that permanently removes light swirls and holograms and further refines your paint while adding deep gloss, shine, and rich, swirl-free results
- CLEAR COAT SAFE: Safe and effective on all glossy paint finishes including clear coats. Both professional formulas work to remove paint defects and increase gloss without causing damage to the paint
- MULTIPLE WAYS TO APPLY: Formulated for use by hand, dual action polisher, or rotary buffer, these Mirror Glaze products can be applied in a versatile manner, allowing you to remove defects and leave paint with a deep, high gloss, swirl-free shine
- CLEANER WAX: One-step liquid wax cleans your paint while you wax
- HIGH GLOSS SHINE: Rich conditioning oils polish and protect, leaving finish with a high gloss shine
- SAFE ON ALL GLOSSY FINISHES: Safely and effectively cleans surface contaminants and blemishes from all glossy paint finishes including clear coats and single-stage paint
- EASE OF USE: Easier to use than traditional carnauba wax
- VERSATILE APPLICATION: Can be applied by hand or Dual Action Polisher like Meguiar's MT300
- One 16 oz bottle of Nu Finish The Once A Year Car Polish
- Automotive polish that is made up of a series of zinc cross-linking polymer emulsions that help it last longer than any other polish on the market
- Nu Finish car polish can be applied anywhere, even in direct sunlight
- Also an ideal boat polish, motorcycle polish and chrome polish
- The only auto polish tough enough to be called "The Once A Year Car Polish”
- EASY SCRATCH and SWIRL REPAIR - If your car has light scratches, swirls, or other marks - you can easily fix that with our Scratch & Swirl Remover Kit! Using the included buffer pad, our specially formulated compound will allow you to easily remove and "erase" years of wear and tear from your vehicles paint and overall appearance!
- ULTIMATE PAINT REPAIR- Not only will this remove swirls and scratches, it will restore the gloss and shine of your paint and bring it back to its original brilliance! The special rubbing compound will remove water spots, oxidation and other contaminants from your paint!
- PREMIUM CHEMICALS - We formulate all our products to ensure they are the best! Professional grade, but easy enough for anyone to use! We use only the absolute best chemicals and ensure there are no unnecessary color dyes or scents!
- ADVANCED SOLUTION FOR ALL PAINT TYPES - Car paint scratch repair is safe to use on all paints and colors. You can safely use it on any clearcoat, single stage, or multi stage paint!
- REVOLUTIONARY PRODUCT - This scratch remover for vehicles provides an effortless and secure way to remove scratches.
- Can be applied to wet or dry paint
- Provides a deep, dark gloss and shine while adding protection
- Ease and convenience of a spray-on, wipe-off product saves on time
- Can be applied in full sun and won't whiten plastic trim
- Offers protection against the sun
Last update on 2025-05-08 / Affiliate links / Images from Amazon Product Advertising API
This product presentation was made with AAWP plugin.
