| “This site contains affiliate links for which OEMDTC may be compensated” |
FORD : : | 2013-2014 C-MAX |
This article supersedes TSB 15-0089 to update the Service Procedure and Part List.
ISSUE:
Some 2013-2014 C-MAX Energi vehicles may exhibit a concern with a discharged 12 volt battery.
ACTION:
Follow the Service Procedure steps to correct the condition.
SERVICE PROCEDURE
- Disconnect the 12 volt battery. Refer to Workshop Manual (WSM), Section 414-01.
- Connect the Rotunda Midtronics GR1-190 or GRX-3590 Diagnostic Battery Charger to the vehicle’s battery terminal posts only. Battery cables must be removed and no other connections, such as body ground, can be in the circuit during testing.
- Select diagnostic fast charge.
- On GR1-190 only – select above 400 km (250 miles) or below 400 km (250 miles) based on vehicle mileage.
- Select battery type Lead Acid.
- Enter cold cranking amp (CCA) rating of 390 CCA.
- Did the battery pass the load test?
- Yes – allow battery to fully charge. After charging is complete, reconnect the 12 volt battery. Refer to WSM, Section 414-01. Proceed to Step 4.
- No – record the failure code. Replace the battery. Refer to WSM, Section 414-01. Make sure the new 12 volt battery is fully charged. Using Integrated Diagnostic System (IDS) service tool, perform the battery monitoring system (BMS) reset after the new battery is connected. Proceed to Step 4.
- Reprogram the powertrain control module (PCM), DC/DC converter (DCDC), instrument panel cluster (IPC), and gateway module (GWM) using IDS release 102.04 or higher. Make sure you are connected to the internet when entering module programming to guarantee you will receive the latest updates. Calibration files may also be obtained at www.motorcraftservice.com.
- Inspect vehicle communication module (VCM) and cables for any damage. Make sure scan tool connections are not interrupted during programming.
- Connect the VCM to the vehicle’s primary data link connector (DLC). Do not connect the VCM to the GWM data link connector.
- Turn off all accessories (radio, heated/cooled seats, headlamps, interior lamps, HVAC system) and close doors.
- Disconnect any aftermarket accessories.
- Disable sleep mode, screen saver and hibernation modes on the computer used for IDS.
- Create all IDS vehicle sessions key on engine off (KOEO). Starting the vehicle before creating a session will cause errors within the programming inhale process.
- Connect a battery charger to the 12 volt battery.
- Was the vehicle built on or before 12-Sep-2013?
- Yes – replace the telematics control unit (TCU)/embedded modem. When completing Programmable Module Installation (PMI) select automatic process for as-built data entry. Refer to WSM, Section 415-00. Proceed to Step 6.
- No – proceed to Step 6.
- Was the vehicle built on or before 3-Jun-2013?
- Yes – proceed to Step 7.
- No – proceed to Step 8.
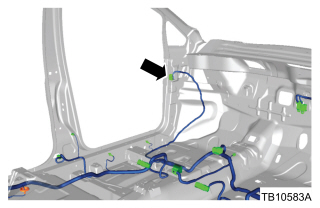
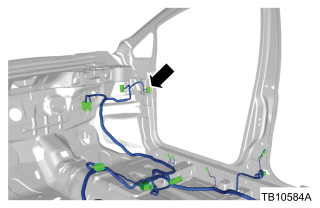
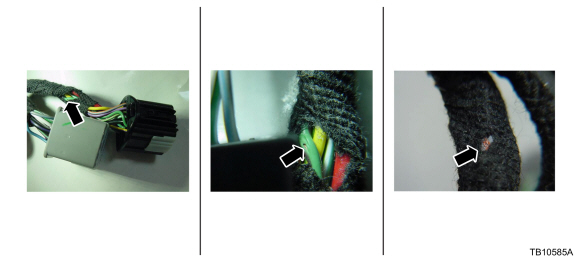
- Inspect the wiring for damage or chafing in the rear liftgate area, driver door connector wire harness C339 and front passenger door connector wire harness C340 (Figures 1, 2, 3 and 4). Is damage or chafing present?
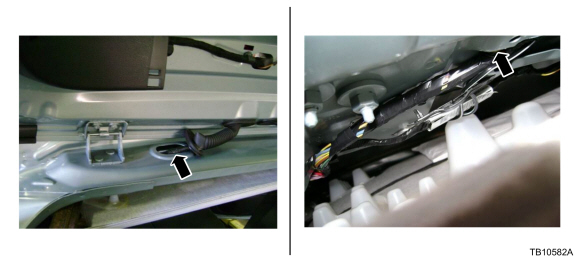
Figure 1 – 16-0157
Figure 3 – 16-0157
Figure 4 – 16-0157- Yes – repair the circuits as needed. Refer to Wiring Diagram (WD), Section 5-1. After repair, wrap the affected area with 3M Temflex Cotton Friction Tape or equivalent to prevent future concerns. Proceed to Step 8.
- No – wrap affected area with 3M Temflex Cotton Friction Tape or equivalent to prevent future concerns. Proceed to Step 8.
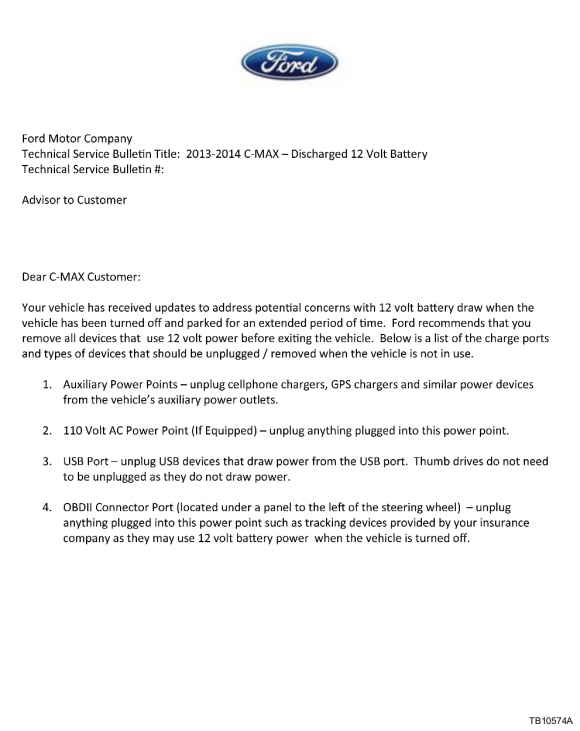
- Print the information sheet and provide to the customer. Communicate to the customer that Ford
 recommends disconnecting any devices attached to the auxiliary power port, USB port and OBDII port when the vehicle is turned off. (such as cell phone chargers, USB devices, insurance company snapshot devices). (Figure 5)
| Obtain Locally | |
| Part Number | Part Description |
| 1755 | 3M Temflex Cotton Friction Tape |
| GM5Z-14G229-BD | TCU Module |
| BXT-67R | 12 Volt Battery |
| OPERATION | DESCRIPTION | TIME |
| 160157A | 2013-2014 C-MAX Energi: Diagnose And Charge Battery, Reprogram Modules, Inspect Wiring Pass (Do Not Use With Any Other Labor Operations) | 1.4 Hrs. |
| 160157B | 2013-2014 C-MAX Energi: Diagnose And Replace Battery, Reprogram Modules, Inspect Wiring Pass (Do Not Use With Any Other Labor Operations) | 1.7 Hrs. |
| 160157C | 2013-2014 C-MAX Energi: Diagnose And Charge Battery, Reprogram Modules, Inspect And Repair Wiring (Do Not Use With Any Other Labor Operations) | 2.1 Hrs. |
| 160157D | 2013-2014 C-MAX Energi: Diagnose And Replace Battery, Reprogram Modules, Inspect And Repair Wiring (Do Not Use With Any Other Labor Operations) | 2.3 Hrs. |
| 160157E | 2013-2014 C-MAX Energi: Diagnose And Charge Battery, Reprogram Modules, Replace The TCU Module, Inspect Wiring Pass (Do Not Use With Any Other Labor Operations) | 1.9 Hrs. |
| 160157F | 2013-2014 C-MAX Energi: Diagnose And Replace Battery, Reprogram Modules, Replace The TCU Module, Inspect Wiring Pass (Do Not Use With Any Other Labor Operations) | 2.1 Hrs. |
| 160157G | 2013-2014 C-MAX Energi: Diagnose And Charge Battery, Reprogram Modules, Replace The TCU Module, Inspect And Repair Wiring (Do Not Use With Any Other Labor Operations) | 2.6 Hrs. |
| 160157H | 2013-2014 C-MAX Energi: Diagnose And Replace Battery, Reprogram Modules, Replace The TCU Module, Inspect And Repair Wiring (Do Not Use With Any Other Labor Operations) | 2.8 Hrs. |
WARRANTY STATUS
Eligible Under Provisions Of New Vehicle Limited Warranty Coverage.
Warranty/ESP coverage limits/policies/prior approvals are not altered by a TSB. Warranty/ESP coverage limits are determined by the identified causal part and verified using the OASIS part coverage tool.
DEALER CODING
| BASIC PART NO. | CONDITION CODE |
| 19K350 | 01 |
Figure 5 – 16-0157
Service Information & Reprogramming
Software necessary to program electronic modules to the latest calibration level, perform module initialization (PATS), and set Programmable Parameters on Ford , Lincoln
 and Mercury
 vehicles.
Ford Module Programming (FMP) is a software application that allows subscribers to program electronic modules on Ford , Lincoln
 and Mercury
 vehicles. It can be used for:
- Reprogramming emission-related (OBDII) modules on some vehicles manufactured in 1995 and all vehicles manufactured from 1996 to the present
- Reprogramming or reconfiguring non-emission-related modules on many vehicles (UBP and MS-CAN not supported)
In addition, module initialization (PATS) functions such as Keycode Erase/Reprogram and PCM Parameter Reset can be done using this application.
J2534 Device ![]()
![]() using Ford Module Programming (FMP) can Reprogram and Configure most Modules.
using Ford Module Programming (FMP) can Reprogram and Configure most Modules.
Latest Calibration Information
Module Build Data (As-Built)
Use VIN to obtain As-Built data
