Ford

Recalls, Repair & Diagnostic Tips
Menu
  • Recalls
    • Aston Martin Recalls
    • BMW Recalls
    • Bugatti Recalls
    • Chrysler Dodge Fiat Jeep Ram Alpha Romeo Recalls
    • Ferrari Recalls
    • Ford Recalls
    • GM Recalls
    • Acura & Honda Recalls
    • Hyundai Recalls
    • Isuzu Recalls
    • Jaguar & Land Rover Recalls
    • Kia Recalls
    • Lamborghini Recalls
    • Maserati Recalls
    • Mazda Recalls
    • Mercedes-Benz Recalls
    • Mitsubishi Recalls
    • Infiniti & Nissan Recalls
    • Porsche Recalls
    • Subaru Recalls
    • Suzuki Recalls
    • Tesla Recalls
    • Toyota Lexus & Scion Recalls
    • Volvo Recalls
    • VW Audi Recalls
  • Diagnostic Tips
    • Ford Diagnostic Tips
    • GM Diagnostic Tips
    • Mazda Diagnostic Tips
    • Subaru Diagnostic Tips
  • Repair Tips
    • Ford Repair Tips
    • GM Repair Tips
    • Mazda Repair Tips
    • Subaru Repair Tips
  • Links
  • E-Books
  • Store
  • oemdtc
    • Aston Martin
    • BMW
    • Bugatti
    • Chrysler Dodge Fiat Jeep Ram Alpha Romeo
    • Ferrari
    • Ford
    • GM
    • Acura & Honda
    • Hyundai
    • Isuzu
    • Jaguar & Land Rover
    • Kia
    • Lamborghini
    • Maserati
    • Mazda
    • Mercedes-Benz
    • Mitsubishi
    • Infiniti & Nissan
    • Porsche
    • Subaru
    • Suzuki
    • Tesla
    • Toyota Lexus & Scion
    • Volvo
    • VW-Audi

Amazon Sells Car & Truck Parts Search by Part Number

Buy Car & Truck Parts on Amazon

Home • Repair Tips • Headliner Sag by the Center High Mounted Stoplamp – 2014-2015 Ford Fusion

Repair Tips

Headliner Sag by the Center High Mounted Stoplamp – 2014-2015 Ford Fusion

oemdtc April 8, 2016 2 Comments
HEADLINER SAG AT THE CENTER HIGH MOUNTED STOPLAMP – BUILT ON OR BEFORE 9/22/2014 – FLAT ROCK ASSEMBLY PLANT


FORD: 2014-2015 Fusion


2014-2015 Fusion vehicles built at the Flat Rock assembly plant on or before 9/22/2014 may exhibit a headliner sag by the center high mounted stoplamp.


SERVICE PROCEDURE

  1. Check the vehicle identification number (VIN). Does the first position start with a 1?
    1. Yes – proceed to Step 2.
    1. No – this article does not apply, refer to Workshop Manual (WSM) for normal diagnosis.
  1. Release the two D-pillar trim panel clips and the 2-stage D-pillar retention clip. Refer to WSM, Section 501-05 for clip location and 2-stage retention clip release information.
    1. It is not necessary to remove the D-pillar from the C-pillar assembly.
  1. Lower the seat backs of both rear seats. Refer to the seats section of the Owner’s Manual if needed.
  1. Placing both hands around the rear headliner edge, pull down the headliner approximately 7.6 cm (3 in) to release the magnets attaching the headliner to the roof. (Figure 1)
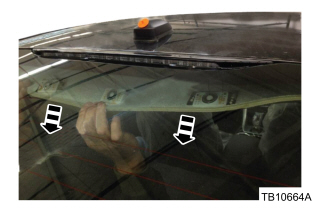
    rear headliner edge
    Figure 1

    1. Pulling the headliner down more than 7.6 cm (3 in) cause damage to the headliner.
  1. Using a flat scraper or knife, remove and discard the rear magnet carriers from the rear of the headliner.
    1. Depending on the vehicle build date there may be no rear magnets, one magnet or 3 magnets securing the headliner to the roof. Remove any rear magnets still stuck to the roof that did not remain glued to the headliner.
  1. Familiarize yourself with the proper placement of the magnets on the vehicle.
    1. Disregard the right and left side markings on the magnet carriers.
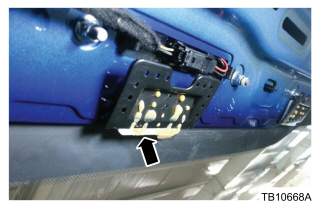
    1. Place the passenger side magnet to the metal roof so the cutout portion of the black plastic carrier goes around the outer stoplamp stud on the passenger side. Make sure the thin, white plastic edge of the carrier aligns with the rear metal edge of the roof. (Figure 2)
      white plastic edge of the carrier
      Figure 2
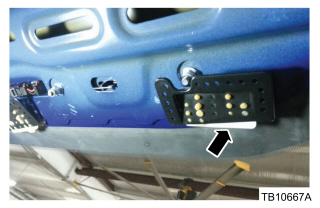
    1. Place the center magnet to the roof so the carrier is centered with the center high mounted stoplamp. Make sure the thin, white plastic edge of the carrier aligns with the rear metal edge of the roof. (Figure 3)
      white plastic edge of the carrier
      Figure 3
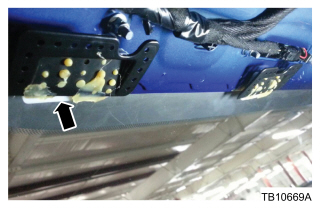
    1. Place the driver side magnet to the roof so the cutout portion of the black plastic carrier goes around the outer stoplamp stud on the driver side. Make sure the thin, white plastic edge of the carrier aligns with the rear metal edge of the roof. (Figure 4)
      white plastic edge of the carrier
      Figure 4


  1. Place drop cloths, as needed, in the back seat and package tray area of the vehicle.
  1. Remove all 3 magnets and place them magnet side down on a piece of cardboard or shop rag so glue does not get on the interior upholstery during application. Keep the magnets in the same orientation as their placement on the vehicle.
  1. After putting on latex gloves, take the nozzle that comes with the 3M Semi-Rigid Plastic Repair adhesive or equivalent and cut the tip of the nozzle to the largest opening.
  1. The following steps of applying adhesive and attaching the magnets need to occur in less than 50 seconds and require a helper. The person familiar with the placement of the magnets should remain in the back of the vehicle while the helper is within reach applying the glue.
    1. Using 3M Semi-Rigid Plastic Repair adhesive or equivalent, have the helper place a 6 mm (1/4 in.) bead of adhesive around the black plastic edge of each magnet carrier on the opposite side of the magnet. The bead should cover the holes on the black plastic. Once glue starts to come out of the nozzle, do not spend more than 10 seconds applying glue to a single magnet carrier.
    1. As soon as the helper is finished adding adhesive to the back of the first magnet carrier, pull down on the headliner and quickly place the magnet to the roof while the helper starts to place glue on the back of another magnet. Keep the headliner pulled down and continue to quickly place the magnets on the vehicle until all 3 magnets with glue are in place.
    1. Quickly remove the latex gloves so no glue is transferred to the headliner, and push the headliner up to the magnet carriers. Press and hold the headliner in place using the palm of your hand and forearm. Apply firm pressure for 2 minutes.
  1. Replace the D-pillar trim panel 2-stage retention clip and reattach the D-pillar trim panel.


Obtain Locally
Part Number Part Description
08190 Headliner Sag by the Center High Mounted Stoplamp - 2014-2015 Ford Fusion • small light 3M Performance Manual Applicator – 50 mL
34240 Headliner Sag by the Center High Mounted Stoplamp - 2014-2015 Ford Fusion • small light 3M Semi-Rigid Plastic Repair – 50 mL


PART NUMBER PART NAME
DS7Z-5452124-A Magnet Carrier Kit
W715667-S439 D-Pillar Trim Panel 2-Stage Retention Clip


TriNova Leather Cleaner for Couch, Car Interior, Bags, Jackets, Saddles. Safe for use in Home or Car, Microfiber Included 18oz
Price: $15.98
Headliner Sag by the Center High Mounted Stoplamp - 2014-2015 Ford Fusion • small light
Price Disclaimer
Weiman Leather Cleaner and Conditioner for Furniture - Cleans Conditions and Restores Leather Surfaces - UV Protectants Help Prevent Cracking or Fading of Leather Car Seats, Shoes, Purses
Price: $9.35
You Save: $0.54 (5%)
Headliner Sag by the Center High Mounted Stoplamp - 2014-2015 Ford Fusion • small light
Price Disclaimer
Lexol Leather Cleaner and Conditioner and Sponge Kit, For Use on Leather Apparel, Furniture, Auto Interiors, Shoes, Handbags and Accessories
Price: $38.90
Headliner Sag by the Center High Mounted Stoplamp - 2014-2015 Ford Fusion • small light
Price Disclaimer

Share
Tweet
Email
Pinterest
Linkedin
Stumble
Reddit
Whatsapp
Telegram
Tumblr
Pocket
Buffer
Vkontakte
Prev Article
Next Article

Related Articles

Manual Liftgate Difficult To Close – Power Liftgate Bounce Back And/Or Will Not Cinch – 2017 Ford Escape
NHTSA ID Number: 10156485 Manufacturer Communication Number: TSB 19-2057 Summary Some 2017 …
Repair Tips oemdtc August 21, 2018 No Comments

Manual Liftgate Difficult To Close – Power Liftgate Bounce Back And/Or Will Not Cinch – 2017 Ford Escape

Torqshift Transmission – Malfunction Indicator Lamp (Mil) – Diagnostic Trouble Codes (DTCs) P0751, P0730 And/or P2700 – 2009-2016 Ford
NHTSA ID Number: 10183758 Manufacturer Communication Number: 16-0057   Summary Some 2009-2016 …
Repair Tips oemdtc April 21, 2016 No Comments

Torqshift Transmission – Malfunction Indicator Lamp (Mil) – Diagnostic Trouble Codes (DTCs) P0751, P0730 And/or P2700 – 2009-2016 Ford

High Current Battery Junction Box – Master Fuse Replacement – 2020-2021 Ford Transit
NHTSA ID Number: 10201590 Manufacturer Communication Number: SSM 50110   Summary Some …
Repair Tips oemdtc February 18, 2021 No Comments

High Current Battery Junction Box – Master Fuse Replacement – 2020-2021 Ford Transit

Wind Noise at the Driver and/or Passenger A-Pillar to Windshield Area – 2016 Lincoln MKX
TSB 16-0088 WIND NOISE AT THE DRIVER AND/OR PASSENGER A-PILLAR TO …
Repair Tips oemdtc October 3, 2016 No Comments

Wind Noise at the Driver and/or Passenger A-Pillar to Windshield Area – 2016 Lincoln MKX

Discharged 12 Volt Battery – 2013-2014 Ford C-MAX
TSB 16-0157 C-MAX ENERGI – DISCHARGED 12 VOLT BATTERY Publication Date: …
Repair Tips oemdtc April 9, 2016 No Comments

Discharged 12 Volt Battery – 2013-2014 Ford C-MAX

Crunching or Creaking Type Niose from Front of Vehicle – Low Speed Turns and Bumps – 2012-2013 Ford Focus & 2013 Escape
NHTSA ID Number: 10183777 Manufacturer Communication Number: 16-0076   Summary Some 2012-2013 …
Repair Tips oemdtc September 29, 2016 No Comments

Crunching or Creaking Type Niose from Front of Vehicle – Low Speed Turns and Bumps – 2012-2013 Ford Focus & 2013 Escape

About The Author

oemdtc

Tags:2014 2015 Ford Fusion Headliner Sag

2 Comments

  1. Andrew

    Is this considered a recall or is ford dealerships going to be difficult and charge $750+ for this service?

    July 11, 2016
    • oemdtc

      This is not a recall, only repair info.

      July 11, 2016

Leave a Reply Cancel Reply

Categories

Infolinks Referral program

Archives

Newsletter

Ford

Recalls, Repair & Diagnostic Tips

File a Vehicle Safety Complaint with NHTSA


https://www-odi.nhtsa.dot.gov/VehicleComplaint/


Ford Lincoln & Mercury VIN Decoder


https://vpic.nhtsa.dot.gov/decoder/Decoder
 
OEMDTC is a participant in the Amazon Services LLC Associates Program, an affiliate advertising program designed to provide a means for us to earn fees by linking to Amazon.com and affiliated sites.
  • Disclaimer
  • Privacy Policy
  • About

Copyright © 2022 Ford
Theme by MyThemeShop.com

Ad Blocker Detected

Our website is made possible by displaying online advertisements to our visitors. Please consider supporting us by disabling your ad blocker.

Refresh