| “This site contains affiliate links for which OEMDTC may be compensated” |
| GLOVE COMPARTMENT DOES NOT LATCH PROPERLY – BUILT ON OR BEFORE 10/23/2015 |
FORD : : | 2015 F-150 |
2015 F-150 vehicles may have a glove compartment that does not latch properly.
SERVICE PROCEDURE
- Open the glove compartment and release the glove compartment down stops. Remove the dampener by pushing down and forward at the damper end then fully lower the glove compartment.
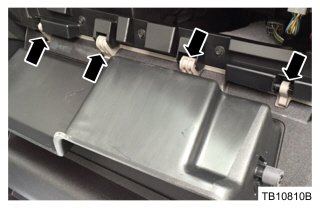
- Inspect both glove compartment hinge pins to make sure they are properly installed through the glove compartment hinge and supported at both ends by the instrument panel. (Figure 1)

Figure 1 - Inspect the glove compartment center hooks to make sure they are properly attached to the hinge line of the instrument panel. (Figure 2)

Figure 2 - Are the hinge pins and center hooks properly attached?
- Yes – proceed to Step 7.
- No – proceed to Step 5.
- If the glove compartment hinge pins or hooks are not properly installed, remove the glove compartment hinge pins and the glove compartment.
- Reattach the glove compartment by attaching only the center two hooks first, then installing the two hinge pins.
- Do not reattach the dampener or latch the down stops until this article is completed.
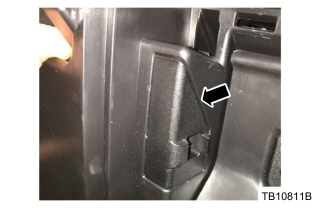
- Remove the left and right glove compartment strikers. (Figure 2)
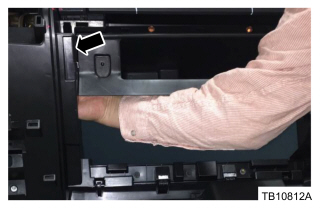
- Reach inside the glove compartment opening of the instrument panel, behind the long vertical side of each striker and press them out by hand. (Figure 3)

Figure 3
- Reach inside the glove compartment opening of the instrument panel, behind the long vertical side of each striker and press them out by hand. (Figure 3)
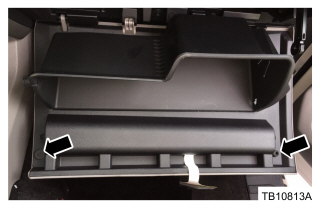
- Remove by hand the 2 (two) rubber bumpers from the glove compartment. (Figure 4)

Figure 4 - Install the 2 (two) new rubber bumpers.
- While supporting the glove compartment, press the 2 (two) new glove compartment bumpers into the open bumper cavities by hand.
- Install the new glove compartment strikers.
- Insert the short forward vertical edge of the new striker into striker pocket first to engage the tab of the striker.
- Press the long rear vertical edge of the new striker into the striker pocket to engage the clips.
- Reattach the glove compartment dampener.
- Latch the glove compartment down stops.
- Close the glove compartment.
| FL3Z-1506064-AA | Glove Box – Striker Kit |


