| “This site contains affiliate links for which OEMDTC may be compensated” |
NHTSA ID Number: 10238283
Manufacturer Communication Number: TSB 23-2181
Summary
Some 2020-2023 Explorer/Aviator vehicles may exhibit a lack of audio and/or a water leak in the rear liftgate area and/or water in the spare tire area. The customer may indicate that this concern is more noticeable after a car wash or rainfall. To correct the condition, follow the Service Procedure to identify the leak path.
This bulletin supersedes 22-2262. Reason for update: Concern Carryover to New Model
Model:
Summary
This article supersedes TSB 22-2262 to update the service procedure, and vehicle model years affected.
Issue: Some 2020-2023 Explorer/Aviator vehicles may exhibit a lack of audio and/or a water leak in the rear liftgate area and/or water in the spare tire area. The customer may indicate that this concern is more noticeable after a car wash or rainfall. To correct the condition, follow the Service Procedure to identify the leak path.
Action: Follow the Service Procedure steps to identify the leak path on vehicles that meet all of the following criteria:
- 2020-2023 Explorer/Aviator
- Lack of audio after a car wash or rainfall
- Water in the rear liftgate area and/or water in the spare tire area
Parts
Parts To Inspect And Replace Only If Necessary
| Service Part Number | Quantity | Description | Unit of Issue | Piece Quantity |
| LC5Z-14B350-B | If Needed | Aviator Power Liftgate Strut – Refer To The Parts Catalog For The VIN Specific Application | 1 | 1 |
| LB5Z-14B351-A | If Needed | Power Liftgate Strut – Refer To The Parts Catalog For The VIN Specific Application | 1 | 1 |
| 18K810 | If Needed | Audio Control Module – Refer To The Parts Catalog For The VIN Specific Application | 1 | 1 |
| W710014-S300 | If Needed | Rubber Plug | 4 | 2 |
Quantity refers to the amount of the service part number required to repair the vehicle.
Unit of Issue refers to the number of individual pieces included in a service part number package.
Piece Quantity refers to the total number of individual pieces required to repair the vehicle.
As Needed indicates the amount of the part may vary and/or is not a whole number. Parts can be billed out as non-whole numbers, including less than 1.
If Needed indicates the part is not mandatory.
Service Procedure
1. Is this an Explorer or Aviator?
(1). Explorer – proceed to the Explorer Vehicle Inspection procedure.
(2). Aviator – proceed to the Aviator Vehicle Inspection procedure.
Explorer Vehicle Inspection
1. Open the rear liftgate.
2. Inspect and make sure the following components are correctly seated by pushing:
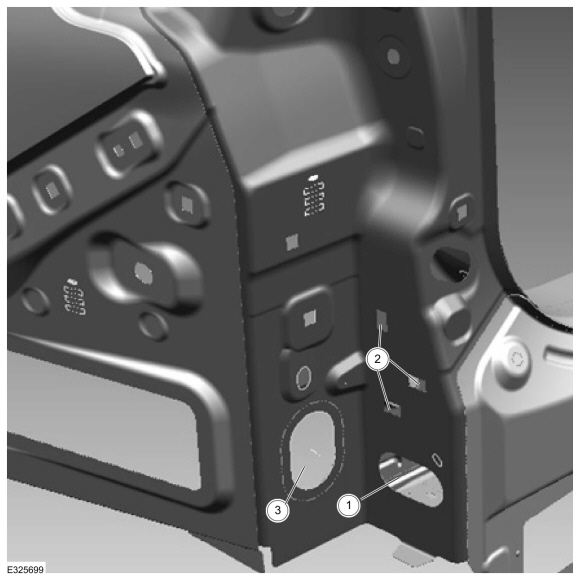
(1). Power liftgate grommet (if equipped). If not properly seated, replace the affected power liftgate strut. (Figure 1 Callout 1, Figure 2)
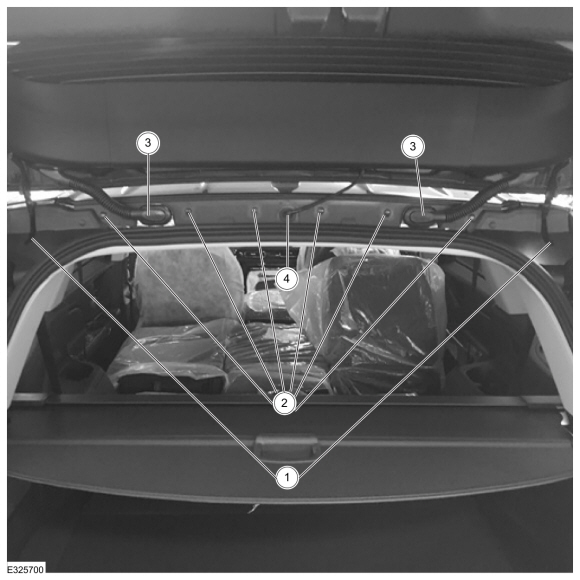
(2). Margin seal and margin seal pushpins. (Figure 1 Callout 2, Figure 3 Callout 2)
(3). Electrical wiring grommet. (Figure 1 Callout 3, Figure 3 Callout 3)
(4). Rear washer hose. (Figure 1 Callout 4, Figure 3 Callout 4)
Figure 1
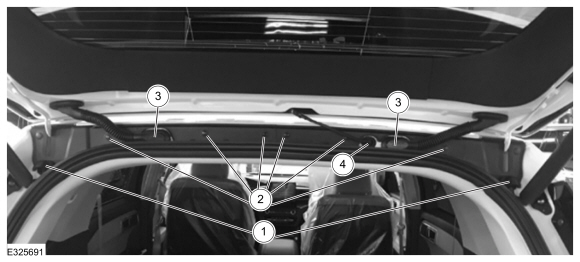
| Item | Description |
|---|---|
| 1 | Power liftgate grommet (if equipped) |
| 2 | Margin seal and margin seal pushpins |
| 3 | Electrical wiring grommet |
| 4 | Rear washer hose |
Figure 2
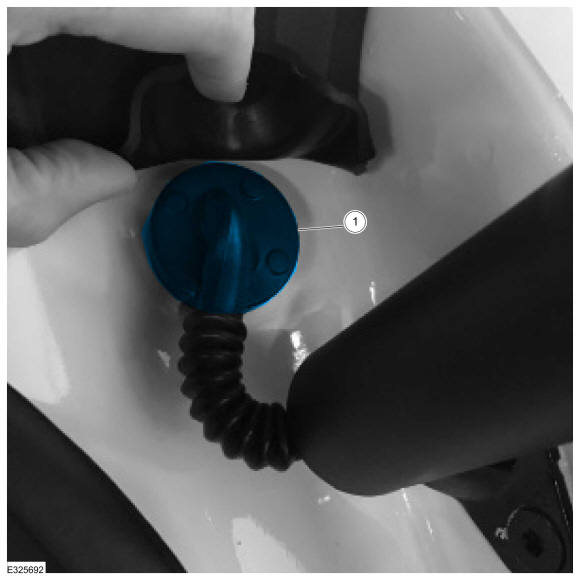
Figure 3
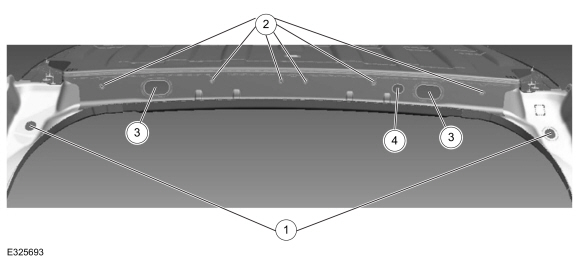
| Item | Description |
|---|---|
| 1 | Power liftgate grommet |
| 2 | Margin seal and margin seal pushpins |
| 3 | Electrical wiring grommet |
| 4 | Rear washer hose |
3. If a water leak is present on the right side of the vehicle, replace the audio control module (ACM).
(1). Reinstall the rain shield (if equipped) on the new ACM. The rain shield, if present, is attached to the ACM chassis using a pushpin which can be reused.
4. Raise the vehicle on a hoist.
5. Inspect the right side rear corner area under the rear bumper cover for the following loose, disconnected, or missing items:
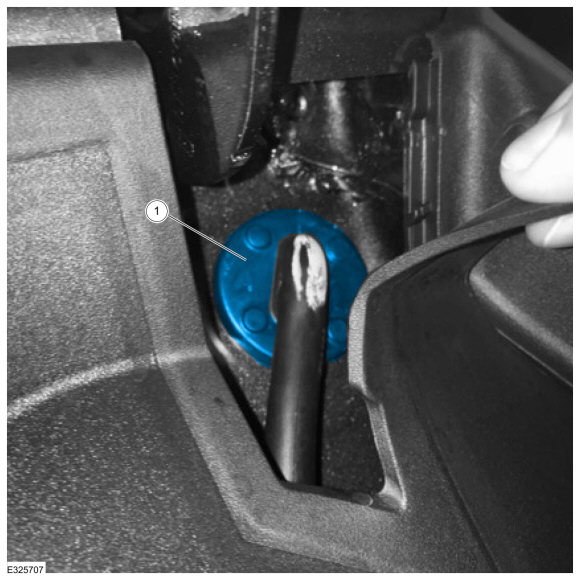
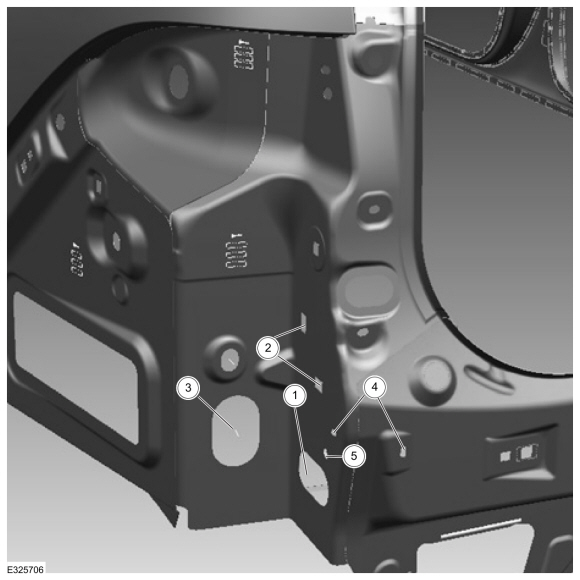
(1). Visually inspect for delete tape completely covering the body hole. (Figures 4-6 Callout 1)
(2). Press down on the blind spot information system (BLIS) module to make sure the BLIS module is fully seated into the body. (Figures 4-6 Callout 2)
(3). Visually inspect the BLIS module harness wire grommet is seated. (Figures 4-6 Callout 3)
Figure 4
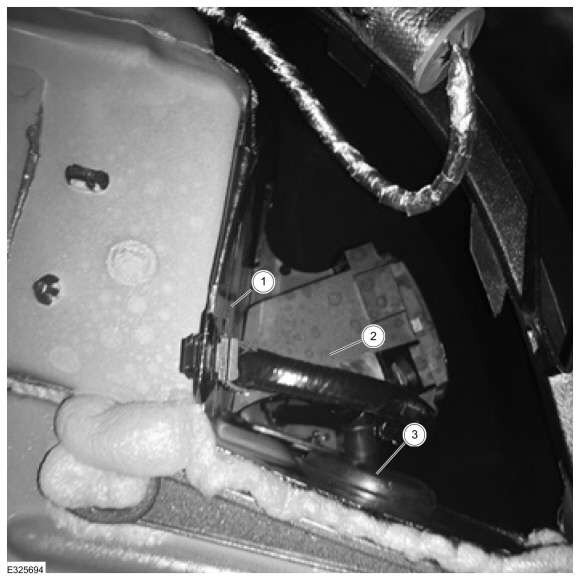
Figure 5
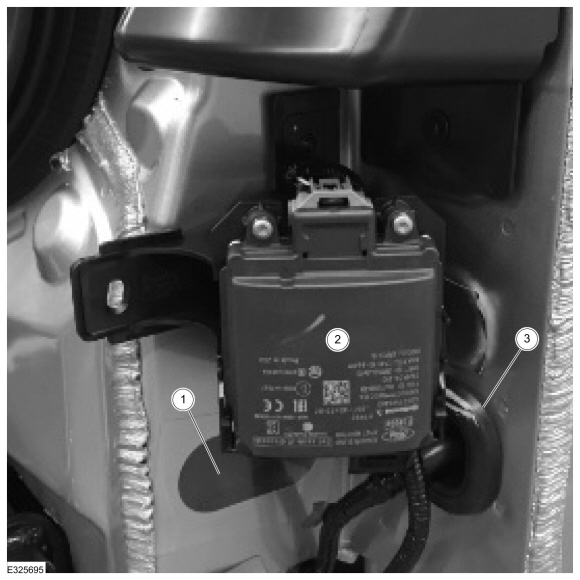
Figure 6
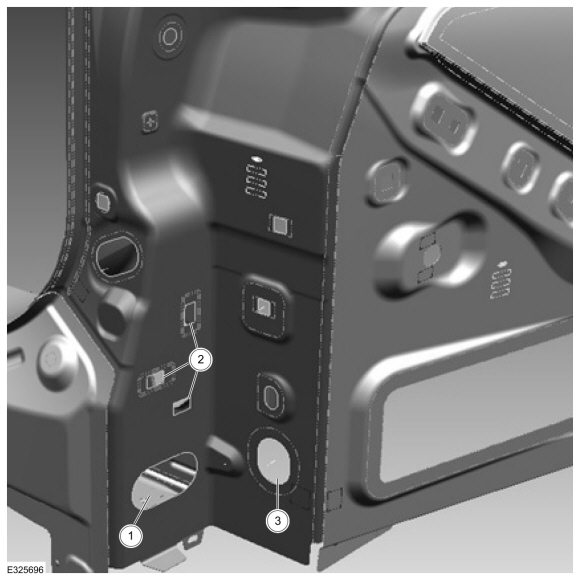
6. Inspect the left side rear corner area under the rear bumper cover for the following loose, disconnected, or missing items:
(1). Visually inspect for delete tape completely covering the body hole. (Figures 7-9 Callout 1)
(2). Press down on the BLIS module to make sure the BLIS module is fully seated into the body. (Figures 7-9 Callout 2)
(3). Visually inspect the BLIS module wire harness grommet is seated. (Figures 7-9 Callout 3)
Figure 7
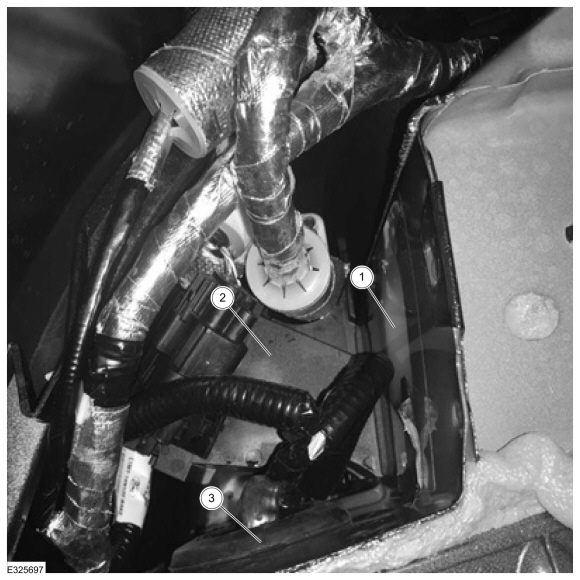
Figure 8
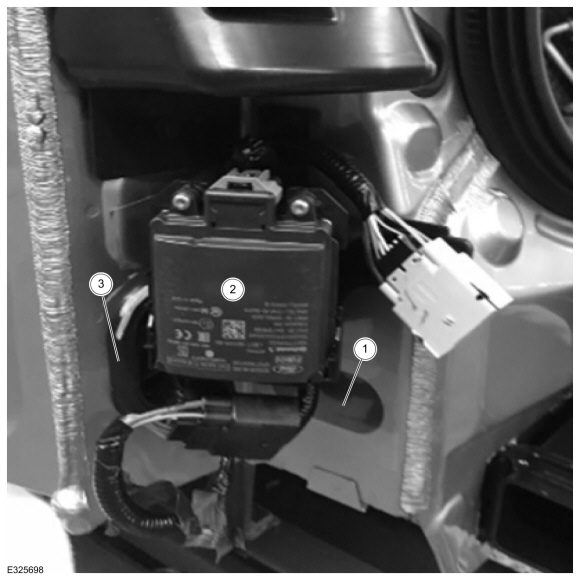
Figure 9
1. Open the rear liftgate.
2. Inspect and make sure the following components are correctly seated by pushing:
(1). Power liftgate grommet. If not properly seated, replace the affected power liftgate strut. (Figure 10 Callout 1, Figure 11)
(2). Margin seal and margin seal pushpins. (Figure 10 Callout 2)
(3). Electrical wiring grommet. (Figure 10 Callout 3)
(4). Rear washer hose. (Figure 10 Callout 4)
Figure 10
| Item | Description |
|---|---|
| 1 | Power liftgate grommet |
| 2 | Margin seal and margin seal pushpins |
| 3 | Electrical wiring grommet |
| 4 | Rear washer hose |
Figure 11
3. If a water leak is present on the right side of the vehicle, replace the ACM.
4. Raise the vehicle on a hoist.
5. Inspect the right side rear corner area under the rear bumper cover for the following loose, disconnected or missing items:
(1). Visually inspect for delete tape completely covering the body hole. (Figures 12-14 Callout 1)
(2). Press down on the BLIS module to make sure the BLIS module is fully seated into the body. (Figures 12-14 Callout 2)
(3). Visually inspect the BLIS module wire harness grommet is seated. (Figures 12-14 Callout 3)
(4). Make sure the wire harness grommet for the phone as a key feature is seated or the delete tape is completely covering the body hole. (Figures 12-14 Callout 4)
(5). BLIS grommet to module wire. (Figures 12-14 Callout 5)
Figure 12
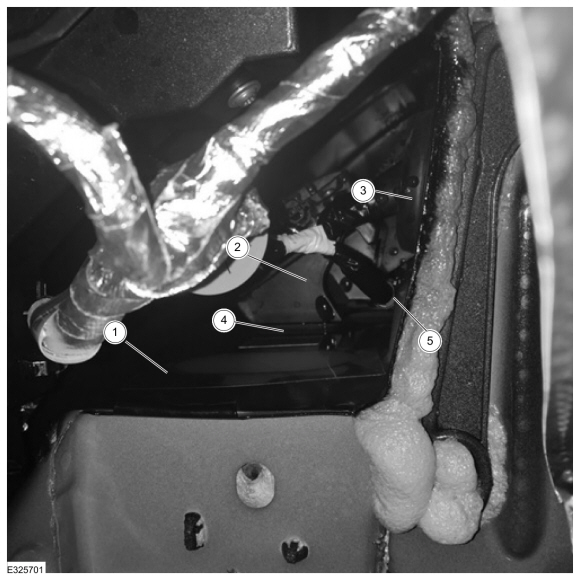
Figure 13
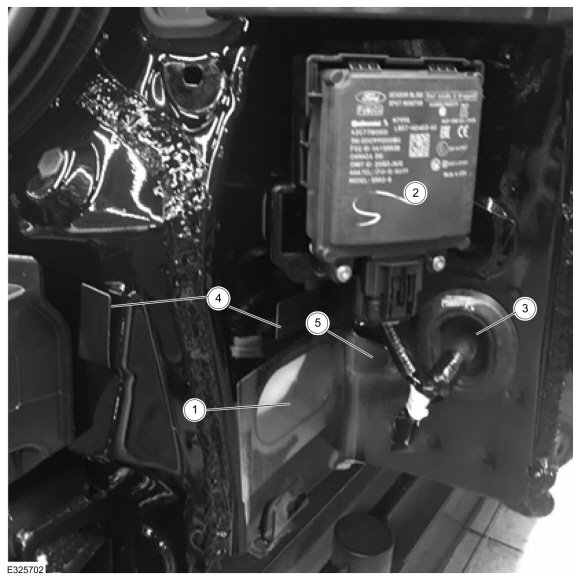
Figure 14
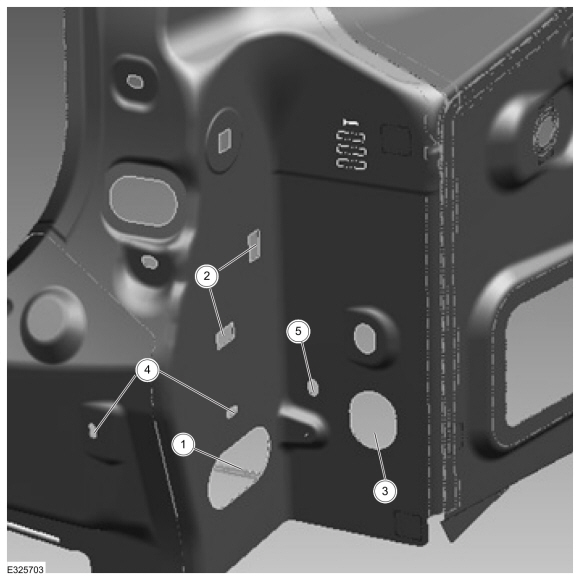
6. Inspect the left side rear corner area under the rear bumper cover for the following loose, disconnected or missing items:
(1). Visually inspect for delete tape completely covering the body hole. (Figures 15-17 Callout 1)
(2). Press down on the BLIS module to make sure the BLIS module is fully seated into the body. (Figures 15-17 Callout 2)
(3). Visually inspect the BLIS module wire harness grommet is seated. (Figures 15-17 Callout 3)
(4). Make sure the wire harness grommet for the phone as a key feature is seated or the delete tape is completely covering the body hole. (Figures 15-17 Callout 4)
(5). Rear fascia wire. (Figures 15-17 Callout 5)
Figure 15
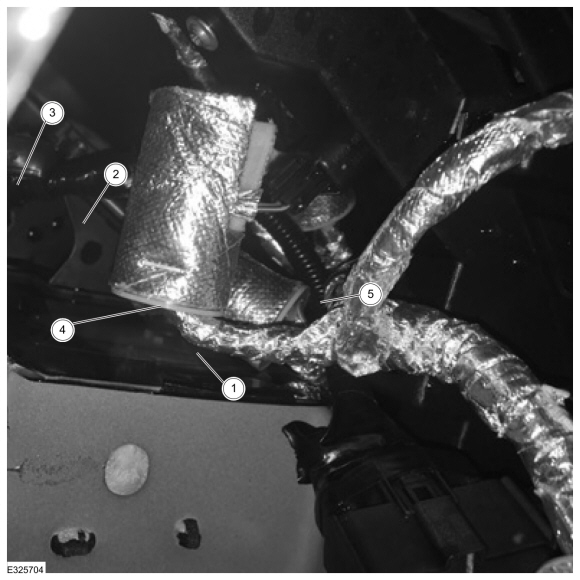
Figure 16
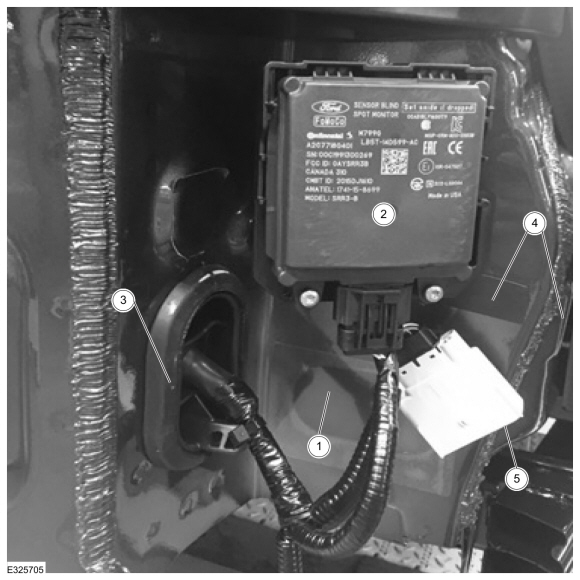
Figure 17
8 Affected Products
Vehicles
1 Associated Document
Manufacturer Communications
23-2181
21 June 2023
MC-10238283-0001.pdf 1991.149KB
 Loading...
NHTSA ID Number: 10215589
Manufacturer Communication Number: TSB 22-2262
Summary
Some 2020-2022 Explorer/Aviator vehicles may exhibit a lack of audio and/or a water leak in the rear liftgate area and/or water in the spare tire area. The customer may indicate that this concern is more noticeable after a car wash or rainfall. To correct the condition, follow the Service Procedure to identify the leak path.
1 Associated Document
Manufacturer Communications
22-2262
30 June 2022
MC-10215589-0001.pdf 731.527KB
 Loading...
NHTSA ID Number: 10184645
Manufacturer Communication Number: TSB 20-2425
Summary
Some 2020-2021 Explorer/Aviator vehicle may exhibit a water leak in the rear liftgate area and/or exhibit water in the spare tire area. To correct the condition, follow the Service Procedure steps to identify the leak path.
1 Associated Document
Manufacturer Communications
20-2425
14 December 2020
MC-10184645-0001.pdf 1955.361KB
 Loading...
- Bonds to All Surfaces: Our seam sealer automotive formula bonds strongly with primed, painted, or bare metal surfaces, offering a fast curing solution. Ready for paint in just 30 minutes, it serves as an effective RV roof sealant and polyurethane auto body filler without the need for sanding.
- All-Weather Performance: Designed to deliver a long-lasting seal, our automotive seam sealer withstands extreme weather without shrinking or cracking. Seam seal technology ensures it remains flexible and durable for both indoor and outdoor applications, making it a versatile automotive sealant.
- Easy Application & No Prep Needed: Seamlessly compatible with any standard urethane caulk gun, this auto glass sealant offers excellent adhesion without the need for surface prep. Our car seam sealer ensures quick and professional-grade gap filling.
- Versatile Application Across Vehicles: Perfect as car body filler for boats, trucks, and RVs, this automotive paintable seam sealer ensures a seamless fit on body panel and seams. Acting as an RV seam sealer, it meets diverse automotive repair needs effectively.
- Professional Results Guaranteed: Trusted by auto repair experts across the USA, our auto body seam sealer ensures high-quality, professional repairs with every use. Satisfaction guaranteed—see the difference in your repairs!
- [2-Pack] Plug Any Void –– Easily patch large cracks with confidence when using this thick auto seam sealer. This single-component panel bond compound provides superior adhesion on bare, primed, or painted metal surfaces on your vehicle or RV. Seam sealer is black in color.
- Complete Kit –– Comes with nitrile gloves and an application tip to make the process ...seamless. This joint and seam filler set comes with everything you need and more. The sealant is compatible with any standard caulking gun
- Permanently Fill Gaps –– Don't settle for a body panel adhesive sealant that doesn't hold up. Trust in a non-shrinking, non-cracking and low odor formula that stays remarkably flexible over time. Prevent leaks and debris from infiltrating your vehicle, and promote corrosion resistance
- Primer and Paint Ready –– Get your project ready for the road in just 24 hours. Smooth out and let the quick-curing seam sealant settle in for 45 minutes. Then you're ready to prime and paint the automotive body filler for a flawless finish that blends right in. Seam sealer is black in color.
- All-Weather Performance –– High heat and humidity are no match for this car sealant. Enhanced moisture curing properties ensure a durable hold for interior or exterior use. Use a urethane sealer that is worlds ahead of any solvent-based solutions
- Bonds to All Surfaces: Our seam sealer automotive formula bonds strongly with primed, painted, or bare metal surfaces, offering a fast curing solution. Ready for paint in just 30 minutes, it serves as an effective RV roof sealant and polyurethane auto body filler without the need for sanding.
- All-Weather Performance: Designed to deliver a long-lasting seal, our automotive seam sealer withstands extreme weather without shrinking or cracking. Seam seal technology ensures it remains flexible and durable for both indoor and outdoor applications, making it a versatile automotive sealant.
- Easy Application & No Prep Needed: Seamlessly compatible with any standard urethane caulk gun, this auto glass sealant offers excellent adhesion without the need for surface prep. Our car seam sealer ensures quick and professional-grade gap filling.
- Versatile Application Across Vehicles: Perfect as car body filler for boats, trucks, and RVs, this automotive paintable seam sealer ensures a seamless fit on body panel and seams. Acting as an RV seam sealer, it meets diverse automotive repair needs effectively.
- Professional Results Guaranteed: Trusted by auto repair experts across the USA, our auto body seam sealer ensures high-quality, professional repairs with every use. Satisfaction guaranteed—see the difference in your repairs!
- Plug Any Void –– Easily patch large cracks with confidence when using this thick auto seam sealer. This single-component panel bond compound provides superior adhesion on bare, primed, or painted metal surfaces on your vehicle or RV
- Complete Kit –– Comes with nitrile gloves and an application tip to make the process seamless This joint and seam filler set comes with everything you need and more. The sealant is compatible with any standard caulking gun
- Permanently Fill Gaps –– Don't settle for a body panel adhesive sealant that doesn't hold up. Trust in a non-shrinking, non-cracking and low odor formula that stays remarkably flexible over time. Prevent leaks and debris from infiltrating your vehicle, and promote corrosion resistance
- Primer and Paint Ready –– Get your project ready for the road in just 24 hours. Smooth out and let the quick-curing seam sealant settle in for 45 minutes. Then you're ready to prime and paint the automotive body filler for a flawless finish that blends right in
- All-Weather Performance –– High heat and humidity are no match for this car sealant. Enhanced moisture curing properties ensure a durable hold for interior or exterior use. Use a urethane sealer that is worlds ahead of any solvent-based solutions
- EASY APPLICATIONS: Brushable and paintable consistency
- HIGH ADHESION: Works on both bare metal and painted surfaces
- FAST SKINNING: Starts in about 10 to 15 minutes
- STAYS IN PLACE: Less likely to drip, sag or run out of gaps being sealed
- NON-STAINING: For all-purpose autobody joint and seam sealing
- Permanent Repairs – Seal seams and fix holes in tents, tarps, awnings, rainflies, and gear like Thermarest sleeping pads with a flexible, waterproof adhesive.
- Covers 12 Feet of Seams – One 1 oz tube treats up to 12 feet of seams or patches torn fabric: 8 oz size also available for larger repair needs.
- Durable & Flexible Seal – Cures into a rubber seal that flexes with fabric, bonds to nylon, polyester, canvas, leather, and vinyl for long-lasting performance.
- Won’t Peel or Crack – Designed to stay put through heavy use and weather; ideal for re-proofing or fixing gear that needs to stay waterproof.
- Easy Application – Comes with applicator brush for precise, mess-free repairs at home or in the field.
- Plug Any Void –– Easily patch large cracks with confidence when using this thick auto seam sealer. This single-component panel bond compound provides superior adhesion on bare, primed, or painted metal surfaces on your vehicle or RV
- 2 Pack Value & Complete Kit - Comes with nitrile gloves and an application tip to make the process seamless This joint and seam filler set comes with everything you need and more. The sealant is compatible with any standard caulking gun
- Permanently Fill Gaps - Don't settle for a body panel adhesive sealant that doesn't hold up. Trust in a non-shrinking, non-cracking and low odor formula that stays remarkably flexible over time. Prevent leaks and debris from infiltrating your vehicle, and promote corrosion resistance
- Primer and Paint Ready - Get your project ready for the road in just 24 hours. Smooth out and let the quick-curing seam sealant settle in for 45 minutes. Then you're ready to prime and paint the automotive body filler for a flawless finish that blends right in
- All-Weather Performance - High heat and humidity are no match for this car sealant. Enhanced moisture curing properties ensure a durable hold for interior or exterior use. Use a urethane sealer that is worlds ahead of any solvent-based solutions
- Bonds to All Surfaces: Our seam sealer automotive formula bonds strongly with primed, painted, or bare metal surfaces, offering a fast curing solution. Ready for paint in just 30 minutes, it serves as an effective RV roof sealant and polyurethane auto body filler without the need for sanding.
- All-Weather Performance: Designed to deliver a long-lasting seal, our automotive seam sealer withstands extreme weather without shrinking or cracking. Seam seal technology ensures it remains flexible and durable for both indoor and outdoor applications, making it a versatile automotive sealant.
- Easy Application & No Prep Needed: Seamlessly compatible with any standard urethane caulk gun, this auto glass sealant offers excellent adhesion without the need for surface prep. Our car seam sealer ensures quick and professional-grade gap filling.
- Versatile Application Across Vehicles: Perfect as car body filler for boats, trucks, and RVs, this automotive paintable seam sealer ensures a seamless fit on body panel and seams. Acting as an RV seam sealer, it meets diverse automotive repair needs effectively.
- Professional Results Guaranteed: Trusted by auto repair experts across the USA, our auto body seam sealer ensures high-quality, professional repairs with every use. Satisfaction guaranteed—see the difference in your repairs!
- High-Quality & Durable Repairs: Our auto seam sealer adopts high-quality urethane, no pungent smell during repairing; cured flexible to the touch, absorb door closing impact; resist heat(-49~239°F), weather & temperature change, never brittle, hardened or softened; no rework and no laborious maintenance
- Tightly Seal All Seams: The auto seam sealer adheres tightly to metal, aluminum, plastic surfaces, never peel or shrink; thick viscosity ensures completely coverage, prevent bare metal & door edge from rust, stop water, dust & wind leak in car from original seam
- Paintable & All-Weather Performance: cocomfix auto body seam sealer needs no primer, no fear of moisture and heat, instantly apply with manual or electric caulk gun; fast set and ready for road in 24 hours, also, you can use paint to change its color or polish to change its shape, until the original gap totally blends with the surrounding car body
- Safe & No Harmful Release & Interior & Exterior Use: Consider unable ventilation after car door closing, our seam sealer adheres an exclusive safe formula, won’t release any volatile gas, no VOC, protect the health of you and your family members sitting in the car
- Full Trust without Concern: If our seam sealer automotive below your expectations, we will provide an intact substitute or indemnify the original value of your order, so please get in touch with us when in need!
- Fast-Drying Automotive Seam Sealer: Specifically designed for automotive use, this sealer dries quickly, saving time on body repairs.
- Flexible & Durable Finish: Remains flexible, preventing cracks, hardening, sinking, or sagging for long-lasting, professional results.
- Easy Brush Application & OEM Match: Applies smoothly with a brush, holding perfect brush marks to replicate OEM seams.
- Excellent Adhesion & Versatile Sealing: Seals cracks, crevices, body seams, and joints with superior adhesion, ideal for lap and flange seams. This auto body seam sealer ensures a strong bond.
- Paintable in 30-60 Minutes, Light Gray: Ready for painting in under an hour, providing a seamless, light gray finish for automotive repairs.
SEOCONTENT-START
6/26/23, 2:46 PM 2023 Explorer https://www.fordtechservice.dealerconnection.com 1/17 TECHNICAL SERVICE BULLETIN Lack Of Audio And/Or Water Leak In Rear Of Vehicle And/Or Spare Tire Area 23-2181 21 June 2023 This bulletin supersedes 22-2262. Reason for update: Concern Carryover to New Model Model: Ford 2020-2023 Explorer Lincoln 2020-2023 Aviator Summary This article supersedes TSB 22-2262 to update the service procedure, and vehicle model years affected. Issue: Some 2020-2023 Explorer/Aviator vehicles may exhibit a lack of audio and/or a water leak in the rear liftgate area and/or water in the spare tire area. The customer may indicate that this concern is more noticeable after a car wash or rainfall. To correct the condition, follow the Service Procedure to identify the leak path. Action: Follow the Service Procedure steps to identify the leak path on vehicles that meet all of the following criteria: • 2020-2023 Explorer/Aviator • Lack of audio after a car wash or rainfall • Water in the rear liftgate area and/or water in the spare tire area Parts Parts To Inspect And Replace Only If Necessary Service Part Number LC5Z-14B350-B LB5Z-14B351-A 18K810 W710014-S300 Quantity If Needed If Needed If Needed If Needed Description Aviator Power Liftgate Strut – Refer To The Parts Catalog For The VIN Specific Application Power Liftgate Strut – Refer To The Parts Catalog For The VIN Specific Application Audio Control Module – Refer To The Parts Catalog For The VIN Specific Application Rubber Plug Unit of Issue 1 1 1 4 Piece Quantity 1 1 1 2 Quantity refers to the amount of the service part number required to repair the vehicle. Unit of Issue refers to the number of individual pieces included in a service part number package. Piece Quantity refers to the total number of individual pieces required to repair the vehicle. As Needed indicates the amount of the part may vary and/or is not a whole number. Parts can be billed out as non- whole numbers, including less than 1. If Needed indicates the part is not mandatory. Warranty Status: Eligible under provisions of New Vehicle Limited Warranty (NVLW)/Service Part Warranty (SPW)/Special Service Part (SSP)/Extended Service Plan (ESP) coverage. Limits/policies/prior approvals are not altered by a TSB. NVLW/SPW/SSP/ESP coverage limits are determined by the identified causal part and verified using the OASIS part coverage tool. Labor Times 6/26/23, 2:46 PM 2023 Explorer Description Operation Time 2020-2023 Explorer/Aviator: Repair The Audio System And Any Water Leaks Following The Service Procedure (Do Not Use With Any Other Labor Operations) MT232181 Actual Time Repair/Claim Coding Causal Part: 5827840 Condition Code: 12 Service Procedure 1. Is this an Explorer or Aviator? (1). Explorer – proceed to the Explorer Vehicle Inspection procedure. (2). Aviator – proceed to the Aviator Vehicle Inspection procedure. Explorer Vehicle Inspection 1. Open the rear liftgate. 2. Inspect and make sure the following components are correctly seated by pushing: (1). Power liftgate grommet (if equipped). If not properly seated, replace the affected power liftgate strut. (Figure 1 Callout 1, Figure 2) (2). Margin seal and margin seal pushpins. (Figure 1 Callout 2, Figure 3 Callout 2) (3). Electrical wiring grommet. (Figure 1 Callout 3, Figure 3 Callout 3) (4). Rear washer hose. (Figure 1 Callout 4, Figure 3 Callout 4) Figure 1 Item 1 2 3 4 Description Power liftgate grommet (if equipped) Margin seal and margin seal pushpins Electrical wiring grommet Rear washer hose Figure 2 https://www.fordtechservice.dealerconnection.com 2/17 6/26/23, 2:46 PM 2023 Explorer Item 1 2 3 Description Power liftgate grommet Margin seal and margin seal pushpins Electrical wiring grommet https://www.fordtechservice.dealerconnection.com 3/17 6/26/23, 2:46 PM 2023 Explorer 4 Rear washer hose 3. If a water leak is present on the right side of the vehicle, replace the audio control module (ACM). (1). Reinstall the rain shield (if equipped) on the new ACM. The rain shield, if present, is attached to the ACM chassis using a pushpin which can be reused. 4. Raise the vehicle on a hoist. 5. Inspect the right side rear corner area under the rear bumper cover for the following loose, disconnected, or missing items: (1). Visually inspect for delete tape completely covering the body hole. (Figures 4-6 Callout 1) If the tape is damaged or leaking, replace with a rubber plug. (2). Press down on the blind spot information system (BLIS) module to make sure it is fully seated into the body. (Figures 4-6 Callout 2) (3). Visually inspect the BLIS module wire harness grommet is seated. (Figures 4-6 Callout 3) Figure 4 Figure 5 https://www.fordtechservice.dealerconnection.com 4/17 6/26/23, 2:46 PM 2023 Explorer Figure 6 https://www.fordtechservice.dealerconnection.com 5/17 6/26/23, 2:46 PM 2023 Explorer 6. Inspect the left side rear corner area under the rear bumper cover for the following loose, disconnected, or missing items: (1). Visually inspect for delete tape completely covering the body hole. (Figures 7-9 Callout 1) If the tape is damaged or leaking, replace with a rubber plug. (2). Press down on the BLIS module to make sure it is fully seated into the body. (Figures 7-9 Callout 2) (3). Visually inspect the BLIS module wire harness grommet is seated. (Figures 7-9 Callout 3) Figure 7 https://www.fordtechservice.dealerconnection.com 6/17 6/26/23, 2:46 PM 2023 Explorer Figure 8 https://www.fordtechservice.dealerconnection.com 7/17 6/26/23, 2:46 PM 2023 Explorer Figure 9 https://www.fordtechservice.dealerconnection.com 8/17 6/26/23, 2:46 PM 2023 Explorer Aviator Vehicle Inspection 1. Open the rear liftgate. 2. Inspect and make sure the following components are correctly seated by pushing: (1). Power liftgate grommet. If not properly seated, replace the affected power liftgate strut. (Figure 10 Callout 1, Figure 11) (2). Margin seal and margin seal pushpins. (Figure 10 Callout 2) (3). Electrical wiring grommet. (Figure 10 Callout 3) (4). Rear washer hose. (Figure 10 Callout 4) Figure 10 https://www.fordtechservice.dealerconnection.com 9/17 6/26/23, 2:46 PM 2023 Explorer Item 1 2 3 4 Description Power liftgate grommet Margin seal and margin seal pushpins Electrical wiring grommet Rear washer hose Figure 11 https://www.fordtechservice.dealerconnection.com 10/17 6/26/23, 2:46 PM 2023 Explorer 3. If a water leak is present on the right side of the vehicle, replace the ACM. (1). Reinstall the rain shield (if equipped) on the new ACM. The rain shield, if present, is attached to the ACM chassis using a pushpin which can be reused. 4. Raise the vehicle on a hoist. 5. Inspect the right side rear corner area under the rear bumper cover for the following loose, disconnected or missing items: (1). Visually inspect for delete tape completely covering the body hole. (Figures 12-14 Callout 1) If the tape is damaged or leaking, replace with a rubber plug. (2). Press down on the BLIS module to make sure it is fully seated into the body. (Figures 12-14 Callout 2) (3). Visually inspect the BLIS module wire harness grommet is seated. (Figures 12-14 Callout 3) (4). Make sure the wire harness grommet for the phone as a key feature is seated or the delete tape is completely covering the body hole. (Figures 12-14 Callout 4) If the tape is damaged or leaking, replace with a rubber plug. (5). BLIS grommet to module wire. (Figures 12-14 Callout 5) Figure 12 https://www.fordtechservice.dealerconnection.com 11/17 6/26/23, 2:46 PM 2023 Explorer Figure 13 https://www.fordtechservice.dealerconnection.com 12/17 6/26/23, 2:46 PM 2023 Explorer Figure 14 https://www.fordtechservice.dealerconnection.com 13/17 6/26/23, 2:46 PM 2023 Explorer 6. Inspect the left side rear corner area under the rear bumper cover for the following loose, disconnected or missing items: (1). Visually inspect for delete tape completely covering the body hole. (Figures 15-17 Callout 1) If the tape is damaged or leaking, replace with a rubber plug. (2). Press down on the BLIS module to make it is fully seated into the body. (Figures 15-17 Callout 2) (3). Visually inspect the BLIS module wire harness grommet is seated. (Figures 15-17 Callout 3) (4). Make sure the wire harness grommet for the phone as a key feature is seated or the delete tape is completely covering the body hole. (Figures 15-17 Callout 4) If the tape is damaged or leaking, replace with a rubber plug. (5). Rear fascia wire. (Figures 15-17 Callout 5) Figure 15 https://www.fordtechservice.dealerconnection.com 14/17 6/26/23, 2:46 PM 2023 Explorer Figure 16 https://www.fordtechservice.dealerconnection.com 15/17 6/26/23, 2:46 PM 2023 Explorer Figure 17 https://www.fordtechservice.dealerconnection.com 16/17 6/26/23, 2:46 PM 2023 Explorer https://www.fordtechservice.dealerconnection.com 17/17 © 2023 Ford Motor Company All rights reserved. NOTE: The information in Technical Service Bulletins is intended for use by trained, professional technicians with the knowledge, tools, and equipment to do the job properly and safely. It informs these technicians of conditions that may occur on some vehicles, or provides information that could assist in proper vehicle service. The procedures should not be performed by “do-it-yourselfers”. Do not assume that a condition described affects your car or truck. Contact a Ford or Lincoln dealership to determine whether the Bulletin applies to your vehicle. Warranty Policy and Extended Service Plan documentation determine Warranty and/or Extended Service Plan coverage unless stated otherwise in the TSB article. The information in this Technical Service Bulletin (TSB) was current at the time of printing. Ford Motor Company reserves the right de this information with updates. The most recent information is available through Ford Motor Company’s on-line technical resources.
**************************************************************************************************************
SEOCONTENT-END
Last update on 2025-05-08 / Affiliate links / Images from Amazon Product Advertising API
This product presentation was made with AAWP plugin.

![Water Leak In Rear Of Vehicle And/Or Spare Tire Area - 2020-2022 Ford Explorer & Lincoln Aviator 31 [Black] Professional Automotive Seam Sealer, Paintable Quick-Set Polyurethane Auto Body Seam Sealer for Metal Surfaces of Cars, Trucks, Etc, Includes Gloves & Tip - Black RV Roof Sealant](https://m.media-amazon.com/images/I/41fApnuHD4L.jpg)
![Water Leak In Rear Of Vehicle And/Or Spare Tire Area - 2020-2022 Ford Explorer & Lincoln Aviator 33 [2-Pack] Black Polyurethane Seam Sealer Automotive Compound Kit - Durable & Flexible Auto Body Filler - Seam & Joint Compound for Bare, Primed or Painted Surfaces - Automotive Seam Sealer [Black]](https://m.media-amazon.com/images/I/4184QW8Um7L.jpg)


![Water Leak In Rear Of Vehicle And/Or Spare Tire Area - 2020-2022 Ford Explorer & Lincoln Aviator 42 [2 Pack] Polyurethane Seam Sealer Automotive Compound Kit - Durable & Flexible Auto Body Filler - Seam & Joint Compound for Bare or Painted Surfaces - Automotive Seam Sealer White - RV Roof Sealant](https://m.media-amazon.com/images/I/413vOkWzIrL.jpg)
![Water Leak In Rear Of Vehicle And/Or Spare Tire Area - 2020-2022 Ford Explorer & Lincoln Aviator 44 [2 Pack] Professional Automotive Seam Sealer, Paintable Quick-Set Polyurethane Auto Body Seam Sealer for Metal Surfaces of Cars, Trucks, Etc, Includes Gloves & Tip - White RV Roof Sealant](https://m.media-amazon.com/images/I/51BnJdNKa5L.jpg)

