| “This site contains affiliate links for which OEMDTC may be compensated” |
| WATER LEAK IN REAR CARGO/SPARE TIRE AREA – BUILT ON OR BEFORE 7/27/2015 |
LINCOLN : : | 2015-2016 MKC |
ISSUE:
Some 2015-2016 MKC vehicles built on or before 7/27/2015 may exhibit a water leak in the rear cargo/spare tire area.
ACTION:
Follow the Service Procedure steps to correct the condition.
SERVICE PROCEDURE
- Remove the spare tire and inspect for moisture in the rear cargo area. Is moisture present?
- Yes – dry the area as needed and proceed to Step 2.
- No – this article does not apply. Refer to Workshop Manual (WSM), Section 501-00 for normal diagnosis.
- Check the vehicle build date. Refer to WSM, Section 100-00. Was the vehicle built on or before 11/11/2014?
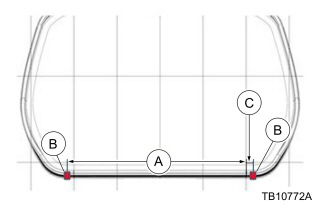
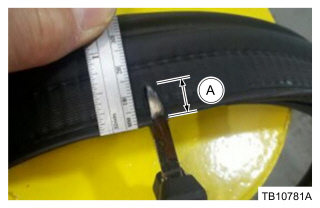
- Yes – cut two (2) square notches in the liftgate weatherstrip.
- The square notches are located 83 cm (32 11/16” ) apart. (Figure 1A )
- The square notches are 14 mm deep by 5 mm wide (9/16” by 3/16”). (Figure 2A)
- No – proceed to Step 3.
- Yes – cut two (2) square notches in the liftgate weatherstrip.
- Was the vehicle built on or before 5/10/2015?
- Yes – proceed to Step 4.
- No – proceed to Step 9.
- Remove the rear bumper cover. Refer to WSM, Section 501-19.
- Remove the air extractors mounted in the lower water drain panel. Refer to WSM, Section 501-30.
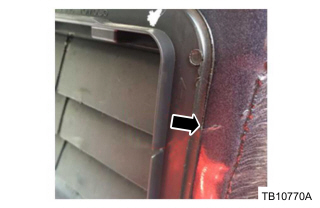
- Remove excess sealer along the air extractors sealing area. (Figure 2)

Figure 3 - Use touch up paint as needed and install new air extractors.
- Reinstall the rear bumper cover. Refer to WSM, Section 501-19.
- Was the vehicle built on or before 6/8/2015?
- Yes – proceed to Step 10.
- No – proceed to Step 11.
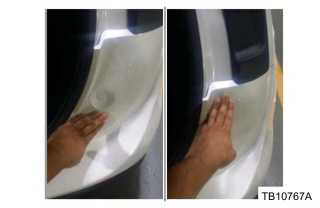
- Verify the rear bumper cover pushpins are fully seated. (Figure 4)

Figure 4- Firmly apply pressure to the lower attachment point and then the upper.
- Was the vehicle built on or before 7/27/2015?
- Yes – proceed to Step 12.
- No – repair is complete.
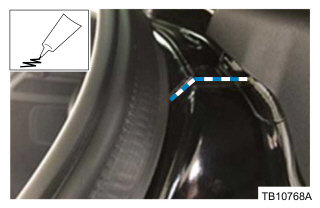
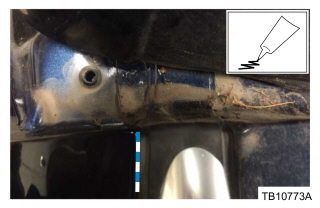
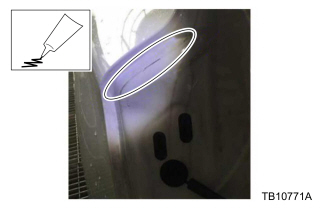
- Apply 3M Flexiclear Body Seam Sealer or equivalent to the D-pillar header joint seams and rear roof ditches. (Figures 5 and 6)

Figure 5- The roof rails do not need to be removed. Use a plastic trim tool to lift the roof rail black plastic mouldings to apply the sealer at the rear corners on both sides of the roof ditch.
- Remove the D-pillar mouldings. Refer to Workshop Manual (WSM), Section 501-08. Be careful not to damage the bottom white clips.
- Start at the top by removing the upper pushpin.
- Slide your hand down the moulding to disengage the magnet from the sheet metal.
- Pull out to dislodge the two (2) clips in the upper part of the lower section of the moulding.
- Pull up to dislodge the lower pin. Do not try to remove the lower section all in one motion.
- Apply 3M™ Flexiclear Body Seam Sealer or equivalent to the D-pillar joint seams. (Figure 7)

Figure 7 - Reinstall the D-pillar mouldings.
| Obtain Locally | |
| Part Number | Part Description |
| 08405 | 3M Flexiclear Body Seam Sealer |
| AG1Z-61280B62-A | Air Extractor (2 Req) |
| W716328-S300 | Rear Bumper Cover Trim Pin (4 Req) |
| 19500 | Touch Up Paint (See Parts Catalog for Color) |
Bestseller No. 1
[Black] Professional Automotive Seam Sealer, Paintable Quick-Set Polyurethane Auto Body Seam Sealer for Metal Surfaces of Cars, Trucks, Etc, Includes Gloves & Tip - Black RV Roof Sealant
- Bonds to All Surfaces: Our seam sealer automotive formula bonds strongly with primed, painted, or bare metal surfaces, offering a fast curing solution. Ready for paint in just 30 minutes, it serves as an effective RV roof sealant and polyurethane auto body filler without the need for sanding.
- All-Weather Performance: Designed to deliver a long-lasting seal, our automotive seam sealer withstands extreme weather without shrinking or cracking. Seam seal technology ensures it remains flexible and durable for both indoor and outdoor applications, making it a versatile automotive sealant.
- Easy Application & No Prep Needed: Seamlessly compatible with any standard urethane caulk gun, this auto glass sealant offers excellent adhesion without the need for surface prep. Our car seam sealer ensures quick and professional-grade gap filling.
- Versatile Application Across Vehicles: Perfect as car body filler for boats, trucks, and RVs, this automotive paintable seam sealer ensures a seamless fit on body panel and seams. Acting as an RV seam sealer, it meets diverse automotive repair needs effectively.
- Professional Results Guaranteed: Trusted by auto repair experts across the USA, our auto body seam sealer ensures high-quality, professional repairs with every use. Satisfaction guaranteed—see the difference in your repairs!
Bestseller No. 2
[2-Pack] Black Polyurethane Seam Sealer Automotive Compound Kit - Durable & Flexible Auto Body Filler - Seam & Joint Compound for Bare, Primed or Painted Surfaces - Automotive Seam Sealer [Black]
- [2-Pack] Plug Any Void –– Easily patch large cracks with confidence when using this thick auto seam sealer. This single-component panel bond compound provides superior adhesion on bare, primed, or painted metal surfaces on your vehicle or RV. Seam sealer is black in color.
- Complete Kit –– Comes with nitrile gloves and an application tip to make the process ...seamless. This joint and seam filler set comes with everything you need and more. The sealant is compatible with any standard caulking gun
- Permanently Fill Gaps –– Don't settle for a body panel adhesive sealant that doesn't hold up. Trust in a non-shrinking, non-cracking and low odor formula that stays remarkably flexible over time. Prevent leaks and debris from infiltrating your vehicle, and promote corrosion resistance
- Primer and Paint Ready –– Get your project ready for the road in just 24 hours. Smooth out and let the quick-curing seam sealant settle in for 45 minutes. Then you're ready to prime and paint the automotive body filler for a flawless finish that blends right in. Seam sealer is black in color.
- All-Weather Performance –– High heat and humidity are no match for this car sealant. Enhanced moisture curing properties ensure a durable hold for interior or exterior use. Use a urethane sealer that is worlds ahead of any solvent-based solutions
Bestseller No. 3
Professional Automotive Seam Sealer, Paintable Quick-Set Polyurethane Auto Body Seam Sealer for Metal Surfaces of Cars, Trucks, Etc, Includes Gloves & Tip - White RV Roof Sealant
- Bonds to All Surfaces: Our seam sealer automotive formula bonds strongly with primed, painted, or bare metal surfaces, offering a fast curing solution. Ready for paint in just 30 minutes, it serves as an effective RV roof sealant and polyurethane auto body filler without the need for sanding.
- All-Weather Performance: Designed to deliver a long-lasting seal, our automotive seam sealer withstands extreme weather without shrinking or cracking. Seam seal technology ensures it remains flexible and durable for both indoor and outdoor applications, making it a versatile automotive sealant.
- Easy Application & No Prep Needed: Seamlessly compatible with any standard urethane caulk gun, this auto glass sealant offers excellent adhesion without the need for surface prep. Our car seam sealer ensures quick and professional-grade gap filling.
- Versatile Application Across Vehicles: Perfect as car body filler for boats, trucks, and RVs, this automotive paintable seam sealer ensures a seamless fit on body panel and seams. Acting as an RV seam sealer, it meets diverse automotive repair needs effectively.
- Professional Results Guaranteed: Trusted by auto repair experts across the USA, our auto body seam sealer ensures high-quality, professional repairs with every use. Satisfaction guaranteed—see the difference in your repairs!
Bestseller No. 4
Polyurethane Seam Sealer Automotive Compound Kit - Durable & Flexible Auto Body Filler - Seam & Joint Compound for Bare, Primed or Painted Surfaces - Automotive Seam Sealer White - RV Roof Sealant
- Plug Any Void –– Easily patch large cracks with confidence when using this thick auto seam sealer. This single-component panel bond compound provides superior adhesion on bare, primed, or painted metal surfaces on your vehicle or RV
- Complete Kit –– Comes with nitrile gloves and an application tip to make the process seamless This joint and seam filler set comes with everything you need and more. The sealant is compatible with any standard caulking gun
- Permanently Fill Gaps –– Don't settle for a body panel adhesive sealant that doesn't hold up. Trust in a non-shrinking, non-cracking and low odor formula that stays remarkably flexible over time. Prevent leaks and debris from infiltrating your vehicle, and promote corrosion resistance
- Primer and Paint Ready –– Get your project ready for the road in just 24 hours. Smooth out and let the quick-curing seam sealant settle in for 45 minutes. Then you're ready to prime and paint the automotive body filler for a flawless finish that blends right in
- All-Weather Performance –– High heat and humidity are no match for this car sealant. Enhanced moisture curing properties ensure a durable hold for interior or exterior use. Use a urethane sealer that is worlds ahead of any solvent-based solutions
SaleBestseller No. 5
3M Dynatron Auto Seam Sealer Caulk, 550, Grey Color, Permanently Elastic, Fast-Skinning, Non-Staining, Non-Sagging, 12 oz
- EASY APPLICATIONS: Brushable and paintable consistency
- HIGH ADHESION: Works on both bare metal and painted surfaces
- FAST SKINNING: Starts in about 10 to 15 minutes
- STAYS IN PLACE: Less likely to drip, sag or run out of gaps being sealed
- NON-STAINING: For all-purpose autobody joint and seam sealing
Bestseller No. 6
Gear Aid Seam Grip WP Waterproof Sealant and Adhesive for Tents and Outdoor Fabric, Clear, 1 oz
- Permanent Repairs – Seal seams and fix holes in tents, tarps, awnings, rainflies, and gear like Thermarest sleeping pads with a flexible, waterproof adhesive.
- Covers 12 Feet of Seams – One 1 oz tube treats up to 12 feet of seams or patches torn fabric: 8 oz size also available for larger repair needs.
- Durable & Flexible Seal – Cures into a rubber seal that flexes with fabric, bonds to nylon, polyester, canvas, leather, and vinyl for long-lasting performance.
- Won’t Peel or Crack – Designed to stay put through heavy use and weather; ideal for re-proofing or fixing gear that needs to stay waterproof.
- Easy Application – Comes with applicator brush for precise, mess-free repairs at home or in the field.
Bestseller No. 7
[2 Pack] Polyurethane Seam Sealer Automotive Compound Kit - Durable & Flexible Auto Body Filler - Seam & Joint Compound for Bare or Painted Surfaces - Automotive Seam Sealer White - RV Roof Sealant
- Plug Any Void –– Easily patch large cracks with confidence when using this thick auto seam sealer. This single-component panel bond compound provides superior adhesion on bare, primed, or painted metal surfaces on your vehicle or RV
- 2 Pack Value & Complete Kit - Comes with nitrile gloves and an application tip to make the process seamless This joint and seam filler set comes with everything you need and more. The sealant is compatible with any standard caulking gun
- Permanently Fill Gaps - Don't settle for a body panel adhesive sealant that doesn't hold up. Trust in a non-shrinking, non-cracking and low odor formula that stays remarkably flexible over time. Prevent leaks and debris from infiltrating your vehicle, and promote corrosion resistance
- Primer and Paint Ready - Get your project ready for the road in just 24 hours. Smooth out and let the quick-curing seam sealant settle in for 45 minutes. Then you're ready to prime and paint the automotive body filler for a flawless finish that blends right in
- All-Weather Performance - High heat and humidity are no match for this car sealant. Enhanced moisture curing properties ensure a durable hold for interior or exterior use. Use a urethane sealer that is worlds ahead of any solvent-based solutions
Bestseller No. 8
[2 Pack] Professional Automotive Seam Sealer, Paintable Quick-Set Polyurethane Auto Body Seam Sealer for Metal Surfaces of Cars, Trucks, Etc, Includes Gloves & Tip - White RV Roof Sealant
- Bonds to All Surfaces: Our seam sealer automotive formula bonds strongly with primed, painted, or bare metal surfaces, offering a fast curing solution. Ready for paint in just 30 minutes, it serves as an effective RV roof sealant and polyurethane auto body filler without the need for sanding.
- All-Weather Performance: Designed to deliver a long-lasting seal, our automotive seam sealer withstands extreme weather without shrinking or cracking. Seam seal technology ensures it remains flexible and durable for both indoor and outdoor applications, making it a versatile automotive sealant.
- Easy Application & No Prep Needed: Seamlessly compatible with any standard urethane caulk gun, this auto glass sealant offers excellent adhesion without the need for surface prep. Our car seam sealer ensures quick and professional-grade gap filling.
- Versatile Application Across Vehicles: Perfect as car body filler for boats, trucks, and RVs, this automotive paintable seam sealer ensures a seamless fit on body panel and seams. Acting as an RV seam sealer, it meets diverse automotive repair needs effectively.
- Professional Results Guaranteed: Trusted by auto repair experts across the USA, our auto body seam sealer ensures high-quality, professional repairs with every use. Satisfaction guaranteed—see the difference in your repairs!
Bestseller No. 9
Professional Seam Sealer Automotive, Paintable Quick-Set Auto Body Seam Sealer, Durable & Flexible Polyurethane Auto Body Filler for Cars, Trucks, RV and Other Metal Surfaces (10.5 oz White)
- High-Quality & Durable Repairs: Our auto seam sealer adopts high-quality urethane, no pungent smell during repairing; cured flexible to the touch, absorb door closing impact; resist heat(-49~239°F), weather & temperature change, never brittle, hardened or softened; no rework and no laborious maintenance
- Tightly Seal All Seams: The auto seam sealer adheres tightly to metal, aluminum, plastic surfaces, never peel or shrink; thick viscosity ensures completely coverage, prevent bare metal & door edge from rust, stop water, dust & wind leak in car from original seam
- Paintable & All-Weather Performance: cocomfix auto body seam sealer needs no primer, no fear of moisture and heat, instantly apply with manual or electric caulk gun; fast set and ready for road in 24 hours, also, you can use paint to change its color or polish to change its shape, until the original gap totally blends with the surrounding car body
- Safe & No Harmful Release & Interior & Exterior Use: Consider unable ventilation after car door closing, our seam sealer adheres an exclusive safe formula, won’t release any volatile gas, no VOC, protect the health of you and your family members sitting in the car
- Full Trust without Concern: If our seam sealer automotive below your expectations, we will provide an intact substitute or indemnify the original value of your order, so please get in touch with us when in need!
Bestseller No. 10
Barrier Bond - Brushable Seam Sealer, Quart Can with 30.4 Fluid Ounces, Seam Sealer for Automotive Joints & Body Repair, Paintable Gray
- Fast-Drying Automotive Seam Sealer: Specifically designed for automotive use, this sealer dries quickly, saving time on body repairs.
- Flexible & Durable Finish: Remains flexible, preventing cracks, hardening, sinking, or sagging for long-lasting, professional results.
- Easy Brush Application & OEM Match: Applies smoothly with a brush, holding perfect brush marks to replicate OEM seams.
- Excellent Adhesion & Versatile Sealing: Seals cracks, crevices, body seams, and joints with superior adhesion, ideal for lap and flange seams. This auto body seam sealer ensures a strong bond.
- Paintable in 30-60 Minutes, Light Gray: Ready for painting in under an hour, providing a seamless, light gray finish for automotive repairs.
Last update on 2025-05-11 / Affiliate links / Images from Amazon Product Advertising API
This product presentation was made with AAWP plugin.

![Water Leak in Rear Cargo/Spare Tire Area - 2015-2016 Lincoln MKC 9 [Black] Professional Automotive Seam Sealer, Paintable Quick-Set Polyurethane Auto Body Seam Sealer for Metal Surfaces of Cars, Trucks, Etc, Includes Gloves & Tip - Black RV Roof Sealant](https://m.media-amazon.com/images/I/41fApnuHD4L.jpg)
![Water Leak in Rear Cargo/Spare Tire Area - 2015-2016 Lincoln MKC 11 [2-Pack] Black Polyurethane Seam Sealer Automotive Compound Kit - Durable & Flexible Auto Body Filler - Seam & Joint Compound for Bare, Primed or Painted Surfaces - Automotive Seam Sealer [Black]](https://m.media-amazon.com/images/I/4184QW8Um7L.jpg)


![Water Leak in Rear Cargo/Spare Tire Area - 2015-2016 Lincoln MKC 20 [2 Pack] Polyurethane Seam Sealer Automotive Compound Kit - Durable & Flexible Auto Body Filler - Seam & Joint Compound for Bare or Painted Surfaces - Automotive Seam Sealer White - RV Roof Sealant](https://m.media-amazon.com/images/I/413vOkWzIrL.jpg)
![Water Leak in Rear Cargo/Spare Tire Area - 2015-2016 Lincoln MKC 22 [2 Pack] Professional Automotive Seam Sealer, Paintable Quick-Set Polyurethane Auto Body Seam Sealer for Metal Surfaces of Cars, Trucks, Etc, Includes Gloves & Tip - White RV Roof Sealant](https://m.media-amazon.com/images/I/51BnJdNKa5L.jpg)

