| “This site contains affiliate links for which OEMDTC may be compensated” |
NHTSA ID Number: 10233585
Manufacturer Communication Number: TSB 23-2062
Summary
Some 2019-2023 Ranger crew cab vehicles may exhibit excessive latching effort when returning the rear seat backrest assembly to the upright position. This may be due to oversized rear seat backrest bumpers preventing latch to striker engagement. Vehicles built on or before 04-Feb-2019 may also have excessive deadening material inside the rear seat backrest latch. To correct this condition, follow the Service Procedure to replace the rear seat backrest bumpers and adjust the striker position.
This bulletin supersedes 22-2026.
Model:
Ford
2019-2023 Ranger |
Summary
This article supersedes TSB 22-2026 to update the vehicle model years affected.
Issue: Some 2019-2023 Ranger crew cab vehicles may exhibit excessive latching effort when returning the rear seat backrest assembly to the upright position. This may be due to oversized rear seat backrest bumpers preventing latch to striker engagement. Vehicles built on or before 04-Feb-2019 may also have excessive deadening material inside the rear seat backrest latch. To correct this condition, follow the Service Procedure to replace the rear seat backrest bumpers and adjust the striker position.
Action: Follow the Service Procedure to correct the condition on vehicles that meet all of the following criteria:
- 2019-2023 Ranger
- Crew cab
- Excessive latching effort when returning the rear seat backrest assembly to the upright position
Parts
| Service Part Number | Quantity | Description | Unit of Issue | Piece Quantity |
| KB3Z-9961383-A | 1 | Rear Seat Back Latch | 1 | 1 |
| KB3Z-2161082-B | 3 | Bumper | 1 | 3 |
| W504694-S424 | 1 | Screw | 4 | 3 |
| 164-R4903 | As Needed | Flock Tape (Rotunda Part Number) | ||
| Obtain Locally | As Needed | String – 2-Foot (60 Cm) Long | ||
| Obtain Locally | As Needed | Modeling Clay |
Quantity refers to the amount of the service part number required to repair the vehicle.
Unit of Issue refers to the number of individual pieces included in a service part number package.
Piece Quantity refers to the total number of individual pieces required to repair the vehicle.
Unit of Issue and Piece Quantity are 1 unless otherwise stated.
As Needed indicates the amount of the part may vary and/or is not a whole number. Parts can be billed out as non-whole numbers, including less than 1.
Service Procedure
1. Check the vehicle build date. Was the vehicle built on or before 04-Feb-2019?
(1). Yes – proceed to Step 2.
(2). No – proceed to Step 14.
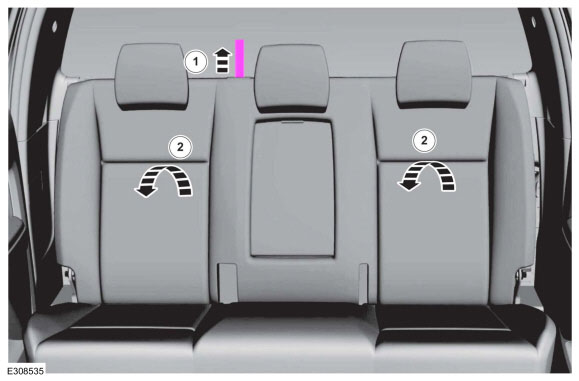
2. Release the rear seat backrest latch (Figure 1 Callout 1) and lower to the fold flat position. (Figure 1 Callout 2)
Figure 1
3. Measure and cut a 60 cm (2-foot) piece of string. (Figure 2)
Figure 2
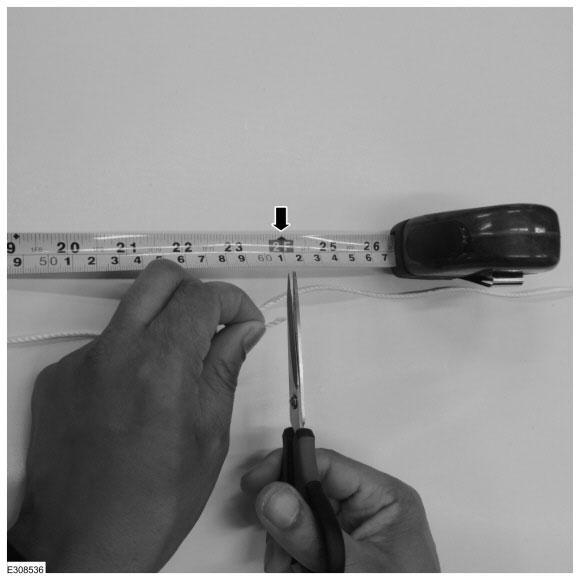
CAUTION: Using metal wire can damage the seat backrest cover. Use string to avoid any damage.
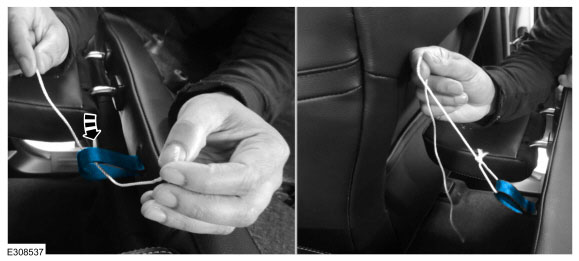
4. Guide the string through the rear seat backrest release strap and double knot a loose loop. (Figure 3)
Figure 3
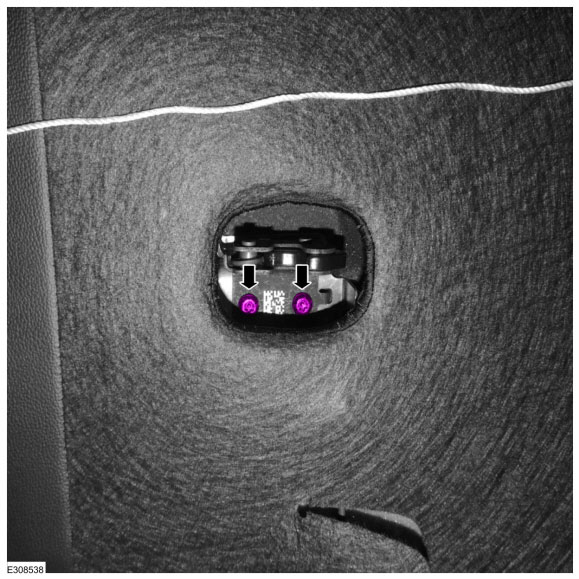
5. Remove the rear seat backrest latch retainers. (Figure 4)
Figure 4
6. Holding the string, guide the rear seat backrest latch up and out of the rear seat backrest assembly just enough to access and remove the rear seat backrest latch release strap. (Figure 5)
Figure 5
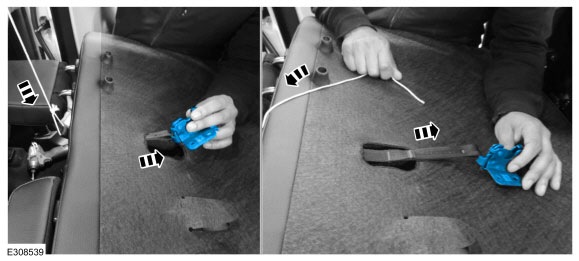
7. Remove and discard the rear seat backrest latch from the rear seat backrest release strap. (Figure 6)
Figure 6
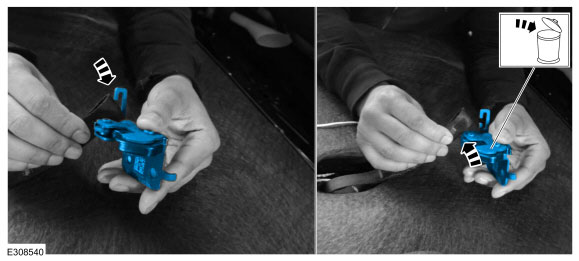
8. Install the rear seat backrest release strap onto the new rear seat backrest latch.
9. Install the new rear seat backrest latch by pulling the string attached to the rear seat backrest release strap back through the seat backrest cover and guiding the rear seat backrest latch back into the rear seat backrest assembly. (Figure 5)
10. Install the rear seat backrest latch retainers. (Figure 4)
(1). Tighten both retainers to 1.2 Nm (10.6 in-lb).
11. Remove the string attached to the rear seat backrest release strap. (Figure 7) Make sure to cut the string as far away from the rear seat backrest release strap as possible or damage to the release strap may occur.
Figure 7
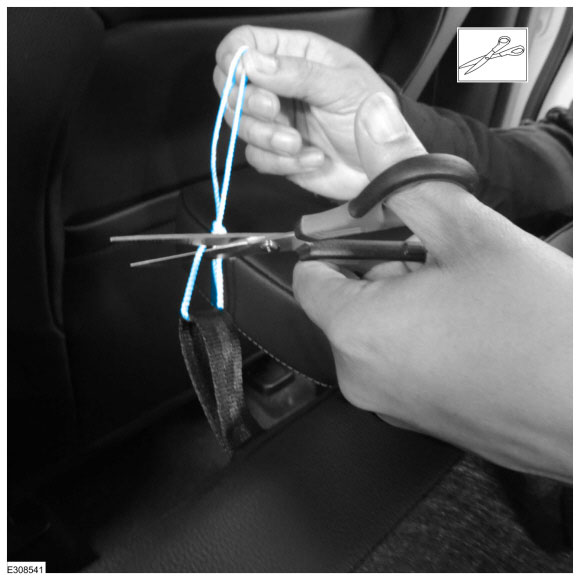
12. Remove and discard the passenger side inboard rear seat backrest bumper on the backside of the rear seat backrest assembly. (Figure 8)
Figure 8
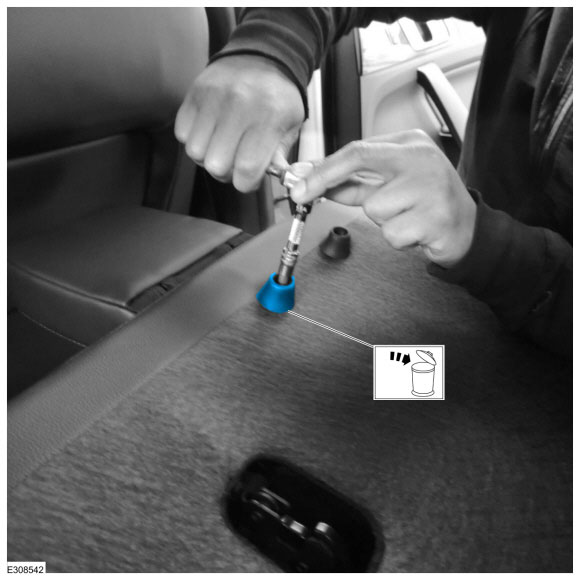
13. Cut a 40 mm by 40 mm (1.5 inch by 1.5 inch) piece of flock tape and install it over the rear seat backrest bumper retainer hole. (Figure 9)
Figure 9
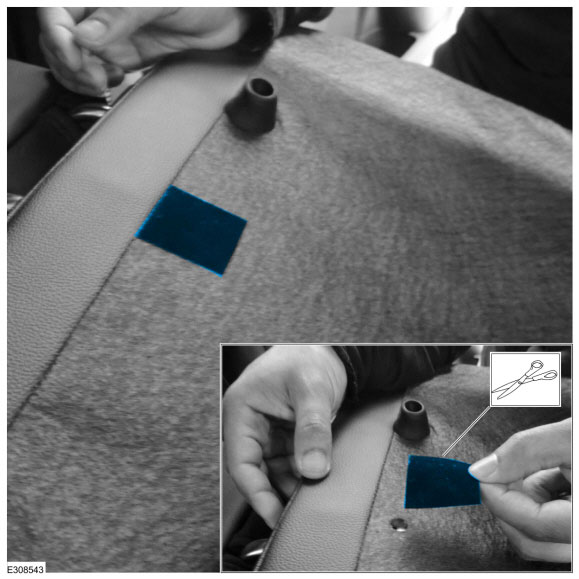
14. Remove only the rear seat outermost head restraints.
(1). Press inward on the head restraint locks.
(2). Lift upward on the head restraint.
15. Replace all 3 rear seat backrest bumpers and fasteners. Tighten to 1.6 Nm (14 lb-in)
16. Perform a drag test using a sheet of paper to determine which of the 3 rear seat backrest bumpers contacts the back of the cab first.
(1). While covering one rear seat backrest bumper with a sheet of paper, raise the rear seat backrest so it is in the upright position, but not latched, and lightly tug on the paper to determine if that bumper is contacting the rear of the cab. Repeat this test on all 3 bumpers.
(2). The rear seat backrest bumper that holds the paper will be considered rear seat backrest bumper ‘X’. Remember the location of rear seat backrest bumper ‘X’, as it will be used later in the procedure. (Figure 10)
NOTE: If more than one seat backrest bumper is found to be contacting the rear of the cab, the bumper closest to the latch should be considered rear seat backrest bumper ‘X’.
Figure 10
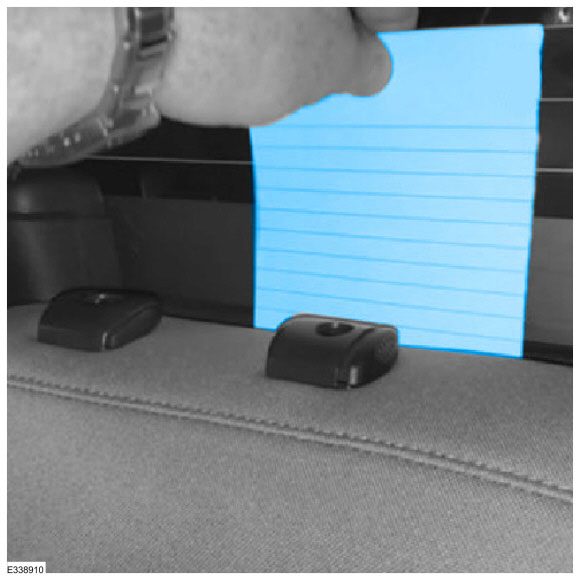
17. Use modeling clay to measure the position of the rear seat back rest latch relative to the striker.
(1). With the rear seat backrest assembly folded to the flat position, apply modeling clay to the width of the striker. The modeling clay should be no more than 5mm thick on the forward side of the striker. (Figure 11)
(2). While holding a sheet of paper over rear seat backrest bumper ‘X’, raise the rear seat backrest assembly until vertical.
(3). Allow gravity to pull the rear seat backrest assembly the rest of the way against the modeling clay while lightly tugging on the paper to confirm when the rear seat backrest bumper ‘X’ is against the cab. If the paper is not being held, apply very light pressure near rear seat backrest bumper ‘X’ until resistance can be felt when tugging on the paper.
Figure 11
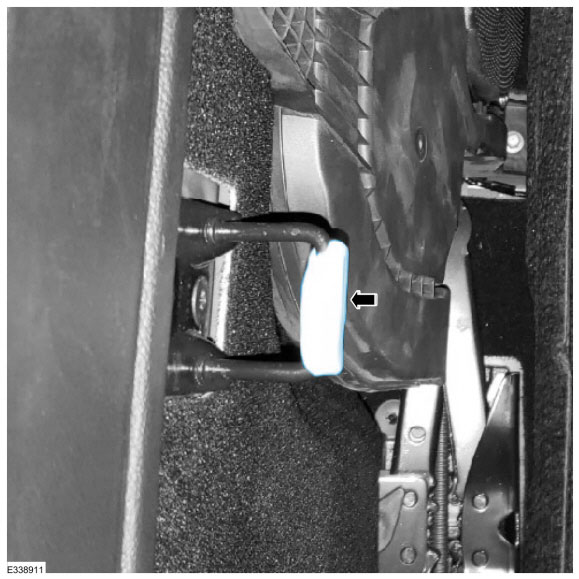
NOTE: Applying too much pressure against the rear seat backrest may compress the rear seat backrest bumpers and give a false impression in the modeling clay.
18. Lower the rear seat backrest assembly to the fold flat position and inspect the impression in the modeling clay left by the rear seat backrest latch. Is the striker visible through the modeling clay? (Figure 12)
(1). Yes – no adjustments to the rear seat backrest bumpers are necessary, however, material may be removed from the rubber bumpers to reduce seat latching efforts for customer preference, but removing too much material may result in rear seat backrest noise, vibration, and harshness (NVH) concerns.
(2). No – proceed to Step 19.
Figure 12
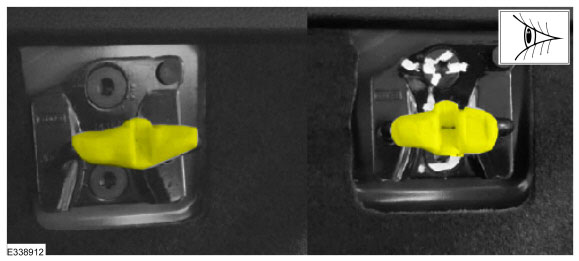
19. Using a knife or blade, cut away half of the modeling clay through the center of the impression to show a cross section of the impression left by the rear seat backrest latch. (Figure 13)
Figure 13
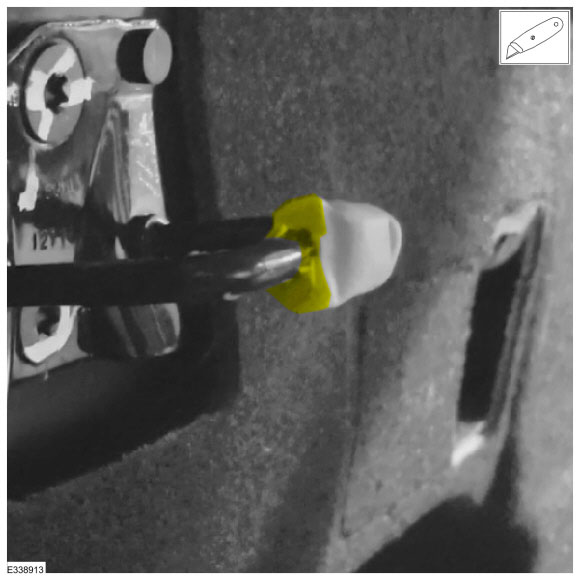
20. Using a ruler or dial caliper, measure the distance between the striker and the deepest part of the impression left in the modeling clay by the rear seat backrest latch. This measurement will be how much material is to be removed from each rear seat backrest bumper. (Figure 14)
Figure 14
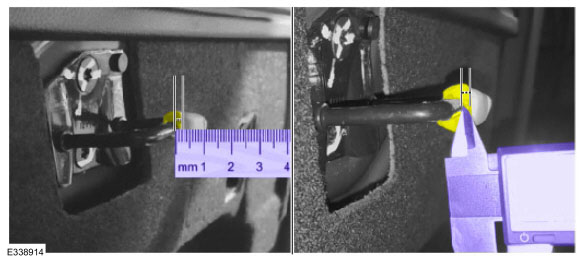
21. Per the modeling clay measurement, mark the top of each rear seat backrest bumper in 4 places, 90° apart, to indicate the amount of material to be removed.
22. Using sand paper or sanding block (80 grit is preferred), remove the measured amount of material from each rear seat backrest bumper. Make sure that any shavings are cleaned prior to returning the vehicle to the customer.
NOTE: The amount of material removed when using this measuring process should allow for reasonable latching efforts without creating any NVH related issues. Additional material may be removed to further reduce seat latching efforts for customer preference but removing too much material may result in rear seat backrest NVH concerns.
23. Remove all modeling clay from the striker.
24. Raise and latch the rear seat backrest assembly.
25. Install the rear seat outermost head restraints.
5 Affected Products
Vehicle
| MAKE | MODEL | YEAR |
FORD | RANGER | 2019-2023 |
1 Associated Document
Manufacturer Communications
23-2062
29 March 2023
MC-10233585-0001.pdf 230.214KB
 Loading...
NHTSA ID Number: 10207891
Manufacturer Communication Number: TSB 22-2026
Summary
Some 2019-2022 Ranger crew cab vehicles may exhibit excessive latching effort when returning the rear seat backrest assembly to the upright position. This may be due to oversized rear seat backrest bumpers preventing latch to striker engagement. Vehicles built on or before 04-Feb-2019 may also have excessive deadening material inside the rear seat backrest latch. To correct this condition, follow the Service Procedure to replace the rear seat backrest bumpers and adjust the striker position.
1 Associated Document
Manufacturer Communications
22-2026
03 February 2022
MC-10207891-0001.pdf 573.753KB
 Loading...
NHTSA ID Number: 10187832
Manufacturer Communication Number: TSB 21-2036
Summary
Some 2019-2021 Ranger crew cab vehicles may exhibit excessive latching effort when returning the rear set backrest assembly to the upright position. This may be due to oversized rear seat backrest bumpers preventing latch to striker engagement. Vehicles built on or before 04-Feb-2019 may also have excessive deadening material inside the rear seat backrest latch. To correct this condition, follow the Service Procedure Steps.
1 Associated Document
Manufacturer Communications
21-2036
16 February 2021
MC-10187832-0001.pdf 589.073KB
 Loading...
NHTSA ID Number: 10180338
Manufacturer Communication Number: TSB 20-2218
Summary
Some 2019-2020 Ranger Crew Cab vehicles may exhibit excessive latching effort when returning the rear seat backrest assembly to the upright position. This may be due to oversized rear seat backrest bumpers preventing latch to striker engagement. Vehicles built on or before 04-Feb-2019 may also have excessive deadening material inside the rear seat backrest latch. To correct this condition, follow the Service Procedure steps.
1 Associated Document
Manufacturer Communications
20-2218
08 September 2020
MC-10180338-0001.pdf 810.313KB
 Loading...
- The product is 3/4x7/16 BLK SpongeTape
- Easy and simple use kit
- The product is manufactured in China
- Minimum Compression
- Superior Shock Absorbing
- Model Number: JTA-1013.1350: Smooth Edge Foam Masking Tape 13mm x 50m with model number JTA-1013.1350
- Material: Foam: Made from foam material for effective masking
- Size: 13mm x 50m: Comes in a size of 13mm x 50m for various masking needs
- Recommended uses: Painting: Ideal for painting projects to protect surfaces
- Surface recommendation: Wood, Metal, Plastic: Suitable for use on wood, metal, and plastic surfaces
- 【Size of This Foam Tape】1/2 inch Wide x 1/4 inch Thick x 21 ft Long x 2 rolls. The Neoprene sponge foam tape is easy enough to customize and cut to size with scissors or blade, and bend easily and conform to any shape
- 【Strong Adhesive】The door weather stripping adopts a stronger adhesive backing which ensures the foam tape can stay in place without falling off once applied.Please note to clean and dry the surface before applying for better performance
- 【High Quality Material】The foam seal tape is made from environmental protection material, CR foam, Neoprene, which has excellent sealing and resistance to deformation feature, can be used from -50℃ to 150℃
- 【Multipulpose】The white foam weather stripping has multi functions, weather proof, oil resistance, resistant to corrosion, dust proof, shock-absorbing, anti-vibration, buffering, sealing, flame retardant, sound proof, heat insulation, anti-skidding and insulating
- 【Widely Used】The adhesive foam strips are widely used in various door seal and window insulation, furniture, electrical cabinets, cars, speakers, toys, handicrafts, sports equipments, etc
- 【ADJUSTABLE & FLEXIBLE】his package includes 2 rolls of 1 in x 3/4 in x 6.5 ft foam tape, total 13 feet long. The Neoprene sponge foam tape is easy enough to customize and cut to size with scissors or blade, and bend easily and conform to any shape.We used a high quality, ultra-strong adhesive backing that ensures this insulation foam tape stays in place indefinitely once applied. You are therefore assured that it will not peel off.
- 【MULTI-FUNCTION】You are guaranteed optimum durability every time you choose our door seal tape for your insulation needs.The closed cell foam strip is weather, oil resistance, resistant to corrosion, shock-absorbing, buffering, sealing, flame retardant, heat insulation, anti-skidding and insulating.
- 【HIGH QUALITY】The foam seal tape is made from material, CR foam, Neoprene, which has excellent sealing and resistance to deformation feature, can be used from -50℃ to 150℃.Our one sided foam insulation tape is designed for both industrial and commercial use. You can use it for anything from doors, vents, and windows, to air conditioners, pipe insulation, plumbing, hvac and more.
- 【100% SATISFACTION GUARANTEED】We are always dedicated to giving you the highest quality products, and this insulation tape is no different. If by any chance you are not completely satisfied with your purchase, please let us know, no questions asked. Click ‘Add to Cart’ now!
- 【WIDELY USED】The adhesive foam strips are widely used in various door seal and window insulation, furniture, electrical cabinets, cars, speakers, toys, handicrafts, sports equipments, etc.
- PERMANENT PRO RESULTS: Permanently attaches side moldings, trim and emblems to the interior and exterior of vehicles
- WEATHERABLE: High strength double-sided adhesive withstands weather and impact. Temperature use range is -40F to 250F
- EASY TO USE: Cut, apply, press. That's it. No tools required. Avoid mess of liquid adhesives
- SUPER CONFORMABLE: 3M VHB tape conforms to irregular and textured surfaces
- BOND WITHOUT RIVETS/SCREWS: Aircraft-grade adhesive strength allows for strong metal to metal bonding without rivets
- Car Speaker Sealing Tape Size:5/64 inch(2mm) Thick x 25/64 inch(10mm) Wide x 33ft(10M)
- Foam Tape Material: Foam tape is made of EVA .High density foam, The foam in this sponge tape is made to provide a completely airtight seal. This makes it ideal for weather stripping cabinets or Insulation tapes for wrapping pipes Sheet metal panels where an air-tight seal is required.
- Application:The single sided foam tape is widely used for doors, window, furniture, cabinets, speaker, pipes, air conditioning sealing
- Function:Weatherproof, oil resistance, resistant to corrosion, dustproof, shock-absorbing, sound insulation, anti-skidding and insulating
- Easy-to-install: Keep the paste area clean and dry before use;Determine the seal size in advance and cut to use
- 【3M Heavy-Duty Strong Tape】: Premium 3M VHB double sided mounting tape that measures 16.5ft in length, 0.98 inch in width. Strength: Holds up to 3 lbs per 2 inches of tape. The larger the adhesive area, the greater the load-bearing capacity.
- 【Flexible & Extensibility】:Crafted from acrylic foam. Super elasticity and adhesion can be extended according to your requirements without break. Say goodbye to drills, screws, and heat guns. Perfect for automotive and electronic applications.
- 【Waterproof & Temperature Resistance】:This double sided tape features a specialized adhesive composition, ensuring reliable bonding even outdoors or in damp environments. Excellent water and moisture resistance once the curing process is done. Perfect for kitchen or bathroom, can resist high temperature, heavy rain, rub.
- 【Easy to Use】:3M foam tape is easy to install, you just peel off the tape and stick it. It's easy to reposition when it's not fully compressed and repositioning will not affect the adhesion durability. The viscosity will gradually increase over time and reaches a maximum after 72 hours.
- 【Multipurpose Mounting Tape】: Small size, big purpose. The double stick tape with smooth foam on both sides provides adhesion to a variety of surfaces including glass, signs, LED and metal panels, car spoilers, door edges, body side moldings, ABS and PVC rocker panels, wheel lips, carpet fixing, wall hooks, DIY, and decoration for automobiles, windows, homes, offices. kitchen and bathroom.
- NEW ADHESIVE CRAFT: No glue spillage, No glue residue, provide you with a better experience
- 2 IN ONE ROLL PACK: This package includes 2 in one roll of 2 in x 1/4 in x 6.5 ft foam tape, total 13 ft length. The two rolls are twined together as one roll in the package. The weather strip is easy enough to customize and cut to size with scissors or blade, and bend easily and conform to any shape
- PREMIUM MATERIAL: The closed cell foam seal tape is made from environmental protection material, CR foam and Neoprene, toxic free, weather proof, oil resistance, resistant to corrosion, dust proof, shock-absorbing, anti-vibration, buffering, sealing, flame retardant, sound proof, heat insulation, anti-skidding and insulating
- UPGRADED STRONG ADHESIVE: The foam weather stripping has upgraded strong adhesive backing, waterproof and non-degumming, stick firmly. Compared with grid backing, it has no glue residue and becomes easier to peel off the backing paper
- WIDE APPLICATION: The adhesive foam strips are widely used in various door seal and window insulation, furniture, electrical cabinets, cars, boats, speakers, toys, handicrafts, sports equipments, vents, air conditioners, plumbing, hvac, etc
- PREMIUM MATERIAL: The foam seal tape is made from environmental protection material, CR foam, Neoprene, which has excellent sealing and resistance to deformation feature, toxic free, can be used from -50℃ to 150℃
- MULTIPURPOSE: The closed cell foam strip is weather proof, oil resistance, resistant to corrosion, dust proof, shock-absorbing, buffering, sealing, flame retardant, sound proof, heat insulation, anti-skidding and insulating
- WIDELY USED: The adhesive foam strips are widely used in various door seal and window insulation, furniture, electrical cabinets, cars, speakers, toys, handicrafts, sports equipments, etc
- STRONG ADHESIVE: The foam weather stripping has strong adhesive backing, waterproof and non-degumming, stick firmly, great weather stripping for doors and windows
- ADJUSTABLE & FLEXIBLE: This package includes 2 in one roll of 2 in x 1/4 in x 6.5 ft foam tape, total 13 feet long. The two rolls are twined together as one roll in the package. The Neoprene sponge foam tape is easy enough to customize and cut to size with scissors or blade, and bend easily and conform to any shape
SEOCONTENT-START
TECHNICAL SERVICE BULLETIN Crew Cab – Folding Rear Seat Backrest Assembly Excessive Latching Effort When Returning To The Upright Position 23-2062 29 March 2023 This bulletin supersedes 22-2026. Model: Ford 2019-2023 Ranger Summary This article supersedes TSB 22-2026 to update the vehicle model years affected. Issue: Some 2019-2023 Ranger crew cab vehicles may exhibit excessive latching effort when returning the rear seat backrest assembly to the upright position. This may be due to oversized rear seat backrest bumpers preventing latch to striker engagement. Vehicles built on or before 04-Feb-2019 may also have excessive deadening material inside the rear seat backrest latch. To correct this condition, follow the Service Procedure to replace the rear seat backrest bumpers and adjust the striker position. Action: Follow the Service Procedure to correct the condition on vehicles that meet all of the following criteria: • 2019-2023 Ranger • Crew cab • Excessive latching effort when returning the rear seat backrest assembly to the upright position Parts Service Part Number Quantity Description Unit of Issue Piece Quantity KB3Z-9961383-A 1 Rear Seat Back Latch 1 1 KB3Z-2161082-B 3 Bumper 1 3 W504694-S424 1 Screw 4 3 164-R4903 As Needed Flock Tape (Rotunda Part Number) Obtain Locally As Needed String – 2-Foot (60 Cm) Long Obtain Locally As Needed Modeling Clay Quantity refers to the amount of the service part number required to repair the vehicle. Unit of Issue refers to the number of individual pieces included in a service part number package. Piece Quantity refers to the total number of individual pieces required to repair the vehicle. Unit of Issue and Piece Quantity are 1 unless otherwise stated. As Needed indicates the amount of the part may vary and/or is not a whole number. Parts can be billed out as non- whole numbers, including less than 1. Warranty Status: Eligible under provisions of New Vehicle Limited Warranty (NVLW)/Service Part Warranty (SPW)/Special Service Part (SSP)/Extended Service Plan (ESP) coverage. Limits/policies/prior approvals are not altered by a TSB. NVLW/SPW/SSP/ESP coverage limits are determined by the identified causal part and verified using the OASIS part coverage tool. Labor Times Description 2019-2023 Ranger Crew Cab: Replace And Adjust Backrest Bumpers Following The Service Procedure (Do Not Use With Any Other Labor Operations) Operation No. 232062A Time 0.4 Hrs. 2019-2023 Ranger Crew Cab: Replace The Rear Seat Backrest Latch And Bumpers Includes Time To Adjust Backrest Bumpers Following The Service Procedure (Do Not Use With Any Other Labor Operations) 232062B 0.5 Hrs. Repair/Claim Coding Causal Part: 9961383 Condition Code: 42 Service Procedure 1. Check the vehicle build date. Was the vehicle built on or before 04-Feb-2019? (1). Yes – proceed to Step 2. (2). No – proceed to Step 14. 2. Release the rear seat backrest latch (Figure 1 Callout 1) and lower to the fold flat position. (Figure 1 Callout 2) Figure 1 3. Measure and cut a 2 foot (60 cm) piece of string. (Figure 2) Figure 2 CAUTION: Using metal wire can damage the seat backrest cover. Use string to avoid any damage. 4. Guide the string through the rear seat backrest release strap and double knot a loose loop. (Figure 3) Figure 3 5. Remove the rear seat backrest latch retainers. (Figure 4) Figure 4 6. Holding the string, guide the rear seat backrest latch up and out of the rear seat backrest assembly just enough to access and remove the rear seat backrest latch release strap. (Figure 5) Figure 5 7. Remove and discard the rear seat backrest latch from the rear seat backrest release strap. (Figure 6) Figure 6 8. Install the rear seat backrest release strap onto the new rear seat backrest latch. 9. Install the new rear seat backrest latch by pulling the string attached to the rear seat backrest release strap back through the seat backrest cover and guiding the rear seat backrest latch back into the rear seat backrest assembly. (Figure 5) 10. Install the rear seat backrest latch retainers. (Figure 4) (1). Tighten both retainers to 1.2 Nm (10.6 in-lb). 11. Remove the string attached to the rear seat backrest release strap. (Figure 7) Make sure to cut the string as far away from the rear seat backrest release strap as possible or damage to the release strap may occur. Figure 7 12. Remove and discard the passenger side inboard rear seat backrest bumper on the backside of the rear seat backrest assembly. (Figure 8) Figure 8 13. Cut a 1.5 inch by 1.5 inch (40 mm by 40 mm) piece of flock tape and install it over the rear seat backrest bumper retainer hole. (Figure 9) Figure 9 14. Remove only the rear seat outermost head restraints. (1). Press inward on the head restraint locks. (2). Lift upward on the head restraint. 15. Replace all 3 rear seat backrest bumpers and fasteners. Tighten to 1.6 Nm (14 lb-in) 16. Perform a drag test using a sheet of paper to determine which of the 3 rear seat backrest bumpers contacts the back of the cab first. (1). While covering one rear seat backrest bumper with a sheet of paper, raise the rear seat backrest so it is in the upright position, but not latched, and lightly tug on the paper to determine if that bumper is contacting the rear of the cab. Repeat this test on all 3 bumpers. (2). The rear seat backrest bumper that holds the paper will be considered rear seat backrest bumper X. Remember the location of rear seat backrest bumper X, as it will be used later in the procedure. (Figure 10) NOTE: If more than one seat backrest bumper is found to be contacting the rear of the cab, the bumper closest to the latch should be considered rear seat backrest bumper X. Figure 10 17. Use modeling clay to measure the position of the rear seat back rest latch relative to the striker. (1). With the rear seat backrest assembly folded to the flat position, apply modeling clay to the width of the striker. The modeling clay should be no more than 5mm thick on the forward side of the striker. (Figure 11) (2). While holding a sheet of paper over rear seat backrest bumper X, raise the rear seat backrest assembly until vertical. (3). Allow gravity to pull the rear seat backrest assembly the rest of the way against the modeling clay while lightly tugging on the paper to confirm when the rear seat backrest bumper X is against the cab. If the paper is not being held, apply very light pressure near rear seat backrest bumper X until resistance can be felt when tugging on the paper. Figure 11 NOTE: Applying too much pressure against the rear seat backrest may compress the rear seat backrest bumpers and give a false impression in the modeling clay. 18. Lower the rear seat backrest assembly to the fold flat position and inspect the impression in the modeling clay left by the rear seat backrest latch. Is the striker visible through the modeling clay? (Figure 12) (1). Yes – no adjustments to the rear seat backrest bumpers are necessary, however, material may be removed from the rubber bumpers to reduce seat latching efforts for customer preference, but removing too much material may result in rear seat backrest noise, vibration, and harshness (NVH) concerns. (2). No – proceed to Step 19. Figure 12 19. Using a knife or blade, cut away half of the modeling clay through the center of the impression to show a cross section of the impression left by the rear seat backrest latch. (Figure 13) Figure 13 20. Using a ruler or dial caliper, measure the distance between the striker and the deepest part of the impression left in the modeling clay by the rear seat backrest latch. This measurement will be how much material is to be removed from each rear seat backrest bumper. (Figure 14) Figure 14 21. Per the modeling clay measurement, mark the top of each rear seat backrest bumper in 4 places, 90° apart, to indicate the amount of material to be removed. 22. Using sand paper or sanding block (80 grit is preferred), remove the measured amount of material from each rear seat backrest bumper. Make sure that any shavings are cleaned prior to returning the vehicle to the customer. NOTE: The amount of material removed when using this measuring process should allow for reasonable latching efforts without creating any NVH related issues. Additional material may be removed to further reduce seat latching efforts for customer preference but removing too much material may result in rear seat backrest NVH concerns. 23. Remove all modeling clay from the striker. 24. Raise and latch the rear seat backrest assembly. 25. Install the rear seat outermost head restraints. © 2023 Ford Motor Company All rights reserved. NOTE: The information in Technical Service Bulletins is intended for use by trained, professional technicians with the knowledge, tools, and equipment to do the job properly and safely. It informs these technicians of conditions that may occur on some vehicles, or provides information that could assist in proper vehicle service. The procedures should not be performed by “do-it-yourselfers”. Do not assume that a condition described affects your car or truck. Contact a Ford or Lincoln dealership to determine whether the Bulletin applies to your vehicle. Warranty Policy and Extended Service Plan documentation determine Warranty and/or Extended Service Plan coverage unless stated otherwise in the TSB article. The information in this Technical Service Bulletin (TSB) was current at the time of printing. Ford Motor Company reserves the right de this information with updates. The most recent information is available through Ford Motor Company’s on-line technical resources.
SEOCONTENT-END
Last update on 2025-05-08 / Affiliate links / Images from Amazon Product Advertising API
This product presentation was made with AAWP plugin.


