| “This site contains affiliate links for which OEMDTC may be compensated” |
August 20, 2015
TO: All U.S.Ford and Lincoln
 Dealers
SUBJECT: DELIVERY HOLD – Customer Satisfaction Program 15B21 – Supplement #2
Certain 2015 Model Year Edge Vehicles
A-Pillar Water Leak Inspection and Repair
REF: DELIVERY HOLD – Customer Satisfaction Program 15B21 – Supplement #1
Dated July 8, 2015
REASON FOR THIS SUPPLEMENT
To advise dealers:
- Complete all inspections of in-stock vehicles affected by Customer Satisfaction Program
15B21 (vehicles that have not been inspected and repaired)
- In-stock vehicles that qualify for potential Company rebill or repurchase will only be considered through September 15, 2015
- Customer owned vehicles that qualify for repurchase under the Reacquired Vehicle (RAV) process will continue through the program expiration of June 30, 2016
PROGRAM TERMS
This program will be in effect through June 30, 2016. There is no mileage limit for this program.
URGENCY / EXPIRATION DATE
To prevent a water leak into the vehicle passenger compartment, dealers and customers are encouraged to have this inspection and repair performed on all affected vehicles as soon as possible.
We recommend dealers utilize their FSA VIN list name and address (available by June 22, 2015) to contact customers with affected vehicles. In addition, dealers should immediately inspect and repair any affected vehicles in their new vehicle inventory. This will help minimize the number of vehicles that may experience a water leak, which requires a more extensive repair.
This Customer Satisfaction Program has an expiration date of June 30, 2016.
AFFECTED VEHICLES
| Vehicle | Model Year | Assembly Plant | Build Dates |
| Edge | 2015 | Oakville | June 25, 2014 through April 28, 2015 |
Affected vehicles are identified in OASIS. In addition, for a list of vehicles assigned to your dealership, visit https://web.fsavinlists.dealerconnection.com. This information will be available on June 9, 2015.
REASON FOR THIS PROGRAM
In some of the affected vehicles, water may leak into the cabin through the sheet metal joint in the Apillar area directly behind the hood hinge on both sides of the vehicle. The water enters the cabin at the lower A-pillar areas behind the lower dash panel trim panels.
SERVICE ACTION
Before delivering any of the vehicles involved in this program, dealers are to inspect for signs of water damage in the vehicle which may include:
- Dampness in the following areas:
- Front and/or rear carpeting
- Floor pan sheet metal
- Dash panel and console insulation
- Lower A-pillar area
- Mildew/musty odor
If there is no evidence of water damage, dealers are to:
- Apply urethane sealer in the A-pillar seams
- Water test the sealed area after repair to confirm there is no water entry into the cabin
- Return the vehicle to the customer
If there is evidence of water damage in the vehicle interior, dealers are to:
- Follow the Wet Vehicle Repair Procedure (Attachment V) to remove and discard wet carpet and insulator padding
- Allow the vehicle and vehicle interior components to dry for three (3) days following the Wet Vehicle Repair Procedure (Attachment V)
- Evaluate the vehicle after it has dried for three (3) days for any further evidence of water damage including a mildew/musty odor:
Vehicles that DO NOT have evidence of water damage after drying for three (3) days – dealers are directed to make repairs as parts become available.
Vehicles that DO have evidence of water damage after drying for three (3) days may qualify for company repurchase. For potential repurchase consideration, follow the directions in Attachment I to open an FMC360 case requesting support from your Customer Service Manager (CSM).
Based on the unique repair requirements of this Field Service Action, dealers with technical questions or difficulties with the Wet Vehicle Repair Procedure should contact the Ford Technical Assistance Center. When contacting the Ford
 Technical Assistance Center through the existing HAR process, dealers should select the “FSA Assistance” group for expedited handling.
NOTE: Up to 3.0 hours additional actual time is authorized to assist with repairs of vehicles that do not have evidence of water damage after drying for three (3) days (Labor Operation 15B21C).
OWNER NOTIFICATION MAILING SCHEDULE
Owner Letters were mailed the week of June 15, 2015. Dealers should repair any affected vehicles that arrive at their dealerships, whether or not the customer has received a letter.
ATTACHMENTS
Attachment I: Administrative Information
Attachment II: Labor Allowances and Parts Ordering Information
Attachment III: Technical Information (Inspection and Dry Vehicle Repair)
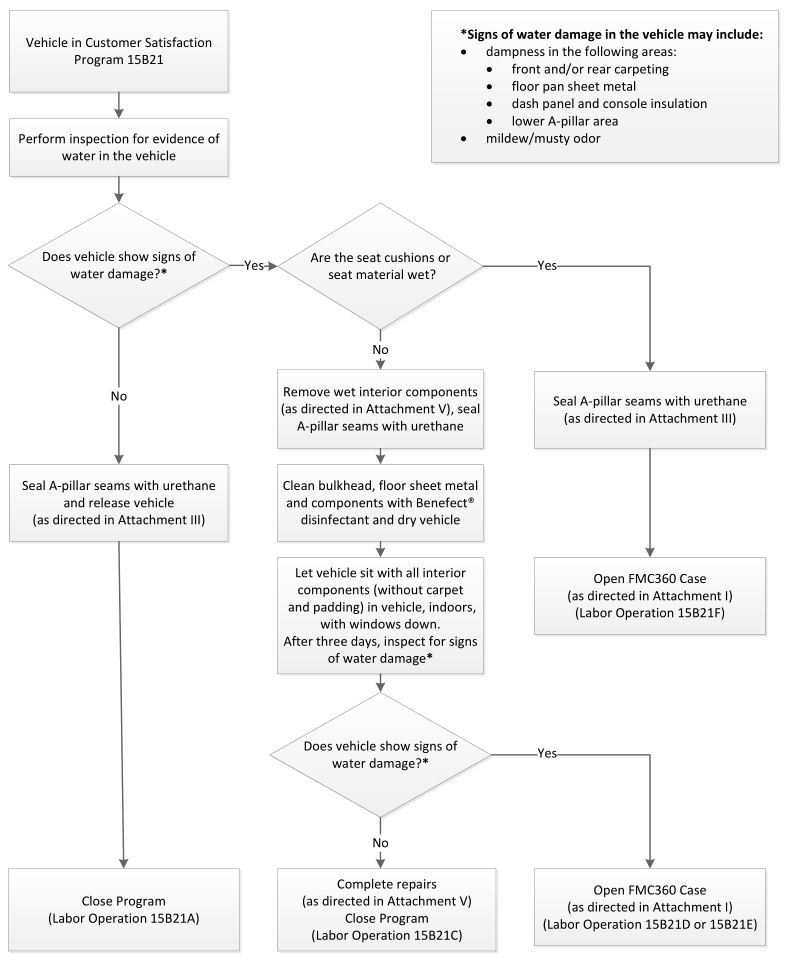
Attachment IV: Inspection and Repair Flow Chart
Attachment V: Wet Vehicle Repair Instructions
Owner Notification Letter
QUESTIONS & ASSISTANCE
For questions and assistance, contact the Special Service Support Center (SSSC) via the SSSC Web Contact Site. The SSSC Web Contact Site can be accessed through the Professional Technician Society (PTS) website using a link listed at the bottom of the OASIS VIN report screen or listed under the SSSC tab.
Customer Service Manager…………………………….1-866-631-3788
ATTACHMENT I
DELIVERY HOLD – Customer Satisfaction Program 15B21 – Supplement #2
Certain 2015 Model Year Edge Vehicles
A-Pillar Water Leak Inspection and Repair
OASIS ACTIVATED?
Yes, OASIS was activated on June 9, 2015.
FSA VIN LIST ACTIVATED?
Yes, FSA VIN list will be available through https://web.fsavinlists.dealerconnection.com on June 9, 2015. Owner names and addresses will be available by June 22, 2015.
NOTE: Your FSA VIN list may contain owner names and addresses obtained from motor vehicle registration records. The use of such motor vehicle registration data for any purpose other than in connection with this program is a violation of law in several states, provinces, and countries. Accordingly, you must limit the use of this listing to the follow-up necessary to complete this service action.
STOCK VEHICLES
Correct all affected units in your new vehicle inventory before delivery.
SOLD VEHICLES
- Owners of affected vehicles will be directed to dealers for repairs.
- Immediately contact any of your affected customers whose vehicles are not on your VIN list but are identified in OASIS. Give the customer a copy of the Owner Notification Letter (when available) and schedule a service date.
- Correct other affected vehicles identified in OASIS which are brought to your dealership.
TITLE BRANDED / SALVAGED VEHICLES
Affected title branded and salvaged vehicles are eligible for this service action.
ADDITIONAL LABOR TIME AND/OR PARTS
Based upon the complexity of the repair of a wet vehicle, dealers are authorized to claim up to 3.0 hours actual time without contacting the SSSC Web Contact Site for approval when claiming Labor Operation 15B21C. Follow the Actual Time Usage Guidelines and Service Management Responsibilities as identified in the Warranty and Policy Manual.
Submit a request to the SSSC Web Contact Site if you have aftermarket equipment or non-Ford modifications to the vehicle which might prevent the repair of the covered condition.
For aftermarket equipment or non-Ford modifications, please be prepared to provide your requested additional warranty part cost, estimated additional labor time, and dealer specific labor rate. Requests for approval after completion of the repair may not be granted. Ford
 Motor Company reserves the right to deny coverage for related damage in cases where the vehicle owner has not had this service action performed on a timely basis. Additional related damage parts are subject to random selection for return to the Ford
 Warranty Parts Analysis Center (WPAC).
OWNER REFUNDS
Refunds are not approved for this program.
RENTAL VEHICLES
Due to parts availability, if a customer’s vehicle exhibits evidence of water damage in the vehicle interior and it is necessary to remove the carpet and padding for repair assessment, Ford Motor Company will pay for up to thirty (30) days of vehicle rental. Prior approval for more than thirty (30) rental days is required from the SSSC via the SSSC Web Contact Site.
- Ford
 Motor Company will provide reimbursement for rental vehicle costs of up to $55 per day, which includes tax and damage waiver. Prior approval is also required for special rental needs and costs above $55 per day from the SSSC via the SSSC Web Contact Site .
 - The customer should be offered a like Ford
 Motor Company brand vehicle.
- In the event that a Ford
 Motor Company vehicle is not available, the customer should be provided a like non-Ford
 vehicle within a comparable vehicle rental class. Every effort should be made to move customers into a Ford
 vehicle as they become available.
 - If a vehicle is not available in the same vehicle rental class, the customer may be offered the next higher vehicle rental class.
- In the event that a Ford
POTENTIAL COMPANY REPURCHASE OF VEHICLE
Vehicles that DO have evidence of water damage after drying for three (3) days may qualify for company repurchase. For potential repurchase consideration, follow the directions below to open an FMC360 case to request support from your Customer Service Manager (CSM).
For a sold unit (normal case creation process):
- Create a “DEALER – VEHICLE CONCERN > CSM ASSISTANCE REQUEST > CLP / LINCOLN
 LOYALTY ASSISTANCE” case
 - Include the VIN and actual owner (customer) in the case
- Select symptom code “Fit/Finish/Body > Water Leak > Passenger Area > OTHER” Add Notes to the case to indicate:
- Why a buyback is being requested o Portion of the vehicle that was wet
- Steps taken to attempt repair (sealing vehicle, extent of any teardown, etc.)
Note: Quickest way to create the case for a sold unit is starting with Vehicle Search (Vehicle Search > Search then click on VIN > Create New Case)
DELIVERY HOLD – Customer Satisfaction Program 15B21 – Supplement #2
Certain 2015 Model Year Edge Vehicles
A-Pillar Water Leak Inspection and Repair
For a stock unit (modified case creation process):
- Create a “DEALER – VEHICLE CONCERN > CSM ASSISTANCE REQUEST > CLP / LINCOLN
 LOYALTY ASSISTANCE” case
 - Create case with “15B21 STOCK UNIT” as the customer o Contact Search > Last name “15B21 STOCK UNIT” and zip code “99999”
- Do not add the VIN in the VIN field. Manually select 2015 Ford
 Edge instead.
 - Select symptom code “Fit/Finish/Body > Water Leak > Passenger Area > OTHER” Add Notes to the case to indicate:
- VIN of stock unit o Why a buyback is being requested o Portion of the vehicle that was wet
- Steps taken to attempt repair (sealing vehicle, extent of any teardown, etc.)
Note: Quickest way to create the case for a stock unit is starting with Contact Search (Contact Search > Search for “15B21 STOCK UNIT” as listed above, then click on contact > Create New Case)
Dealer in-stock vehicles approved for repurchase may either be rebilled or repurchased through the RAV process by RAV Headquarters.
Note: Company repurchase of dealer stock units will only be considered through September 15, 2015. Dealers are encouraged to immediately inspect all affected in-stock vehicles.
For questions/concerns related to 15B21 please contact your assigned Customer Care Team Customer Service Manager at 866-631-3788, select option 2 and enter your dealership P&A Code.
CLAIMS PREPARATION AND SUBMISSION
- Enter claims using Direct Warranty Entry (DWE) or One Warranty Solution (OWS).
- DWE: refer to ACESII manual for claims preparation and submission information.
- OWS: when entering claims in DMS software, select claim type 31: Field Service Action. The FSA number (15B21) is the sub code.
- Refer to ACESII manual for claims preparation and submission information.
- Additional Labor– Labor Operation 15B21C Only (Wet Vehicle Repair) o Claim Related Damage and Additional Labor Time to Labor Operation 15B21C using Program Code 15B21 on a repair line that is separate from the repair line on which the FSA is claimed with the related damage flag checked.
- For additional labor time claim as actual time up to 3.0 hours using “MT15B21”.
- Additional Labor and/or Parts – All Labor Operations EXCEPT 15B21C o Additional labor (except for 15B21C) and/or parts (for all repairs) must be claimed as related damage on a separate repair line from which the FSA is claimed. Additional labor and /or parts require prior approval from the SSSC via the SSSC Web Contact Site.
- For rental vehicles:
- Claim up to $55 per day including tax and damage waiver for up to thirty (30) days pre-approved.
- Prior approval for more than thirty (30) rental days, for special rental needs and for costs above $55 per day is required from the SSSC via the SSSC Web Contact Site.
- Enter the total amount of the rental expense under Miscellaneous Expense code “Rental”.
- PROGRAM TERMS: This program will be in effect through June 30, 2016. There is no mileage limit for this program.
- Provision for Locally Procured Supplies: Include actual cost of supplies as follows:
- Sealer Application – Up to $10.00 for 3/8” O.D. tube for urethane nozzle fabrication and actual cost up to $27.00 if using locally procured urethane (and Motorcraft TA-2-B is not charged out on the repair).
- Disinfectant – Up to $20 for Benefect Disinfectant (or equivalent for wet vehicle repair).
- Submit on the same repair line as the repair.
- Program Code: 15B21
- Expense: OTHER
- Expense: Claim Actual Cost as described above.
ATTACHMENT II
DELIVERY HOLD – Customer Satisfaction Program 15B21 – Supplement #2
Certain 2015 Model Year Edge Vehicles
A-Pillar Water Leak Inspection and Repair
LABOR ALLOWANCES
NOTE: Parts are not currently available to repair all vehicles that have verified leaks. Use the labor operations provided to claim the inspection and appropriate action based on the results.
| Description | Labor Operation | Engine Application | Labor Time |
Inspect for evidence of water damage in vehicle
(includes fabricating urethane application nozzle)
| 15B21A | All Engines | 0.9 Hours |
Inspect for evidence of water damage in vehicle
(includes fabricating urethane application nozzle)
| 15B21C | 2.0L GTDI | 14.1
Hours |
| 2.7L GTDI | 14.7
Hours | ||
| 3.5L TiVCT | 14.6
Hours | ||
Inspect for evidence of water damage in vehicle
| 15B21D | All Engines | 3.6 Hours |
Inspect for evidence of water damage in vehicle
| 15B21E | 2.0L GTDI | 6.7 Hours |
| 2.7L GTDI | 7.4 Hours | ||
| 3.5L TiVCT | 7.2 Hours | ||
Inspect for evidence of water damage in vehicle
(includes fabricating urethane application nozzle)
| 15B21F | All Engines | 0.9 Hours |
PARTS REQUIREMENTS / ORDERING INFORMATION
| Part Number | Description | Quantity |
|---|---|---|
| FT4Z-5801670-A | Instrument panel insulator pad | 1 |
| FA1Z-5811165-A | Floor console insulator pad | 1 |
| FT4Z-5813001-AF | LH front carpet | 1 |
| DG9Z-19N619-A | Fresh air filter | 1 |
| E1GZ-19G317-A | Power inverter (if equipped) | 1 |
| W709980-S439 | Front seat bolts (4 bolts/package, 8 needed) | 2 |
| (Procure locally) c/ | Benefect disinfectant (or equivalent) | As required |
| TA-2-B a/b/ | Motorcraft Urethane Sealer (or equivalent) | As required |
| (Procure Locally) c/ | 3/8-inch OD x 11 inch steel brake or fuel line (for fabrication of urethane application nozzle) | As required |
Use Ford Catalog Advantage to identify specific part numbers by VIN for each of the base part numbers below Catalog Advantage to identify specific part numbers by VIN for each of the base part numbers below
| ||
| *-5813000-* | RH front carpet | 1 |
| *-5813046-* | Rear carpet | 1 |
| *-5813300-* | Carpeted floor mats (set) | 1 |
| *-14A005-* | Body wire harness | 1 |
| *-14401-* | Instrument panel wire harness | 1 |
a/ If TA-2-B is not available, dealers may substitute with either:
- b/c/3M #08367 Urethane Seam Sealer (10.5 Oz. Tube)
- b/c/Lord Fusor #803DTM Urethane Sealant (10.5 Oz. Tube)
b/ Chemicals have a shelf life/expiration date. Use only current, non-expired products for proper repair results. c/ Claim as MISC OTHER. See Attachment I (CLAIMS PREPARATION AND SUBMISSION).
The DOR/COR number for this program is 50607.
Order parts through normal order processing channels.
For questions regarding parts, contact SSSC via the SSSC Web Contact Site.
DEALER PRICE
For latest prices, refer to DOES II.
PARTS RETENTION AND RETURN
Follow the provisions of the Warranty and Policy Manual, Section 1 “WARRANTY PARTS RETENTION AND RETURN POLICIES.”
EXCESS STOCK RETURN
Excess stock returned for credit must have been purchased from Ford Customer Service Division in accordance with Policy Procedure Bulletin 4000.
ATTACHMENT III
CERTAIN 2015 MODEL YEAR EDGE VEHICLES — A-PILLAR WATER LEAK
INSPECTION AND REPAIR PROCEDURE
OVERVIEW
In some of the affected vehicles, water may leak into the cabin through the sheet metal joint in the A-pillar area directly behind the hood hinge on both sides of the vehicle. The water enters the cabin at the lower A-pillar areas behind the lower dash panel trim panels.
Before delivering any of the vehicles involved in this program, dealers are to inspect for signs of water damage in the vehicle which may include:
- Dampness in the following areas:
- Front and/or rear carpeting
- Floor pan sheet metal
- Dash panel and console insulation
- Lower A-pillar area
- Mildew/musty odor
If there is no evidence of water damage, dealers are to:
- Apply urethane sealer in the A-pillar seams
- Perform a water test to the sealed area after repair to confirm there is no water entry to the cabin
- Return the vehicle to the customer
If there is evidence of water damage in the vehicle interior, dealers are to:
- Follow the Wet Vehicle Repair Procedure (Attachment V) to remove and discard wet carpet and insulator padding
- Allow the vehicle and vehicle interior components to dry for three (3) days following the Wet Vehicle Repair Procedure (Attachment V)
- Evaluate the vehicle after it has dried for three (3) days for any further evidence of water damage including a mildew/musty odor.
- Vehicles that DO NOT have evidence of water damage after drying for three (3) days – Dealers are to make repairs as parts become available.
- Vehicles that DO have evidence of water damage after drying for three (3) days may qualify for company repurchase. For potential repurchase consideration, follow the directions in Attachment I to open an FMC360 case requesting support from your Customer Service Manager (CSM).
Based on the unique repair requirements of this Field Service Action, dealers with technical
questions or difficulties with the Wet Vehicle Repair Procedure should contact the Ford Technical Assistance Center. When contacting the Ford
 Technical Assistance Center through the existing HAR process, dealers should select the “FSA Assistance” group for expedited handling.
INSPECTION PROCEDURE
- Perform the following checks to determine if water has entered the vehicle as the result of an A-pillar leak.
- Upon entering the vehicle, note if a mildew/musty odor exists in the vehicle. A mildew/musty odor is an indication that water may have entered the cabin of the vehicle.
- Feel for wet carpet in both the front and rear footwell areas on both the driver’s and passenger’s sides of vehicle and note if any carpet is wet.
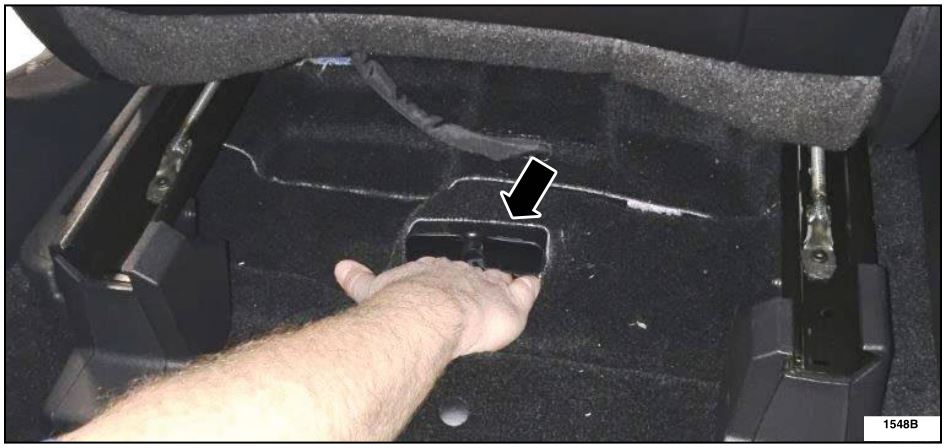
- Move both front seats to full forward position. From rear seat area, reach in through the holes in the carpet below the rear seat climate control ducts on the floor and feel for water or evidence of moisture on the floor pan sheet metal. See Figure 1.
- If the vehicle is an unsold unit, remove plastic shipping covers from the seats. For all vehicles, check the front and rear seat cushions and seat material for presence of moisture.
- – Is water or moisture present?
- YES – If the seat cushions or seat materials are wet, complete the “Upper A-pillar Sheet Metal Seam Sealing Procedure” and open an FMC360 case as directed in Attachment I.
- If moisture is present but the seats are not wet, proceed to Wet Vehicle Repair Procedure (Attachment V).
- NO – Continue to Step 2 for further inspection.
- – Is water or moisture present?
FIGURE 1
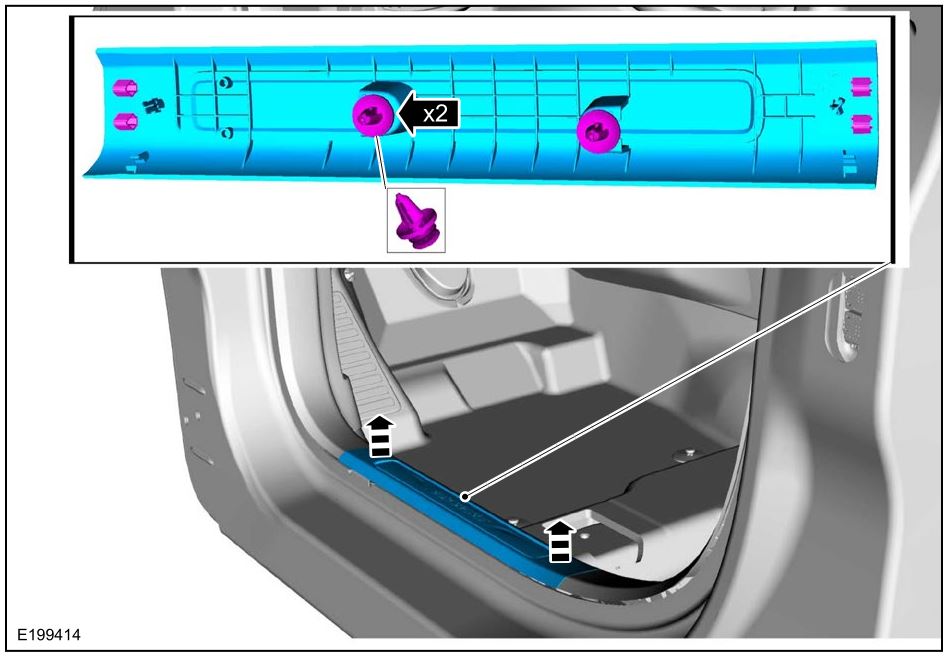
- Release the clips and remove the LH and RH sill plate. See Figure 2.
NOTE: LH side shown, RH similar.
FIGURE 2
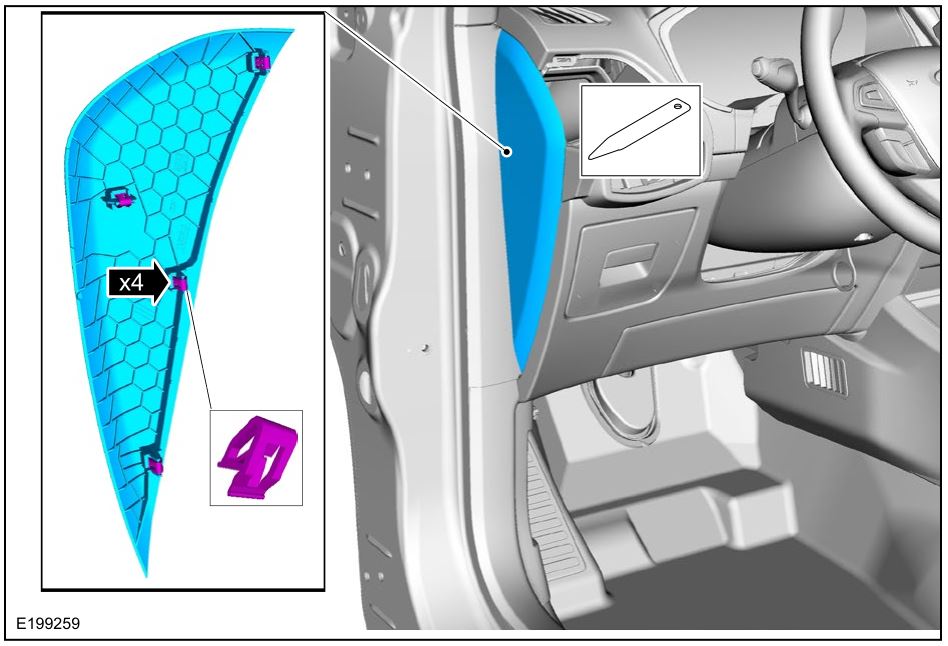
- Release the clips and remove the LH and RH side trim panel. See Figure 3.
NOTE: LH side shown, RH similar.
FIGURE 3
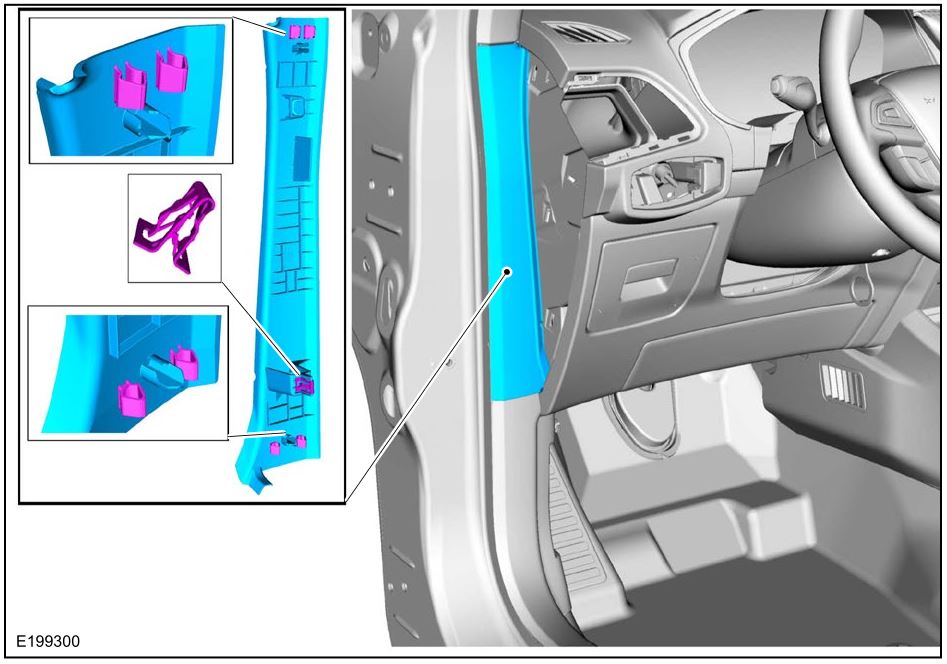
- Release the clips and remove the LH and RH cowl panel upper trim panel. See Figure 4.
NOTE: LH side shown, RH similar.
FIGURE 4
- NOTE: Use a 10mm (1/4 inch) drive socket to release the hood latch release handle clip to prevent damage to the handle.
Remove the hood latch release handle. Please follow Workshop Manual (WSM) procedures in Section 501-14.
- Remove the LH and RH lower interior cowl trim panels. See Figure 5.
NOTE: LH side shown, RH similar.
FIGURE 5
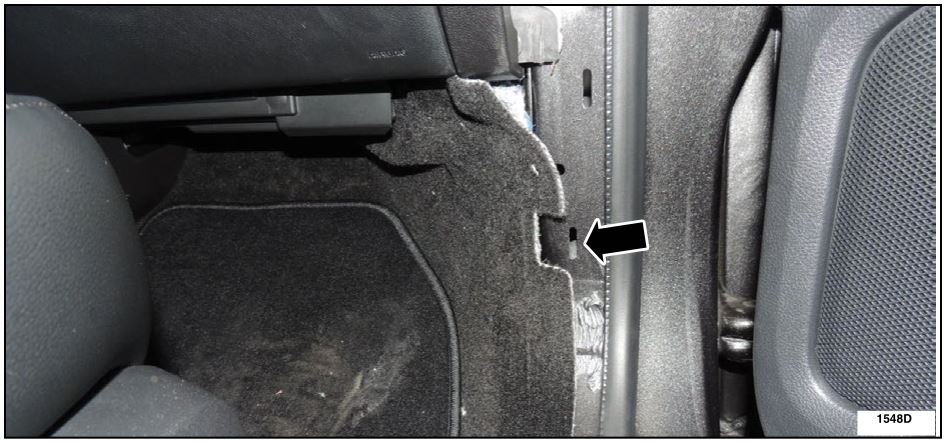
- Using a cotton swab or a piece of paper/cardboard, check for the presence of standing water and visually check for the evidence of water/dampness in the lower A-pillar on both the LH and RH sides of the vehicle through the interior cowl trim panel lower attaching clip retainer opening. See Figure 6.
- Pull back the carpet and padding on the floor next to the LH and RH A-pillar areas and check for water/dampness.
- Is standing water, moisture or a mildew/musty odor present?
- YES – Proceed to Wet Vehicle Repair Procedure (Attachment V).
- NO – The vehicle did not experience a water leak. Continue to Upper A-pillar Sheet Metal Seam Sealing Procedure to complete repairs.
- Is standing water, moisture or a mildew/musty odor present?
FIGURE 6
UPPER A-PILLAR SHEET METAL SEAM SEALING PROCEDURE
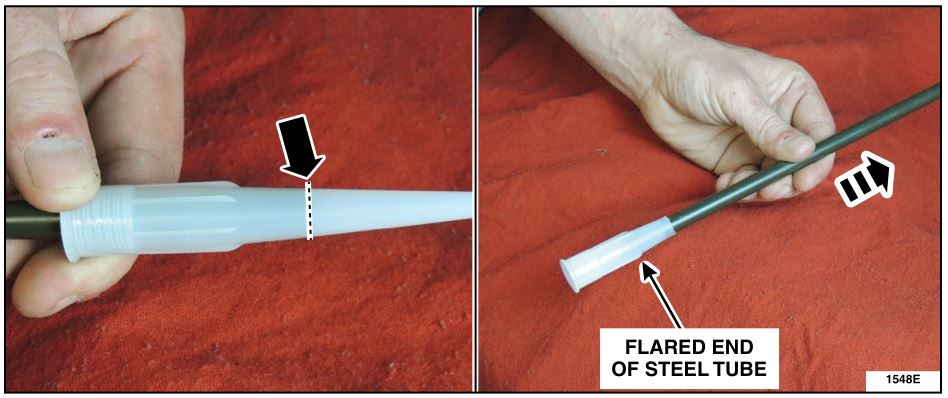
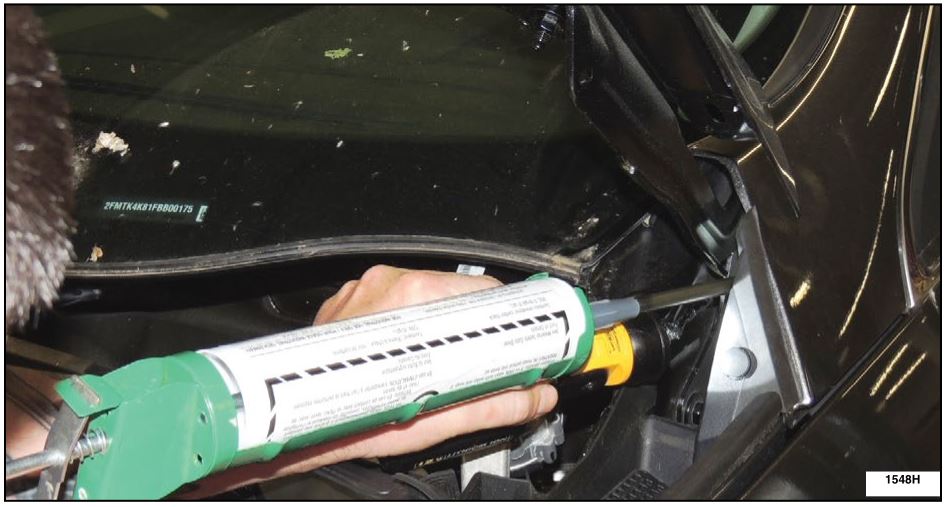
NOTE: Use Motorcraft urethane sealer TA-2-B and an application nozzle extension fabricated from 3/8” O.D. x 11” flared steel tubing to seal gaps in sheet metal. See Figure 7.
- Attach the fabricated nozzle to a tube of Motorcraft TA-2-B or equivalent seam sealer. See Figure 7.
FIGURE 7
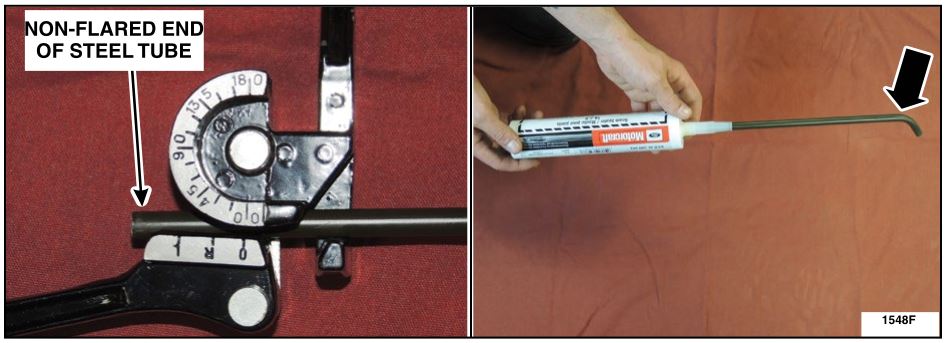
- Insert approximately 38 mm (1.5 in) of the non-flared end of the 3/8” O.D. x 11” flared steel tubing into a tube bender and bend to a 45 degree angle. See Figure 8.
FIGURE 8
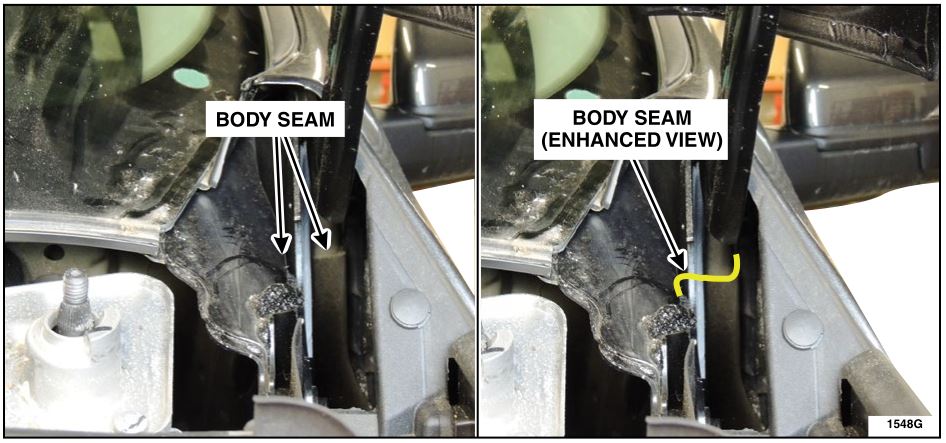
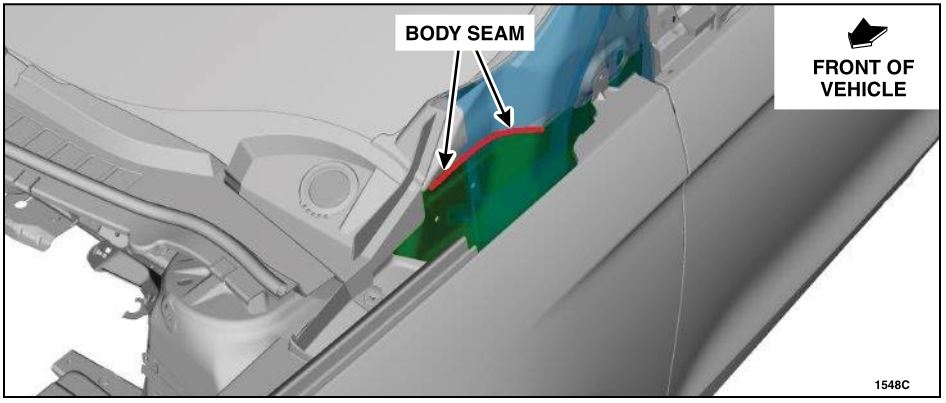
- Open the hood and locate the body seam that runs behind the hood hinge at the base of the exterior A-pillar on both the RH and LH sides of the vehicle. See Figures 9 and 10.
NOTE: Cowl removed for clarity.
FIGURE 9
- Use a flashlight to locate the body seam that runs behind and along the side of the LH and RH hood hinges. Apply a bead of sealer to the body seam. See Figures 9, 10 and 11.
NOTE: LH side shown, RH side is similar.
FIGURE 10
FIGURE 11
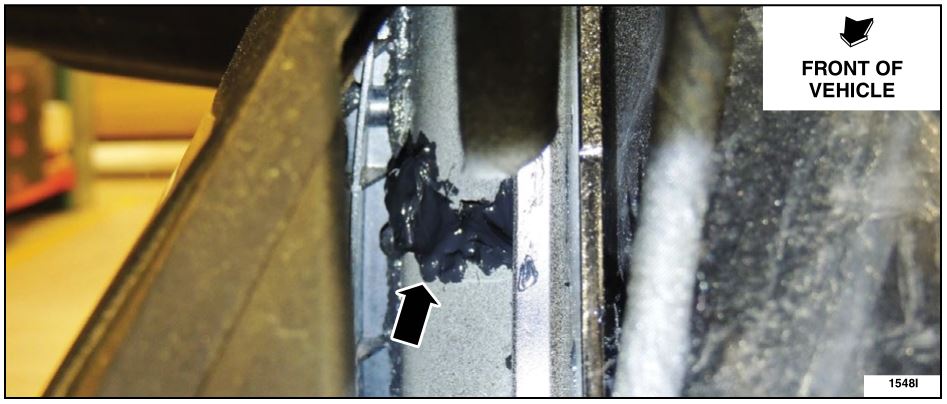
- Carefully inspect the bead of seam sealer to ensure it completely fills the gap in the sheet metal panels. Apply additional seam sealer if required to ensure a leak free joint is attained. See Figure 12.
FIGURE 12
- NOTE: Observe the LH and RH lower A-pillar area while water testing the vehicle.
NOTE: It is acceptable to water test before the seam sealer is cured providing pressurized water is not used.
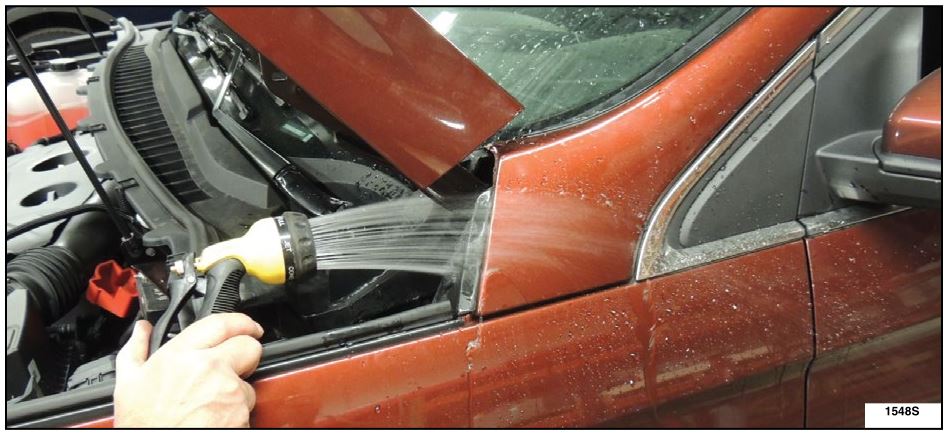
Water test the LH and RH A-pillars (See Figure 13) with gently flowing water for 5 minutes per side. Do not use pressurized water.
- If water is leaking into the A-pillar(s) dry with compressed air and apply additional seam sealer to repair area. Repeat step to verify repair as needed.
FIGURE 13
- Reassemble the vehicle by reversing the removal procedures.
- Close the hood.
- Return the vehicle to the customer.
ATTACHMENT IV
CERTAIN 2015 MODEL YEAR EDGE VEHICLES — A-PILLAR WATER LEAK
INSPECTION AND REPAIR PROCEDURE FLOWCHART
ATTACHMENT V
CERTAIN 2015 MODEL YEAR EDGE VEHICLES — A-PILLAR WATER LEAK – WET VEHICLE REPAIR INSTRUCTIONS
WET VEHICLE REPAIR INSTRUCTIONS
Based on the unique repair requirements of this Field Service Action, dealers with technical
questions or difficulties with the Wet Vehicle Repair Procedure should contact the Ford Technical Assistance Center. When contacting the Ford
 Technical Assistance Center through the existing HAR process, dealers should select the “FSA Assistance” group for expedited handling.
- Remove the following components, proceed to the appropriate WSM sections:
- Both front seats – Section 501-10A.
- Rear seat bottom cushion – Section 501-10B.
- Floor console – Section 501-12.
- Lower B-pillar trim panel – Section 501-05.
- If equipped, Direct Current/Alternating Current (DC/AC) inverter – Section 414-05.
- Release the clips and remove the LH and RH side trim panel. See Figure 1.
NOTE: LH side shown, RH similar.
FIGURE 1
- Release the clips and remove the LH and RH cowl panel upper trim panel. See Figure 2.
NOTE: LH side shown, RH similar.
FIGURE 2
- NOTE: Use a 10mm (1/4 inch) drive socket to release the hood latch release handle clip to prevent damage to the handle. Remove the hood latch release handle. Please follow WSM procedures in Section 501-14.
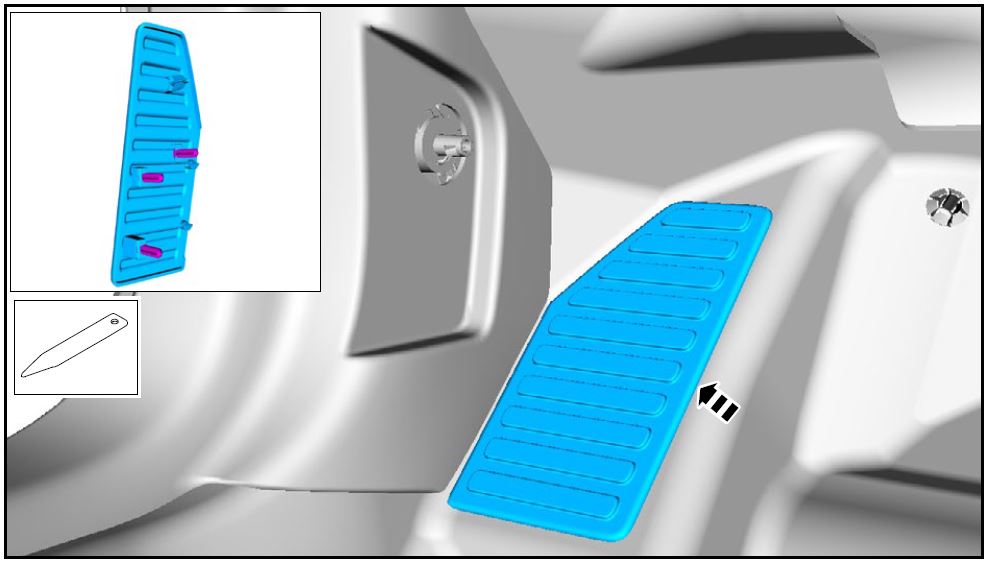
- Remove the foot rest pad. See Figure 3.
FIGURE 3
- Remove the LH and RH lower interior cowl trim panels. See Figure 4.
NOTE: LH side shown, RH similar.
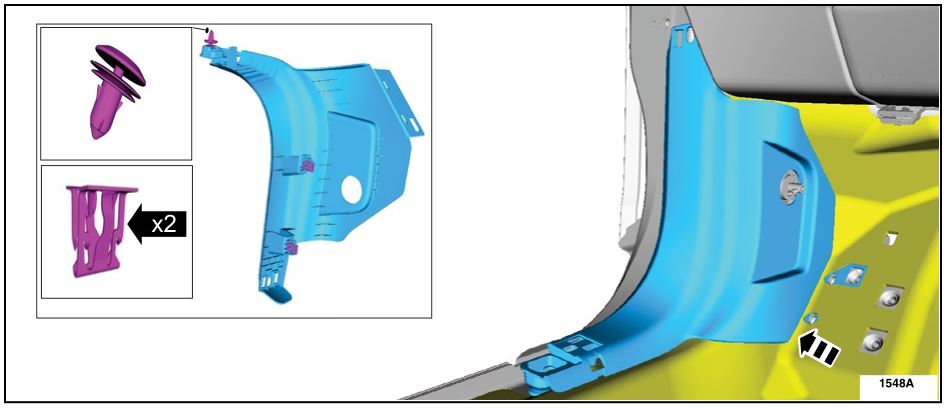
FIGURE 4
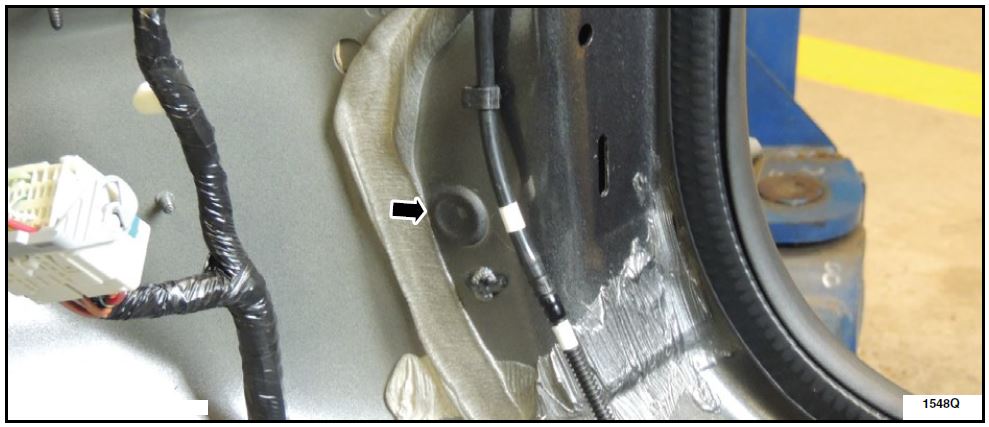
- Remove and discard the round plug on the LH and RH lower cowl side. See Figure 5.
NOTE: This hole will remain open after this repair process is complete.
NOTE: LH side shown, RH similar.
FIGURE 5
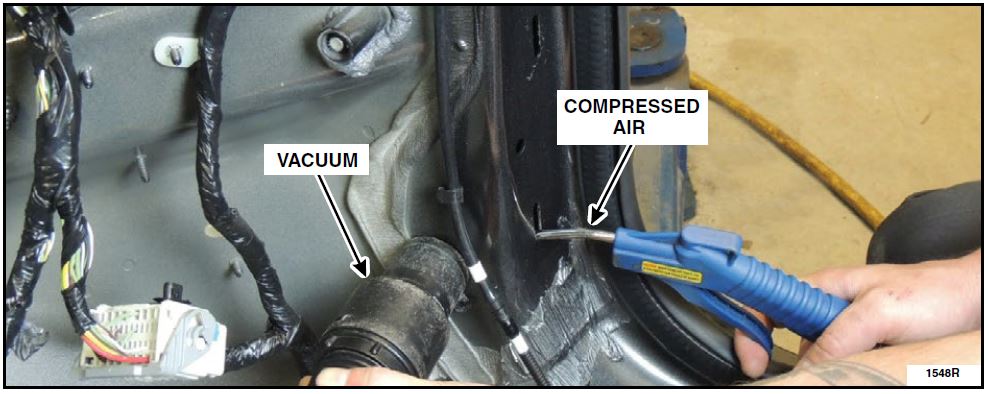
- Using an air hose nozzle and shop vacuum, remove any residual water from the lower A-pillars as shown. See Figure 6.
- Manipulation of air hose nozzle around the cavity is required for minimum of five minutes per side.
FIGURE 6
NOTE: Use Motorcraft urethane sealer TA-2-B and an application nozzle extension fabricated from 3/8” O.D. x 11” flared steel tubing to seal gaps in sheet metal. See Figure 7.
- Attach the fabricated nozzle to a tube of Motorcraft TA-2-B or equivalent seam sealer. See Figure 7.
FIGURE 7
- Insert approximately 38 mm (1.5 in) of the non-flared end of the 3/8” O.D. x 11” flared steel tubing into a tube bender and bend to a 45 degree angle. See Figure 8.
FIGURE 8
- Open the hood and locate the body seam that runs behind the hood hinge at the base of the exterior A-pillar on both the LH and RH sides of the vehicle. See Figures 9 and 10.
NOTE: Cowl removed for clarity.
FIGURE 9
- Use a flashlight to locate the body seam that runs behind and along the side of the LH and RH hood hinges. Apply a bead of sealer to the body seam. See Figures 10, 11 and 12.
NOTE: LH side shown, RH side is similar.
FIGURE 10
FIGURE 11
- Carefully inspect the bead of seam sealer to ensure it completely fills the gap in the sheet metal panels. Apply additional seam sealer if required to ensure a leak free joint is attained. See Figure 12.
FIGURE 12
- NOTE: Observe the LH and RH lower A-pillar area while water testing the vehicle.
NOTE: It is acceptable to water test before the seam sealer is cured providing pressurized water is not used. Water test the LH and RH A-pillars (See Figure 13) with gently flowing water for 5 minutes per side. Do not use pressurized water.
- If water is leaking into the A-pillar(s) dry with compressed air and apply additional seam sealer to repair area. Repeat step to verify repair as needed.
FIGURE 13
- Remove all four floor mats (discard carpeted floor mats).
- Remove the trim clips (x4) that hold the LH and RH front carpet in place.
- Remove and discard the LH and RH front carpets.
- Remove the six (6) trim clips holding the rear carpet in place.
- Remove and discard the rear carpet.
- Remove the LH and RH floor ducts.
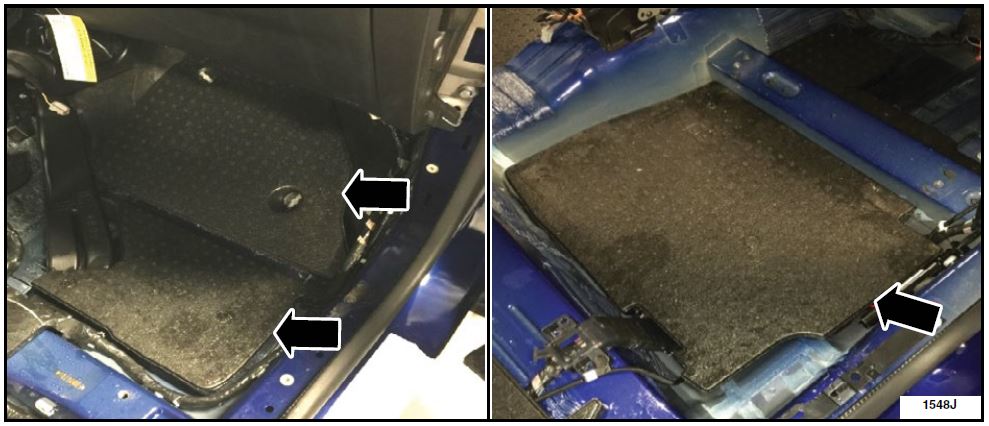
- Remove the foam spacer footpads located in the LH and RH front and rear floor panels. See Figure 14.
NOTE: RH side shown, LH side similar.
FIGURE 14
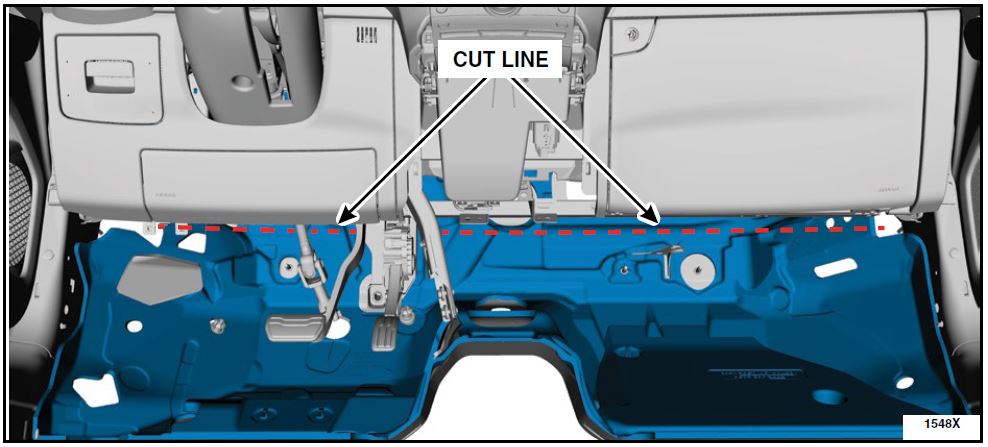
- If possible, the affected wet portion of the instrument panel insulator pad should be cut out of the vehicle without removing the instrument panel at this time, so that the vehicle can be moved within the dealership until final repairs can be performed. Discard the removed portion of the instrument panel insulator pad. See Figure 15.
- If all affected (wet) areas of the insulator pad cannot be removed, follow WSM Section 501-12 to remove the instrument panel and completely remove and discard the instrument panel insulator pad.
FIGURE 15
FIGURE 16
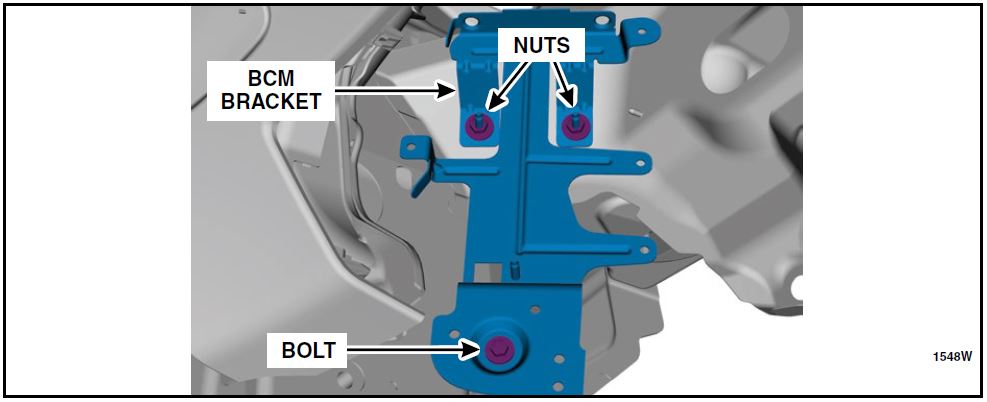
- Remove the brake pedal and bracket. Refer to WSM Section 206-06.
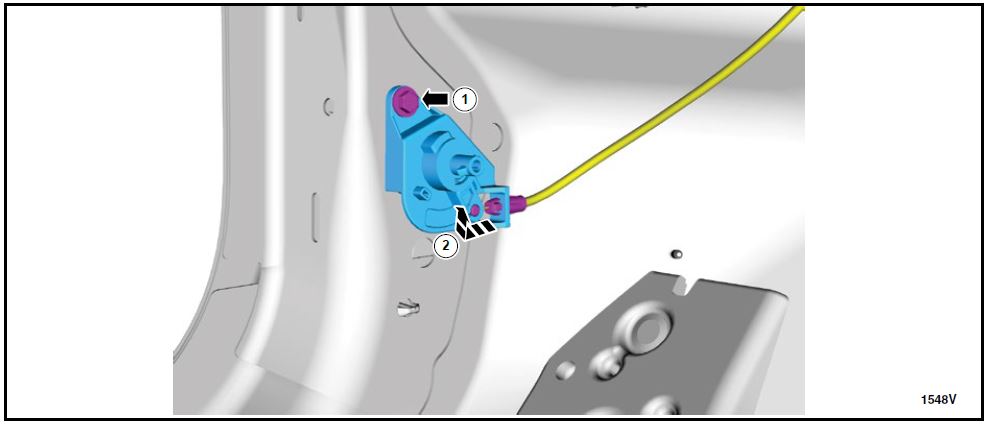
- Remove the hood latch release and disconnect the rear hood latch release cable. See Figure 17.
- Remove the bolt Torque: 80 lb.in (9 Nm)
- Disconnect the rear hood latch release cable.
FIGURE 17
- Remove and discard the console tunnel insulator pad.
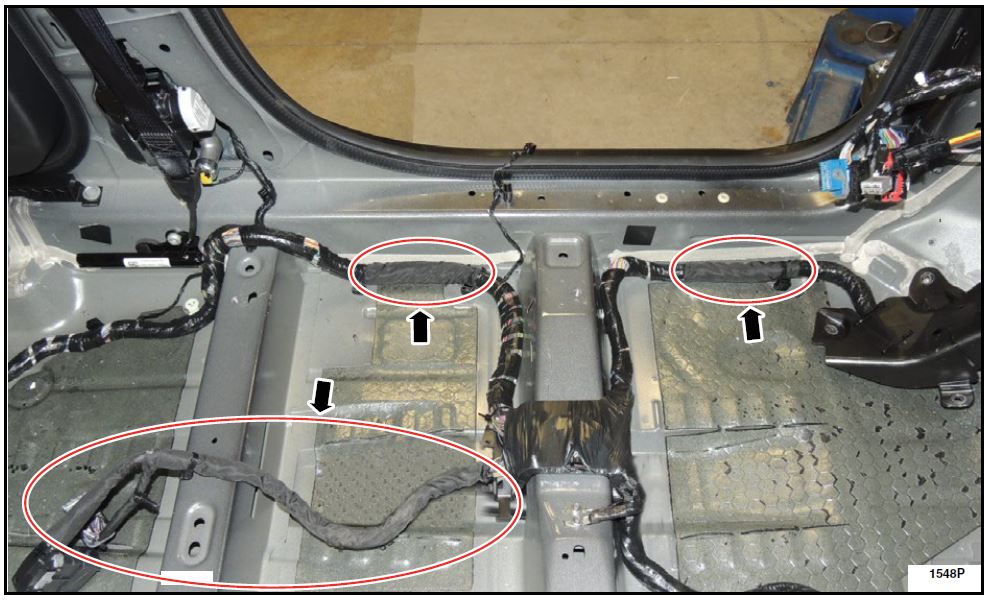
NOTE: The entire body harness will be replaced later within this procedure.
- Cut to remove and discard all fabric protective sheathing on the body wire harness at six locations (three each side). See Figure 18.
NOTE: LH side shown, RH side similar.
FIGURE 18
- Pour approximately 12 oz of Benefect disinfectant or equivalent disinfectant into either a suitable pressurized sprayer or trigger/pump sprayer.
- Spray the inside/outside of the LH and RH floor ducts with the disinfectant spray. Rinse them off with water and set aside to dry.
- Spray the foam spacer footpads with the disinfectant spray. Set aside to dry.
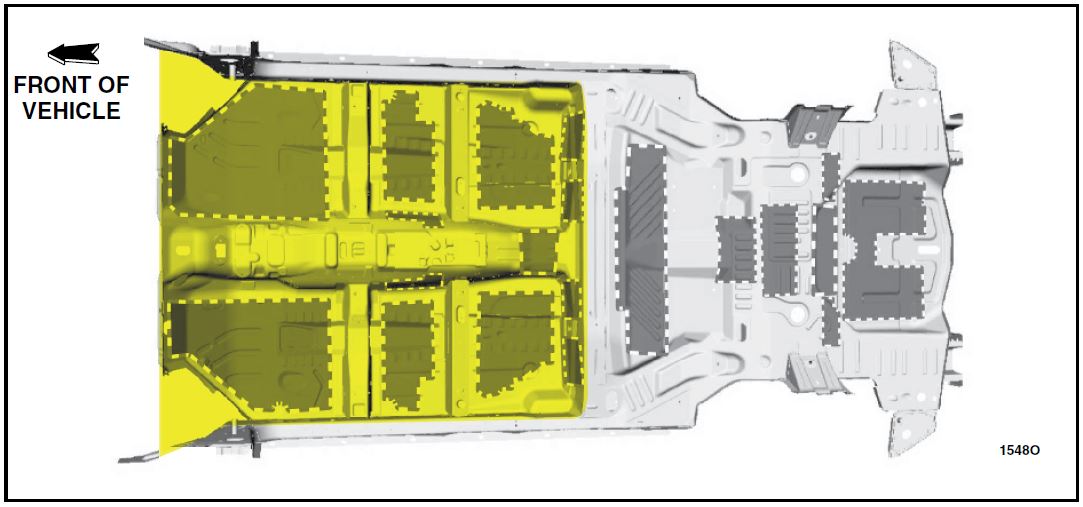
- Cover all electrical connectors and electrical components in the spray area shown in Figure 19.
IMPORTANT!: Cover any electrical connectors and components before spraying the vehicle
interior. (e.g Restraints Control Module (RCM), Body Control Module (BCM),
seatbelt pretensioners, electrical connectors and other electric modules that may
be in the spray path). Wiring can be sprayed.
- Spray the bulkhead and front/rear floor pan areas within the vehicle using the disinfectant spray (highlighted area). See Figure 19.
- Also lightly spray inside the LH and RH lower A-pillar. See Figure 6.
FIGURE 19
- Dry vehicle and place all removed interior components (less the discarded carpet and carpeted floor mats, discarded insulator padding and discarded wiring harness fabric protective sheathing) inside the vehicle. Store the vehicle indoors with windows down for 3 days.
- After three days, reassess the vehicle for mildew/musty smell.
- Does the vehicle have water damage?
- No – Continue to Step 37.
- Yes – Do not proceed further. Vehicles that DO have evidence of water damage after three (3) days may qualify for company repurchase. For potential repurchase consideration, follow the directions in Attachment I to open an FMC360 case requesting support from your Customer Service Manager (CSM).
NOTE: Vehicles being repurchased must be partially reassembled for transport. At a minimum, the following components should be re-installed and functional:
- Instrument panel
- Driver and passenger seats
- Console (selector lever and parking brake)
- Interior trim and other miscellaneous parts should be placed in the rear cargo area.
- Remove the following components (if not removed currently), proceed to the appropriate WSM sections:
- Instrument panel – Section 501-12.
- Instrument panel Upper Section – Section 501-12.
- C-Pillar Trim Panel – Section 501-05.
- Rear Bumper Cover – Section 501-19.
- Audio Digital Signal Processing (DSP) module and subwoofer speaker – 415-00C.
- Restraints Control Module (RCM) – 501-20B.
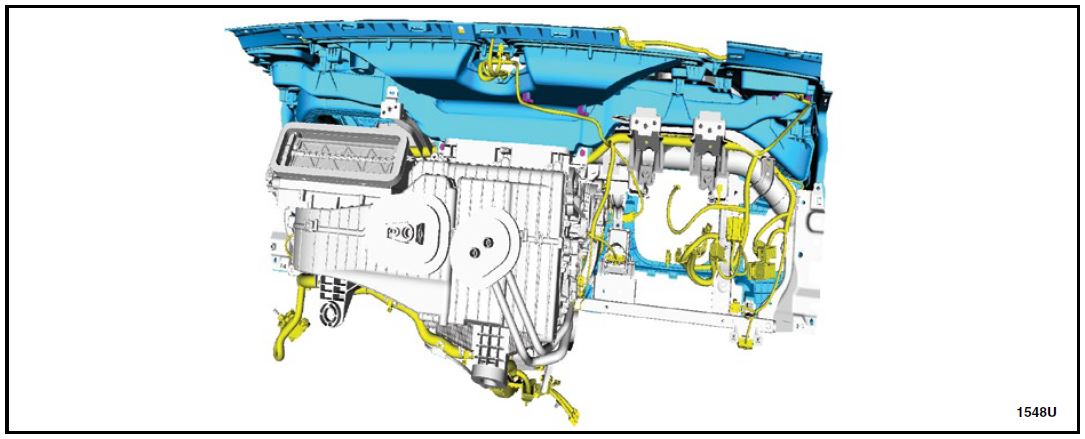
- Remove and discard the instrument panel wire harness. See Figure 20.
FIGURE 20
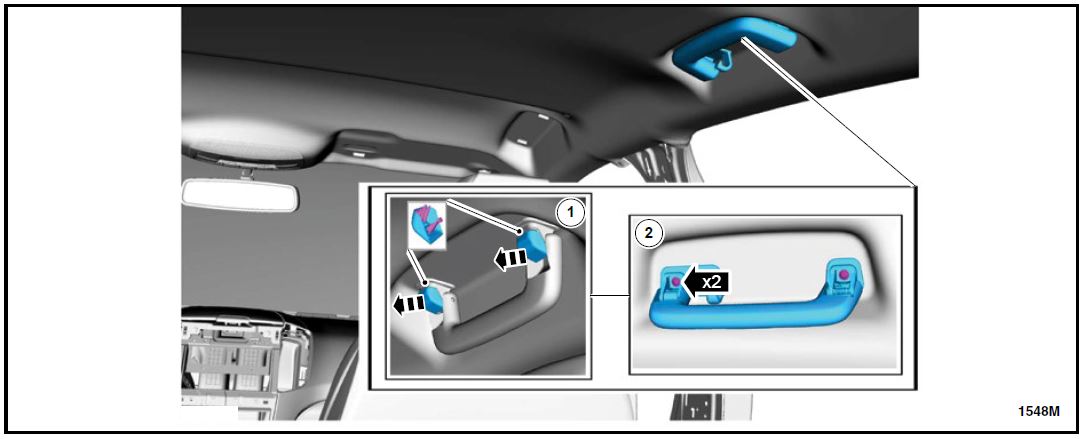
- Remove the LH and RH rear grab handles. See Figure 21.
- Remove the bolt covers.
- Remove the retainers and the rear grab handles.
NOTE: RH side shown, LH side similar.
FIGURE 21
FIGURE 22
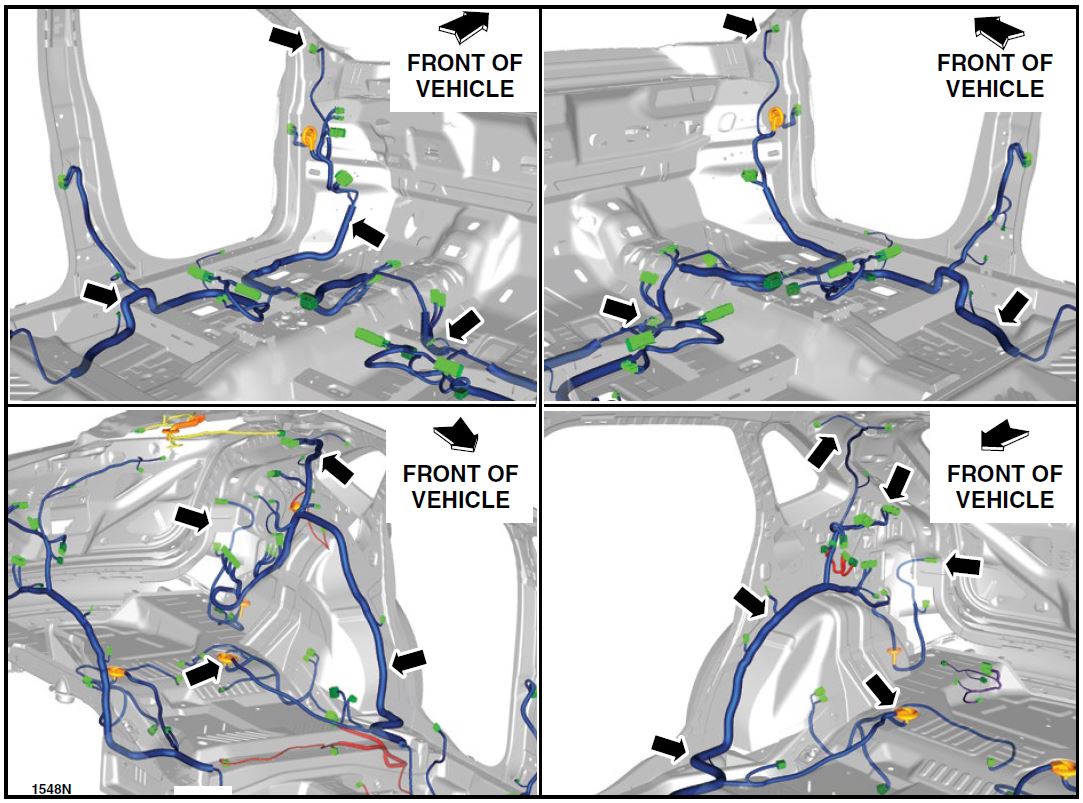
- Remove and discard the vehicle body harness (14A005 – harness – blue, connectors – green). See Figure 23.
FIGURE 23
- Reassemble the vehicle using WSM and reversing the removal procedure with the following:
- New instrument panel to bulkhead insulator pad and floor console insulator pad.
- New instrument panel wire harness.
- New body wire harness.
- New DC/AC inverter (if equipped).
- New floor carpet.
- New carpeted floor mats.
- New cabin air filter.
June 2015
Customer Satisfaction Program 15B21
Programa de satisfacción del cliente 15B21
Mr. John Sample
123 Main Street
Anywhere, USA 12345
Your Vehicle Identification Number (VIN): 12345678901234567
At Ford Motor Company, we are committed not only to building high quality, dependable products, but also to building a community of happy, satisfied customers. To demonstrate that commitment, we are providing a no-charge Customer Satisfaction Program for your vehicle with the VIN shown above.
| Why are you receiving this notice? | On your vehicle water may leak into the passenger compartment in the front foot well areas. |
| What will Ford and your dealer do? | In the interest of customer satisfaction, Ford Motor Company has authorized your dealer to inspect your vehicle and to make any repairs as required. These repairs will be made free of charge (parts and labor) under the terms of this program.
This Customer Satisfaction Program will be in effect until June 30, 2016 regardless of mileage. Coverage is automatically transferred to subsequent owners. |
| How long will it take? | The time needed for this inspection and repair is less than one-half day. However, should a water leak be found your dealer may need your vehicle for a longer period of time. |
| What should you do? | To help avoid damage that may be caused by a water leak into the interior of your vehicle, please avoid car washes and exposure to rain or water until you have this service completed. If possible, park in a garage or covered area when rain is expected. Please call your dealer without delay and request a service date for Customer Satisfaction Program 15B21 as soon as possible. Provide the dealer with the Vehicle Identification Number (VIN) of your vehicle. The VIN is printed near your name at the beginning of this letter.
If you do not already have a servicing dealer, you can access www.Fordowner.com for dealer addresses, maps, and driving instructions. Ford Motor Company wants you to have this service action completed on your vehicle. The vehicle owner is responsible for making arrangements to have the work completed. Ford Motor Company can deny coverage for any vehicle damage that may result from the failure to have this service action performed on a timely basis. Therefore, please have this service action performed as soon as possible. |
| Do you need a rental vehicle? | If your dealer identifies water/dampness or a musty odor in your vehicle interior and needs your vehicle overnight, your dealer is authorized to provide a rental vehicle for your personal transportation at no charge (except for fuel, insurance, and tax) while your vehicle is at the dealership for repairs. Please see your dealer for guidelines and limitations. |
| What if you no longer own this vehicle? | If you no longer own this vehicle, and have an address for the current owner, please forward this letter to the new owner.You received this notice because our records, which are based primarily on state registration and title data, indicate that you are the current owner. |
| Can we assist you further? | If you have difficulties getting your vehicle repaired promptly and without charge, please contact your dealership’s Service Manager for assistance.
RETAIL OWNERS: If you still have concerns, please contact the Ford Motor Company Customer Relationship Center at 1-866-436-7332 and one of our representatives will be happy to assist you. For the hearing impaired call 1800-232-5952 (TDD). Representatives are available Monday through Friday: 8:00AM – 8:00PM (Eastern Time). If you wish to contact us through the Internet, our address is: www.Fordowner.com. Si necesita ayuda o tiene alguna pregunta, por favor llame al Centro de Relación con Clientes al 1-866-436-7332 y presione 2 para Español. FLEET OWNERS: If you still have concerns, please contact the Fleet Customer Information Center at 1-800-34-FLEET, Option #3 and one of our representatives will be happy to assist you. Representatives are available Monday through Friday: 8:00AM – 8:00PM (Eastern Time). Or you may contact us through the Internet at www.fleet.ford.com. |
Thank you for your attention to this important matter.
Ford Customer Service Division
 Loading...
