| “This site contains affiliate links for which OEMDTC may be compensated” |
| BODY CREAK/POP NOISE OVER BUMPS – RIGHT FRONT SUBFRAME BOLT AREA – BUILT ON OR BEFORE 1/31/2016 |
FORD : : | 2016 Explorer |
ISSUE:
Some 2016 Explorer vehicles built on or before 1/31/2016 may exhibit a pop or creak noise from the right front mounting bolt of the front subframe.
This condition may be due to a mispositioned weld between the barrel nut and the subframe mounting bracket.
ACTION:
Follow the Service Procedure steps to correct the condition.
SERVICE PROCEDURE
The steps below will add an additional weld to eliminate the possibility of the barrel nut creak/pop noise.
- Attach Rotunda Wireless Chassis Ears JSP97202 or equivalent. Does diagnosis with chassis ears indicate the noise is originating from the right front mounting bolt of the front subframe?
- Yes – proceed to Step 2.
- No – this article does not apply. Refer to Workshop Manual (WSM), Section 100-04 for normal diagnostics.
- Disconnect the negative battery cable. Refer to WSM, Section 414-01.
- Remove the right front wheel and tire assembly. Refer to WSM, Section 204-04.
- Remove the right side fender splash shield. Refer to WSM, Section 501-02.
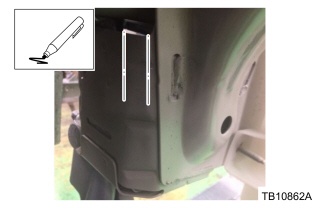
- Locate the front subframe bolt mounting tower bracket on the right side frame member and mark 2 cut lines approximately 63 mm (2.50 in) long as shown. (Figure 1)
Figure 1
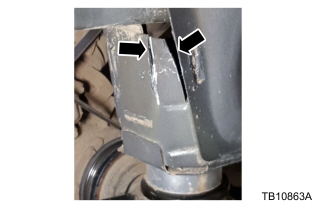
- Using an abrasive cut off wheel, cut the bracket sheet metal along the marked lines. (Figure 2)
- Make sure to only cut through the outer layer.
Figure 2
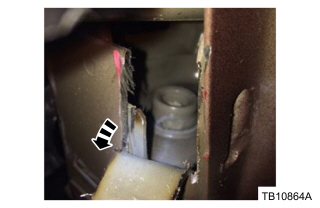
- Position the sheet metal out of the way to allow access to the barrel nut. (Figure 3)
Figure 3
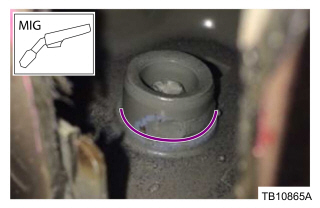
- Using a MIG welder, weld the barrel nut to the bracket along the seam. The weld bead should span as far along the seam as possible. (Figure 4)
Figure 4
- Position the sheet metal back to the original location.
- Prepare the area for welding by grinding and cleaning.
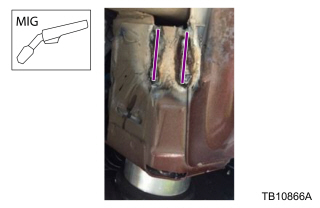
- Using a MIG welder, weld the previously cut sheet metal to repair the bracket. (Figure 5)
Figure 5
- Clean the welded area to prepare it for corrosion protection.
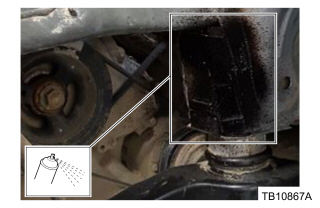
- Apply ValuGard Premium Undercoating, or equivalent corrosion protection to the repaired cut line area. Refer to WSM, Section 501-25. (Figure 6)
Figure 6
- Apply ValuGard Rust Inhibitor, or equivalent to the welded barrel nut. Refer to WSM, Section 501-25.
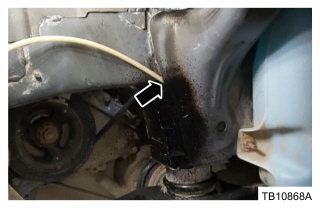
- Use an appropriate spray nozzle to access the cavity. (Figure 7)
Figure 7
- Install the right side fender splash shield. Refer to WSM, Section 501-02.
- Install the right front wheel and tire assembly. Refer to WSM, Section 204-04.
- Reconnect the negative battery cable. Refer to WSM, Section 414-01.
| Obtain Locally | |
| Part Number | Part Description |
|---|---|
| VG104, VG104A | ValuGard Rust Inhibitor |
| VG101, VG101A | ValuGard Premium Undercoating |
