| “This site contains affiliate links for which OEMDTC may be compensated” |
NHTSA ID Number: 10183755
Manufacturer Communication Number: 14R02-S1
Summary
Description
2 Affected Products
Vehicle
| MAKE | MODEL | YEAR |
FORD | EDGE | 2007-2008 |
April 28, 2016
TO: All U.S. Ford and Lincoln
 Dealers
SUBJECT: Regional Program 14R02 – Supplement #1
Certain 2007-2008 Model Year Edge and MKX Vehicles Not Covered Under Safety Recall 14S22
Fuel Tank Corrosion Inspection and Repair
REF: Safety Recall 14S22 – Supplement #2 Dated September 21, 2015
New! REASON FOR THIS SUPPLEMENT
- Owner mailing: Owner Letters will be mailed the week of June 6, 2016. Additionally, the deadline for customer refunds has been extended to October 7, 2016.
- Field data gathering: Sufficient field data has been collected. Images of corroded fuel tanks no longer need to be submitted for review. Additionally, repairs dated May 5, 2016, and later that include labor operation 14R02D for SSSC Image Submission will not be accepted.
- Rental vehicles: Dealers are now pre-approved for up to five days of vehicle rental.
AFFECTED VEHICLES
(Not registered in corrosion states covered under Safety Recall 14S22)
| Vehicle | Model Year | Assembly Plant | Build Dates |
| Edge | 2007-2008 | Oakville | June 15, 2006 through September 22, 2008 |
| MKX | 2007-2008 | Oakville | June 20, 2006 through September 22, 2008 |
Affected vehicles are identified in OASIS and FSA VIN Lists.
REASON FOR THIS PROGRAM
In some of the affected vehicles that are operated in high-corrosion environments associated with road salt use, moisture and salt may become trapped under the fuel tank mounting reinforcement brackets at the four corners where the fuel tank is attached to the vehicle. Over time, corrosion under these reinforcement brackets can spread to the fuel tank which can result in a fuel leak. A fuel leak in the presence of an ignition source may result in a fire.
Owners that operate their vehicle in a corrosive environment (e.g., where road salt is used in winter months) or have concerns about their fuel tank are eligible for a repair under this Regional Program.
SERVICE ACTION
Upon customer request, dealers are to remove and inspect the fuel tank for corrosion. Based on the results of the inspection, dealers will either clean and treat or replace the fuel tank. This service must be performed at no charge to the vehicle owner.
New! OWNER NOTIFICATION MAILING SCHEDULE
Owner Letters are expected to be mailed the week of June 6, 2016. Owners will be instructed to schedule a service appointment without delay if their vehicle exhibits symptoms associated with a fuel tank leak. If not evident, owners may still request the remedy if they operate their vehicle in corrosive environments associated with road salt use or have concerns with the fuel tank on their vehicle.
New! ATTACHMENTS
Attachment I: Administrative Information
Attachment II: Labor Allowances and Parts Ordering Information
Attachment III: Technical Information
Owner Notification Letters
QUESTIONS & ASSISTANCE
For questions and assistance, contact the Special Service Support Center (SSSC) via the SSSC Web Contact Site. The SSSC Web Contact Site can be accessed through the Professional Technician Society (PTS) website using the SSSC link listed at the bottom of the OASIS VIN report screen or listed under the SSSC tab.
Sincerely,
Michael A. Berardi
ATTACHMENT I
Regional Program 14R02 – Supplement #1
Certain 2007-2008 Model Year Edge and MKX Vehicles Not Covered Under Safety Recall 14S22
Fuel Tank Corrosion Inspection and Repair
OASIS ACTIVATION
OASIS will be activated on December 15, 2015
FSA VIN LISTS ACTIVATION
FSA VIN Lists will not be activated for this service action.
STOCK VEHICLES
Use OASIS to identify any affected vehicles in your used vehicle inventory.
SOLD VEHICLES
Owners of affected vehicles will be directed to contact their dealer for repairs if their vehicle exhibits symptoms associated with fuel tank leaks, if they operate their vehicle in corrosive environments associated with road salt use, or if they have concerns with the fuel tank on their vehicle.
TITLE BRANDED / SALVAGED VEHICLES
Affected title branded and salvaged vehicles are eligible for this service action.
ADDITIONAL LABOR TIME AND/OR PARTS
Submit a request to the SSSC Web Contact Site prior to the repair if you have any of the following:
- Damage that you believe was caused by the covered condition.
- A condition that requires additional labor and/or parts to complete the repair.
- Aftermarket equipment or non-Ford
 modifications to the vehicle which might prevent the repair of the covered condition.
Requests for approval after completion of the repair may not be granted. Ford Motor Company reserves the right to deny coverage for related damage in cases where the vehicle owner has not had this repair performed on a timely basis. Additional related damage parts are subject to random selection for return to the Ford
 Warranty Parts Analysis Center (WPAC).
New! OWNER REFUNDS
- Ford
 Motor Company is offering a refund for owner-paid repairs covered by this program if the repair was performed before the date of the Owner Notification Letter. This refund offer expires October 7, 2016.
 - Dealers are also pre-approved to refund owner-paid emergency repairs that were performed away from an authorized servicing dealer after the date of the Owner Notification Letter. There is no expiration date for emergency repair refunds. Non-covered repairs, or those judged by Ford
 to be excessive, will not be reimbursed.
 - Refunds will only be provided for the cost associated with repair or replacement of the fuel tank due to a leak caused by corrosion.
New! RENTAL VEHICLES
If a customer’s vehicle requires replacement of the fuel tank and it is necessary to order parts, dealers are authorized to provide the customers up to five days of vehicle rental. The daily rate can include applicable taxes but must not exceed $55.00. Rentals will only be reimbursed for the day(s) the vehicle is at the dealership for part replacement. Prior approval for more than five rental days is required from the SSSC via the SSSC Web Contact Site.
CLAIMS PREPARATION AND SUBMISSION
- Enter claims using Direct Warranty Entry (DWE) or One Warranty Solution (OWS).
- DWE: refer to ACESII manual for claims preparation and submission information.
- OWS: when entering claims in DMS software, select claim type 31: Field Service Action. The FSA number (14R02) is the sub code.
- Additional labor and/or parts must be claimed as related damage on a separate repair line from which the FSA is claimed. Additional labor and/or parts require prior approval from the SSSC via the SSSC Web Contact Site.
- Submit refunds on a separate repair line.
- Program Code: 14R02 – Misc. Expense: ADMIN
- Misc. Expense: REFUND – Misc. Expense: 0.2 Hrs.
- Multiple refunds should be submitted on one repair line and the invoice details for each repair should be detailed in the comments section of the claim.
- Claim up to $55.00 per day for customer rental vehicles. Enter the total amount of the rental expense under Miscellaneous Expense code “Rental”.
- Provision for Locally Obtained Supplies: Valugard VG-101A rust inhibitor aerosol or Daubert NOX RUST 7703-W aerosol. Submit on the same line as the repair.
- Program Code: 14R02 o Expense: OTHER o Misc. Expense: Claim up to $8.00
ATTACHMENT II
Regional Program 14R02 – Supplement #1
Certain 2007-2008 Model Year Edge and MKX Vehicles Not Covered Under Safety Recall 14S22
Fuel Tank Corrosion Inspection and Repair
LABOR ALLOWANCES
| Description | Vehicle Type | Labor Operation | Labor Time |
| Remove, Clean, and Treat Fuel Tank Includes inspection (pass). | FWD vehicles | 14R02B | 1.7 Hours |
| Remove, Clean, and Treat Fuel Tank Includes inspection (pass). | AWD vehicles | 2.0 Hours | |
| Remove and Replace Fuel Tank
Includes inspection (fail) and transfer of parts. | FWD vehicles | 14R02C | 1.6 Hours |
| Remove and Replace Fuel Tank
Includes inspection (fail) and transfer of parts. | AWD vehicles | 2.0 Hours |
PARTS REQUIREMENTS / ORDERING INFORMATION
| Part Name | Order Quantity | Part Number |
| FWD vehicles | ||
| Fuel tank assembly (replace only if inspection failed) | 1 | AT4Z-9002-DCP |
| Fuel pump o-ring (replace only if inspection failed) | 1 | 4L3Z-9276-AA |
| Fuel tank bolts (4/package, 4 needed) | 1 | W713928-S438 |
| Fuel tank to bracket bolts (4/package, 4 needed) | 1 | W506023-S439 |
| AWD vehicles | ||
| Fuel tank assembly (replace only if inspection failed) | 1 | AT4Z-9002-CCP |
| Fuel pump o-ring (replace only if inspection failed) | 1 | 4L3Z-9276-AA |
| Fuel tank bolts (4/package, 4 needed) | 1 | W713928-S438 |
| Fuel tank to bracket bolts (4/package, 4 needed) | 1 | W506023-S439 |
| Rear driveshaft flange bolts (4/package, 4 needed) | 1 | W711918-S439 |
| Driveshaft center support bearing nuts (4/package, 4 needed) | 1 | W520113-S440 |
| Additional materials for fuel tank anti-corrosion treatment | ||
| Valugard rust inhibitor aerosol (obtain from www.valugard.net) | Claim anticorrosion treatment as MISC OTHER | VG-101A |
| – or – | ||
| Daubert NOX RUST aerosol (obtain from www.daubertchemical.com) | 7703-W | |
| Motorcraft metal brake parts cleaner (or equivalent) | 1 | PM-4-A |
| PM-4-B | ||
|
|
The DOR/COR number for this program is 51016.
Order your parts requirements through normal order processing channels.
DEALER PRICE
For latest prices, refer to DOES II.
PARTS RETENTION AND RETURN
Follow the provisions of the Warranty and Policy Manual, Section 1 “WARRANTY PARTS RETENTION AND RETURN POLICIES.”
EXCESS STOCK RETURN
Excess stock returned for credit must have been purchased from Ford Customer Service Division in accordance with Policy Procedure Bulletin 4000.
ATTACHMENT III
CERTAIN 2007 THROUGH 2008 MODEL YEAR EDGE AND MKX VEHICLES — FUEL TANK CORROSION INSPECTION AND REPAIR
OVERVIEW
In some of the affected vehicles that are operated in high-corrosion environments associated with road salt use, moisture and salt may become trapped under the fuel tank mounting reinforcement brackets at the four corners where the fuel tank is attached to the vehicle. Over time, corrosion under these reinforcement brackets can spread to the fuel tank which can result in a fuel leak. A fuel leak in the presence of an ignition source may result in a fire.
SERVICE PROCEDURE
WARNING: do not smoke, carry lighted tobacco or have an open flame of any type when working on or near any fuel-related component. Highly flammable mixtures are always present and may be ignited. Failure to follow these instructions may result in serious personal injury.
WARNING: do not carry personal electronic devices such as cell phones, pagers or audio equipment of any type when working on or near any fuel-related component. Highly flammable mixtures are always present and may be ignited. Failure to follow these instructions may result in serious personal injury.
WARNING: Before working on or disconnecting any of the fuel tubes or fuel system components, relieve the fuel system pressure to prevent accidental spraying of fuel. Fuel in the fuel system remains under high pressure, even when the engine is not running. Failure to follow this instruction may result in serious personal injury.
WARNING: Remove the fuel filler cap slowly. The fuel system may be under pressure. If the fuel filler cap is venting vapor or if you hear a hissing sound, wait until it stops before completely removing the fuel filler cap. Otherwise, fuel may spray out. Failure to follow these instructions may result in serious personal injury.
WARNING: When handling fuel, always observe fuel handling precautions and be prepared in the event of fuel spillage. Spilled fuel may be ignited by hot vehicle components or other ignition sources. Failure to follow these instructions may result in serious personal injury.
Fuel Tank Removal Procedure
All Vehicles
- Position vehicle on a hoist. Please follow Workshop Manual (WSM) procedures in Section 100-02.
- Check fuel level indication on instrument cluster and drain fuel if needed.
- Release the fuel system pressure. Please follow WSM procedures in Section 310-00.
- Disconnect the battery ground cable. Please follow WSM procedures in Section 414-01.
- Lower or remove the muffler and tailpipe as follows:
NOTE: Do not damage or tear the isolators during removal. Do not use oil or grease-based lubricants on the isolators. They may cause deterioration of the rubber. Use soapy water as needed to separate the isolators from the vehicle.
Front Wheel drive (FWD) Vehicles
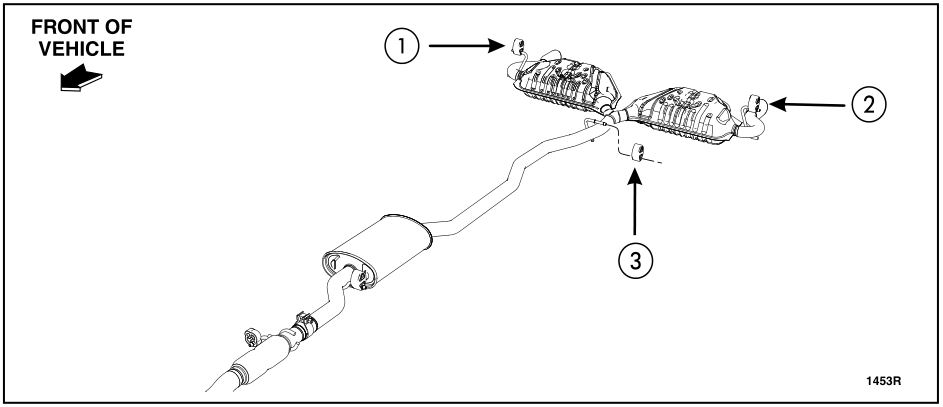
- Detach the three (3) muffler and tailpipe assembly rear isolators. See Figure 1.
- Position the rear of the exhaust system down approximately 305 mm (12 in) and support using a jack stand.
FIGURE 1
All Wheel drive (AWD) Vehicles
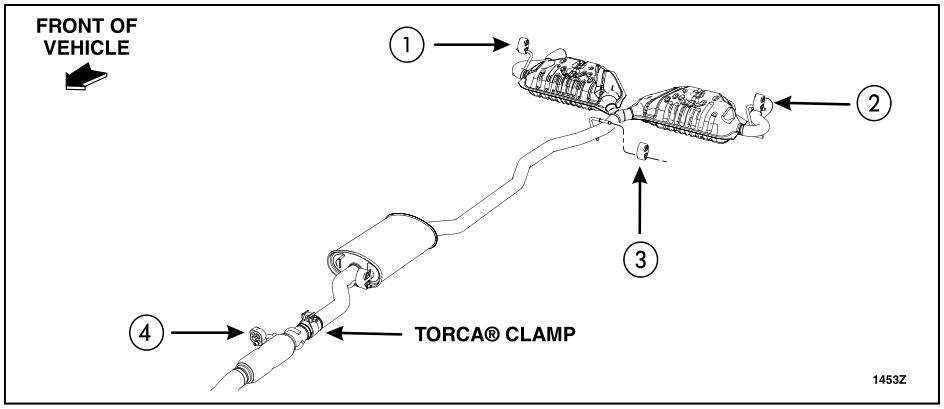
- Detach the four (4) muffler and tailpipe assembly isolators. See Figure 2.
- Loosen the Torca clamp and remove the exhaust system from the vehicle.
NOTE: Install a new Torca clamp, if necessary, following the procedures in Section 309-00.
FIGURE 2
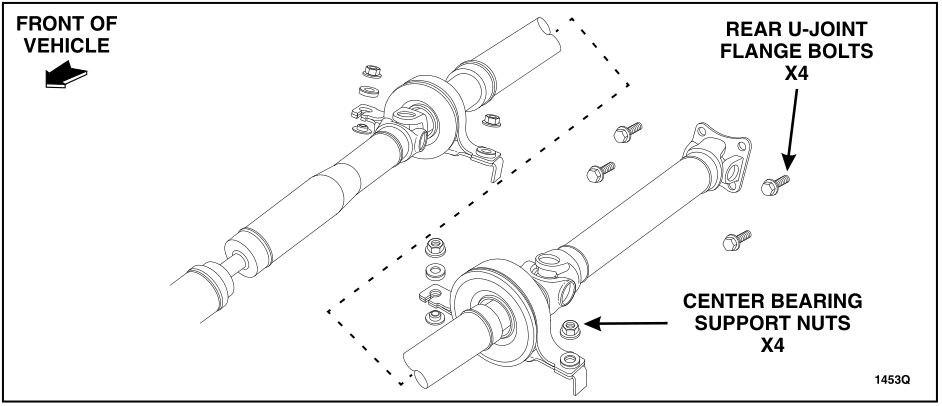
- With the help of an assistant, detach and position the rear of the driveshaft aside as follows: See Figure 3.
- Remove and discard the four (4) rear u-joint flange bolts at the differential assembly.
- Remove and discard the two (2) or four (4) center bearing support nuts. Position and secure the driveshaft up and to the left side of the vehicle.
FIGURE 3
All Vehicles
- Install a suitable lifting device under the fuel tank.
- Disconnect the fuel tank wiring harness electrical connector.
- Disconnect the Fuel Tank Pressure (FTP) sensor electrical connector.
- Disconnect the fuel vapor tube assembly-to-fuel tank quick connect coupling. Please follow WSM procedures in Section 310-00.
- Release the clamp and disconnect the fuel tank filler pipe hose from the fuel tank.
- Disconnect the fuel tank jumper tube-to-fuel tube quick connect coupling. Please follow WSM procedures in Section 310-00.
- Remove the two (2) parking brake cable bracket bolts and position cables aside.
NOTICE: Position the lifting device securely against the fuel tank prior to loosening any fuel tank attaching bolts.
- Remove the fuel tank bolts as follows:
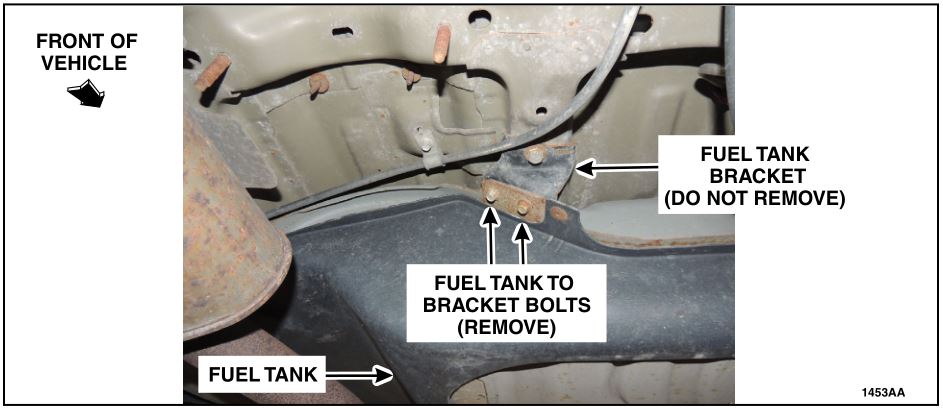
- Remove and discard two (2) bolts attaching the fuel tank to the fuel tank brackets at both the front center and rear center of the tank (four (4) bolts total). Leave the brackets attached to the vehicle. See Figure 4.
- Remove and discard the four (4) bolts (one at each corner) attaching the fuel tank to the body.
NOTE: Two (2) rear center fuel tank to bracket bolts shown, two (2) front center fuel tank to bracket bolts similar.
FIGURE 4
NOTE: AWD vehicles require the fuel tank to be positioned forward, past the Rear Differential Unit (RDU), then lowered. FWD vehicles require the fuel tank be partially lowered onto a 102 mm (4 in) by 102 mm (4 in) piece of lumber (or equivalent) placed under the right side of the tank and then lifted and lowered over the exhaust and out the drivers side of the vehicle.
NOTE: If you experience difficulty removing fuel tank corner attaching bolts, it may be necessary to safely heat the bolts during removal. If necessary, use the following procedure.
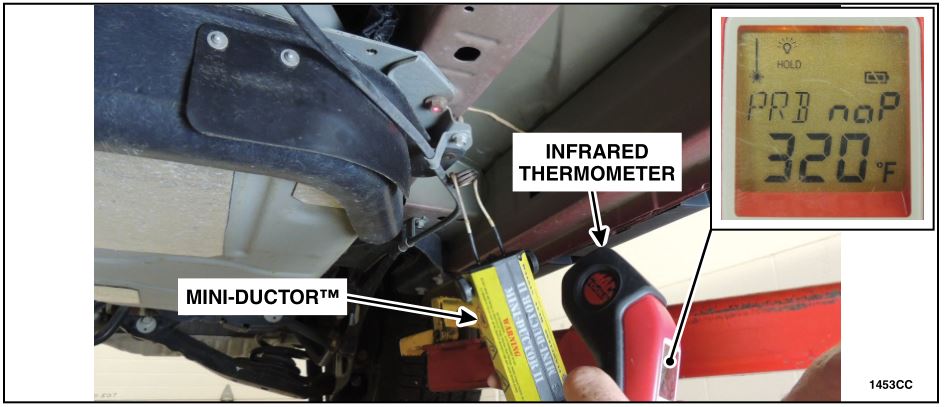
WARNING: Only use Mini-ductor or equivalent heating device if there is no visible fuel leak and no fuel smell that could be the result of a fuel leak. do not allow the temperature of the bolt to rise above 165°C (330°F).
-
- Using a Mini-Ductor or equivalent and infrared thermometer, heat the corner attaching bolts one at a time to approximately 160°C (320°F). See Figure 5.
- Use an air impact gun to remove each bolt immediately after it is heated.
FIGURE 5
Fuel Tank Inspection Procedure
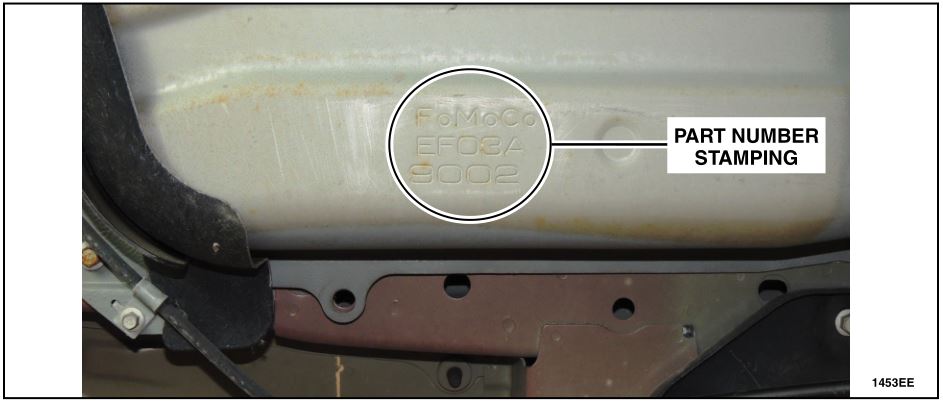
- Inspect the bottom side of the fuel tank for a “FoMoCo” part number stamping. See Figure 6.
FIGURE 6
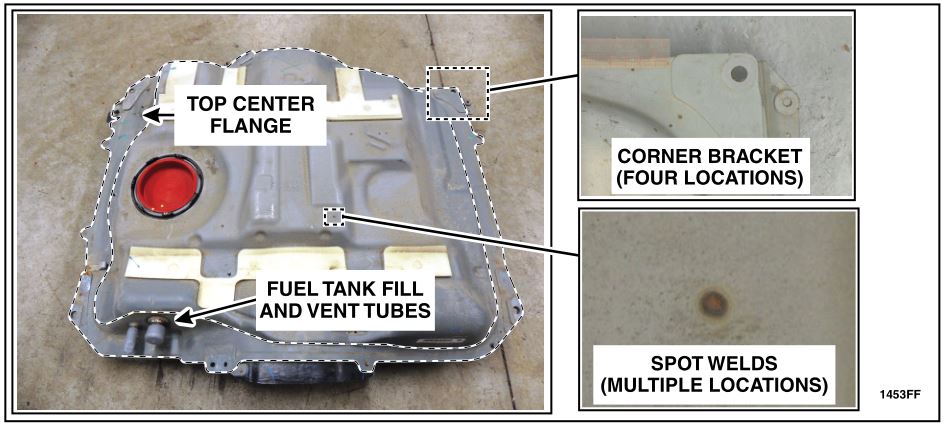
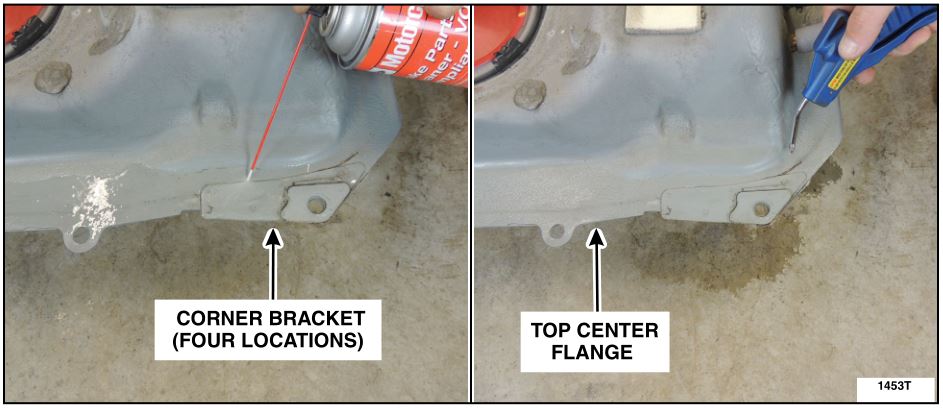
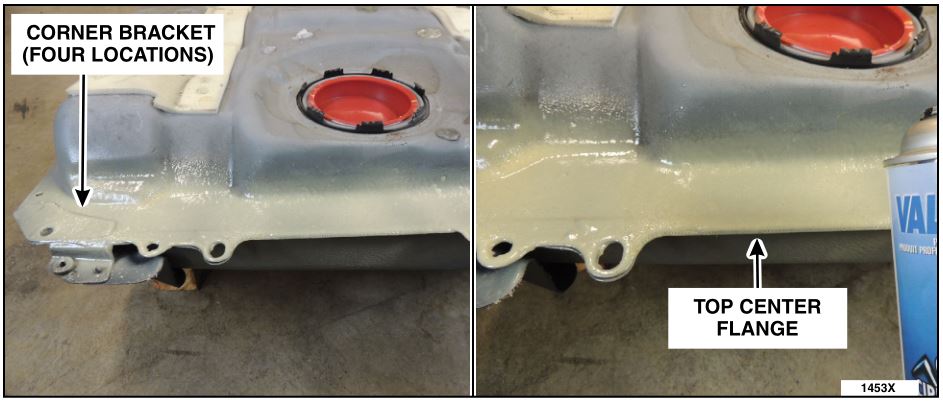
- If necessary, use a stiff nylon brush and Motorcraft Metal Brake Parts Cleaner to clean any heavy deposits of dirt/debris from around the top center flange area of the fuel tank so the metal in the corner bracket areas can be inspected for rust/corrosion. See Figure 7.
NOTE: DO NOT use a metal or wire brush or scraper. This will compromise the coatings on the tank.
- Inspect the fuel tank corner bracket areas, fuel filler and vent tube attachment areas and other areas of the fuel tank for signs of leaks or corrosion. See Figures 7, 8a-8b, and 9a-9b.
FIGURE 7
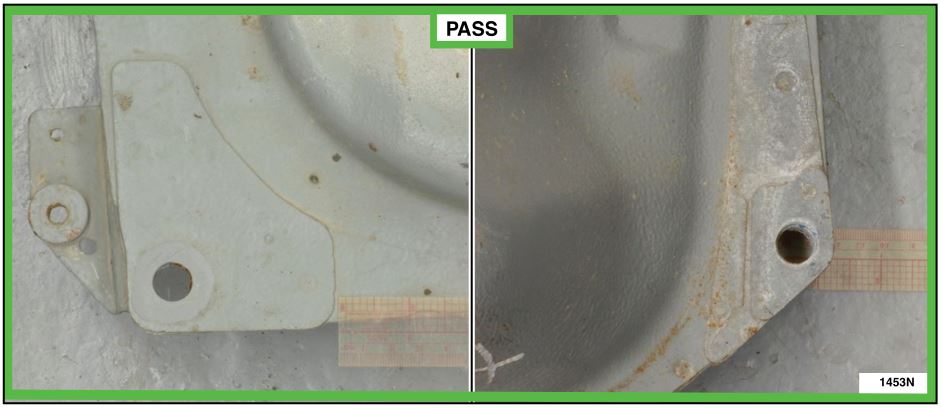
A fuel tank PASSES the inspection procedure if there are no signs of leaks, soft/bubbling paint or corrosion at the edges of the corner brackets, fuel filler and vent tube attachment areas, or other areas of the fuel tank. If the fuel tank passes the inspection, continue to Fuel Tank Corrosion Treatment Procedure on the next page. See Figures 8a and 8b.
FIGURE 8a FIGURE 8b
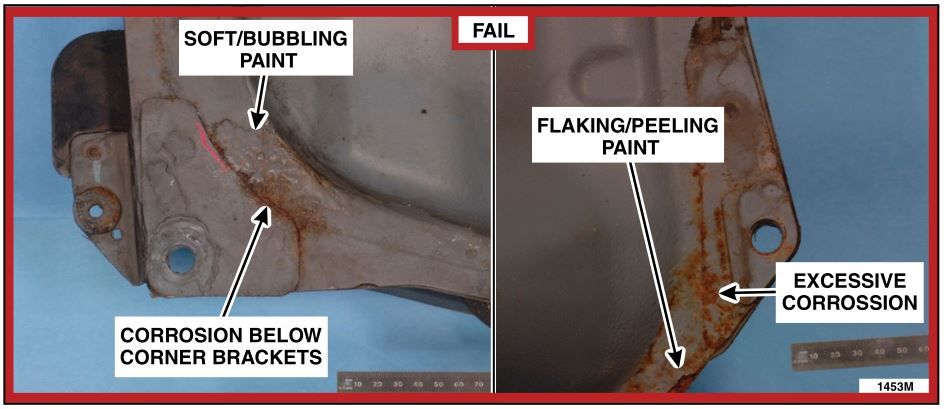
Conditions that indicate a fuel tank FAILS and must be replaced include:
- Any soft or bubbling paint that is easily scraped from the surface of the tank at ANY location.
- Any corrosion stemming from below the corner brackets that has compromised the surface of the metal.
- Excessive corrosion at the weld seam around the top center flange of the tank, at the base of the fuel inlet and vent ports, and on top of the tank at the baffle spot welds.
If the fuel tank fails the inspection, replace the tank and proceed to Fuel Tank Installation Procedure on Page 11. See Figures 9a and 9b.
FIGURE 9a FIGURE 9b
Fuel Tank Corrosion Treatment Procedure
- Using a stiff nylon brush and Motorcraft Metal Brake Parts Cleaner, clean the top surface area of all four (4) corner brackets and surrounding area of the center tank flange.
NOTE: DO NOT use a metal or wire brush or scraper. This will compromise the coatings on the tank.
- Clean the area around the fuel fill and vent tubes.
- Clean the spot welds on top of the tank.
- Wipe clean with shop towel.
- Spray Motorcraft Metal Brake Parts Cleaner under each of the corner brackets using the supplied aerosol spray tube. See Figure 10a.
- Use compressed air regulated to approximately 137 kpa (20 psi) to spray under the corner brackets to clean/dry the surfaces under them. See Figure 10b.
FIGURE 10a FIGURE 10b
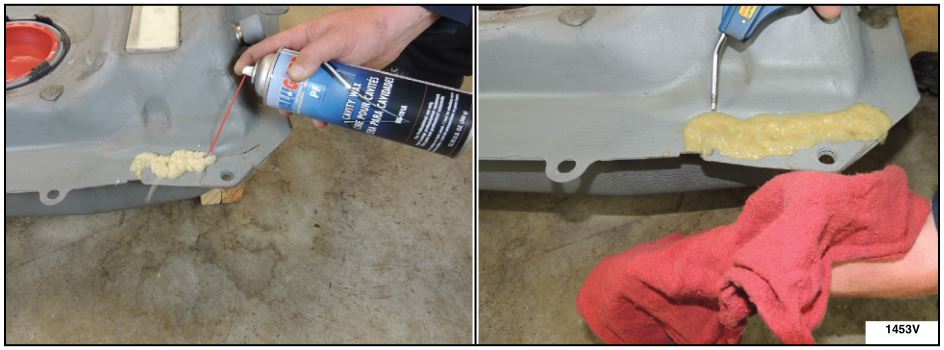
- Spray anti-corrosion treatment under each corner bracket using the supplied aerosol spray tube. See Figure 11a.
- Use compressed air regulated to approximately 137 kpa (20 psi) to force the anti-corrosion treatment under each of the corner brackets. See Figure 11b.
FIGURE 11a FIGURE 11b
- Repeat spraying a second application of anti-corrosion treatment under each of the corner brackets but DO NOT use compressed air on the second application.
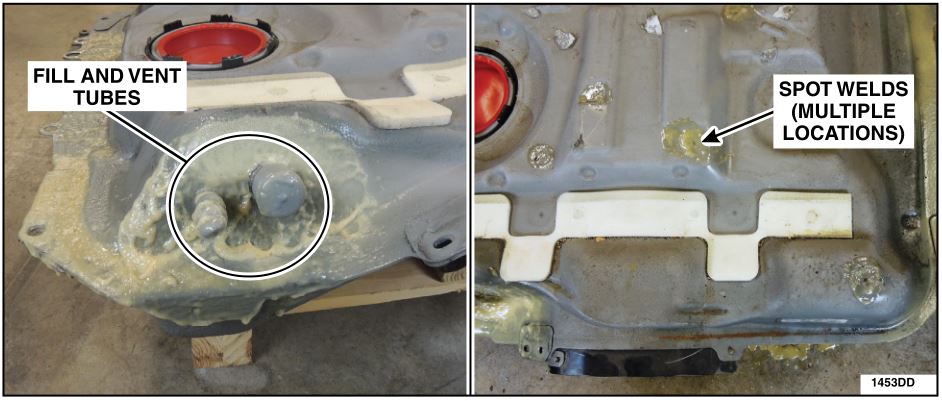
NOTE: Before applying anti-corrosion treatment to the fuel tank surface, cover the filler neck and vent tube with a suitable cover to keep these areas free of the treatment. See Figure 12a.
- Remove the aerosol tube and apply a heavy coat of anti-corrosion treatment over the following areas of the fuel tank: See Figures 7 and 12a-12d.
- Around the fill and vent tubes.
- All spot welds on top of the tank.
- Corner bracket areas.
- On the top center flange around the entire perimeter of the tank.
FIGURE 12a FIGURE 12b
FIGURE 12c FIGURE 12d
Fuel Tank Installation Procedure
All Vehicles
NOTE: If installing a new fuel tank, the fuel pump module and the fuel level sensor (AWD) must be transferred to the new fuel tank (lubricate the fuel level sensor seal with clean oil to aid in sensor installation), following the procedures in Section 310-01.
- Using a suitable lifting device, raise the fuel tank into position.
- Install the four (4) new fuel tank bolts (one at each corner).
- Tighten to 25 Nm (18 lb-ft).
NOTE: The brackets may need to be loosened slightly to reposition them if the center bracket to tank attaching holes do not line up. If necessary, safely heat the bolts using the procedure on page 5.
- Install the four (4) new fuel tank to bracket bolts. See Figure 4.
- Tighten to 25 Nm (18 lb-ft).
- Position the parking brake cables and install the two (2) parking brake cable bracket bolts.
- Tighten to 23 Nm (17 lb-ft).
- Connect the fuel tank jumper tube-to-fuel tank quick connect coupling. Please follow WSM procedures in Section 310-00.
- Connect the fuel tank pressure sensor.
- Connect the fuel tank wiring harness connector.
FWD Vehicles
- Attach the three (3) muffler and tailpipe assembly isolators. See Figure 1.
AWD Vehicles
- Position the driveshaft and install the two (2) or four (4) new center bearing support nuts. See Figure 3.
- Tighten to 40 Nm (30 lb-ft).
- Position the driveshaft and install the four (4) new rear u-joint flange bolts. See Figure 3.
- Tighten to 70 Nm (52 lb-ft).
NOTE: Install a new Torca clamp, if necessary, following WSM procedures in Section 309-00.
- Install the muffler and tailpipe assembly and attach the four (4) isolators. See Figure 2.
All Vehicles
June 2016
Regional Program 14R02
Programa de satisfacción del cliente 14R02
Mr. John Sample
123 Main Street
Anywhere, USA 12345
Your Vehicle Identification Number (VIN): 12345678901234567
At Ford Motor Company, we are committed not only to building high quality, dependable products, but also to building a community of happy, satisfied customers. To demonstrate that commitment, we are providing a no-charge Regional Customer Satisfaction Program for your vehicle with the VIN shown above.
What is the issue?
 Service Engine Soon Indicator | Ford Motor Company is conducting a safety recall (14S22) on certain 20072008 Edge and MKX vehicles registered in corrosion states. In these states, where road salt is frequently used in the winter months, it may be possible for the fuel tank to corrode, resulting in a fuel leak. Fuel leakage in the presence of an ignition source may result in a fire. Motor Company is conducting a safety recall (14S22) on certain 20072008 Edge and MKX vehicles registered in corrosion states. In these states, where road salt is frequently used in the winter months, it may be possible for the fuel tank to corrode, resulting in a fuel leak. Fuel leakage in the presence of an ignition source may result in a fire.
Our records indicate that your vehicle is not registered in a state where road salt is frequently used, and therefore is not subject to the safety recall. However, we want to inform you that your vehicle is eligible for a free, one time inspection and repair of the fuel tank under this Regional Customer Satisfaction Program (14R02). If a fuel tank leak occurs, you may experience symptoms of a fuel odor, fuel on the ground, or illumination of the “Service Engine Soon” warning indicator. |
What will Ford and your dealer do? and your dealer do? | If at any time your vehicle exhibits symptoms related to fuel tank leaks, or if you have concerns about your vehicle’s fuel tank, Ford Motor Company has authorized your dealer to inspect your vehicle’s fuel tank and either clean and treat the fuel tank with corrosion preventative measures or replace it if needed. This service will be completed free of charge (parts and labor). Motor Company has authorized your dealer to inspect your vehicle’s fuel tank and either clean and treat the fuel tank with corrosion preventative measures or replace it if needed. This service will be completed free of charge (parts and labor). |
| How long will it take? | The time needed for this repair is less than one-half day. However, due to service scheduling requirements, your dealer may need your vehicle for a longer period of time. In addition, your vehicle will require an inspection to determine if parts need to be ordered. |
| What should you do? | If you have concerns regarding the fuel tank in your vehicle, please contact your dealer and reference Regional Customer Satisfaction Program 14R02. Otherwise, no action is required. If you do contact your dealer, please be prepared to provide the VIN of your vehicle, which is printed near your name at the beginning of this letter.
If you do not already have a servicing dealer, you can access www.Fordowner.com for dealer addresses, maps, and driving instructions. |
| Have you previously paid for this repair? | If you have previously paid for a repair that addresses the issue described in this letter, you may still have this Regional Customer Satisfaction Program performed to ensure the correct parts and procedures were used. If the previously paid repair was performed before the date of this letter, you may be eligible for a refund. Refunds will only be provided for service related to repair or replacement of the fuel tank for fuel leaks caused by corrosion. To verify eligibility and expedite reimbursement, give your paid original receipt to your dealer before October 7, 2016. To avoid delays, do not send receipts to Ford Motor Company. Motor Company. |
| What if you no longer own this vehicle? | If you no longer own this vehicle, and have an address for the current owner, please forward this letter to the new owner.
You received this notice because our records, which are based primarily on state registration and title data, indicate that you are the current owner. |
| Can we assist you further? | If you have difficulties getting your vehicle repaired promptly and without charge, please contact your dealership’s Service Manager for assistance.
RETAIL OWNERS: If you still have concerns, please contact the Ford If you wish to contact us through the Internet, our address is: www.Fordowner.com. Para asistencia en Español: Si necesita ayuda o tiene alguna pregunta, por favor llame al Centro de Relación con Clientes al 1-866-436-7332 y presione 2 para Español. FLEET OWNERS: If you still have concerns, please contact the Fleet Customer Information Center at 1-800-34-FLEET, Option #3 and one of our representatives will be happy to assist you. Representatives are available Monday through Friday: 8:00AM – 8:00PM (Eastern Time). Or you may contact us through the Internet at www.fleet.ford.com. |
Thank you for your attention to this important matter.
Ford Customer Service Division
June 2016
Regional Program 14R02
Programa de satisfacción del cliente 14R02
Mr. John Sample
123 Main Street
Anywhere, USA 12345
Your Vehicle Identification Number (VIN): 12345678901234567
At The Lincoln Motor Company, we are committed not only to building high quality, dependable products, but also to building a community of happy, satisfied customers. To demonstrate that commitment, we are providing a no-charge Regional Customer Satisfaction Program for your vehicle with the VIN shown above.
What is the issue?
 Service Engine Soon Indicator | The Lincoln Motor Company is conducting a safety recall (14S22) on certain 2007-2008 MKX vehicles registered in corrosion states. In these states, where road salt is frequently used in the winter months, it may be possible for the fuel tank to corrode, resulting in a fuel leak. Fuel leakage in the presence of an ignition source may result in a fire. Motor Company is conducting a safety recall (14S22) on certain 2007-2008 MKX vehicles registered in corrosion states. In these states, where road salt is frequently used in the winter months, it may be possible for the fuel tank to corrode, resulting in a fuel leak. Fuel leakage in the presence of an ignition source may result in a fire.
Our records indicate that your vehicle is not registered in a state where road salt is frequently used, and therefore is not subject to the safety recall. However, we want to inform you that your vehicle is eligible for a free, one time inspection and repair of the fuel tank under this Regional Customer Satisfaction Program (14R02). If a fuel tank leak occurs, you may experience symptoms of a fuel odor, fuel on the ground, or illumination of the “Service Engine Soon” warning indicator. |
What will Lincoln and your dealer do? and your dealer do? | If at any time your vehicle exhibits symptoms related to fuel tank leaks, or if you have concerns about your vehicle’s fuel tank, The Lincoln Motor Company has authorized your dealer to inspect your vehicle’s fuel tank and either clean and treat the fuel tank with corrosion preventative measures or replace it if needed. This service will be completed free of charge (parts and labor). Motor Company has authorized your dealer to inspect your vehicle’s fuel tank and either clean and treat the fuel tank with corrosion preventative measures or replace it if needed. This service will be completed free of charge (parts and labor). |
| How long will it take? | The time needed for this repair is less than one-half day. However, due to service scheduling requirements, your dealer may need your vehicle for a longer period of time. In addition, your vehicle will require an inspection to determine if parts need to be ordered. |
| What should you do? | If you have concerns regarding the fuel tank in your vehicle, please contact your dealer and reference Regional Customer Satisfaction Program 14R02. Otherwise, no action is required. If you do contact your dealer, please be prepared to provide the VIN of your vehicle, which is printed near your name at the beginning of this letter.
If you do not already have a servicing dealer, you can access www.Lincolnowner.com for dealer addresses, maps, and driving instructions. |
| Have you previously paid for this repair? | If you have previously paid for a repair that addresses the issue described in this letter, you may still have this Regional Customer Satisfaction Program performed to ensure the correct parts and procedures were used. If the previously paid repair was performed before the date of this letter, you may be eligible for a refund. Refunds will only be provided for service related to repair or replacement of the fuel tank for fuel leaks caused by corrosion. To verify eligibility and expedite reimbursement, give your paid original receipt to your dealer before October 7, 2016. To avoid delays, do not send receipts to The Lincoln Motor Company. Motor Company. |
| What if you no longer own this vehicle? | If you no longer own this vehicle, and have an address for the current owner, please forward this letter to the new owner.
You received this notice because our records, which are based primarily on state registration and title data, indicate that you are the current owner. |
| Can we assist you further? | If you have difficulties getting your vehicle repaired promptly and without charge, please contact your dealership’s Service Manager for assistance.
RETAIL OWNERS: If you still have concerns, please contact our Customer Relationship Center at 1-866-436-7332 and one of our representatives will be happy to assist you. For the hearing impaired call 1-800-232-5952 (TDD). Representatives are available Monday through Friday: 8:00AM – 8:00PM (Eastern Time). If you wish to contact us through the Internet, our address is: www.Lincolnowner.com. Para asistencia en Español: Si necesita ayuda o tiene alguna pregunta, por favor llame al Centro de Relación con Clientes al 1-866-436-7332 y presione 2 para Español. FLEET OWNERS: If you still have concerns, please contact the Fleet Customer Information Center at 1-800-34-FLEET, Option #3 and one of our representatives will be happy to assist you. Representatives are available Monday through Friday: 8:00AM – 8:00PM (Eastern Time). Or you may contact us through the Internet at www.fleet.ford.com. |
Thank you for your attention to this important matter.
The Lincoln Motor Company
1 Associated Document
Manufacturer Communications
Regional Program 14R02 – Supplement #1
April 28, 2016
MC-10183755-9999.pdf 1806.184KB
 Loading...
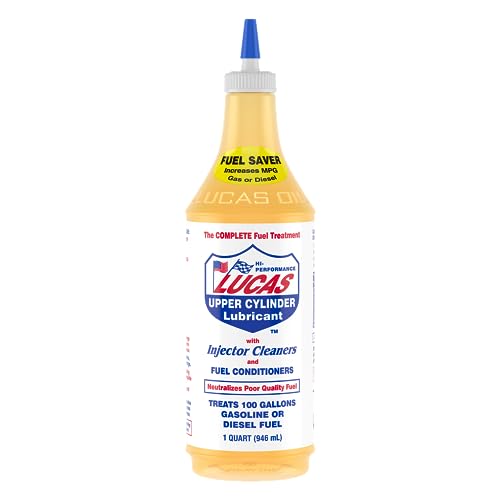
- The world’s #1 fuel additive for both gasoline and diesel engines
- A great tune-up in a bottle – treats gasoline, diesel fuel and increases MPG
- Cleans and lubricates the fuel system, including fuel injectors, carburetor and combustion chamber
- Improves fuel economy by burning excess exhaust emissions
- Increases power and acceleration by improving fuel flow and reducing deposit buildup
- Restores fuel economy
- Stabilizes ethanol
- Maximizes horsepower
- Improves responsiveness
- For use in both gasoline and diesel engines
- Save gas by keeping fuel intake system clean
- Helps restore performance
- Removes deposits from entire fuel system
- Helps inhibit corrosion
- Compatible with cap-less fuel tanks
- Cleans, restores, protects the entire fuel system (fuel injectors, carburetors, intake valves and combustion chambers)
- Restores: lost power, acceleration, lost fuel economy, and operation of the fuel gauge sensor
- Reduces: rough idle, engine surge, hesitation, and spark plug fouling
- Improves: cold start performance, and fuel stability for up to one year
- Automobiles and trucks use every 3,000 miles or at your next oil change. All other gasoline engines use as needed (motorcycles, dirt bikes, boats, ATVs, RVs, water craft, lawn care, etc.)
- Unclogs dirty fuel injectors to restore performance
- Helps restore lost power and acceleration
- Removes harmful deposits
- Compatible with cap-less gas systems
- Saves gas
- Contains 100% High-Energy Solvent Technology
- Helps Keep Injectors Or Carb(S) And Intake Ports And Valves Clean
- Quickly Disperses Moisture And Dissolves Gum, Varnish, And Other Fuel Residues
- Disperses Moisture In Conventional Gasoline
- Eliminates starting problems, hesitation and stalling.Fit Type: Universal
- Smoother idling
- Better throttle response
- Cleaner combustion
- Formulated to help save gas and lower emissions by deep cleaning the entire fuel system
- Formulated to help restore peak performance and reduce friction by lubricating engine parts
- Formulated to help prevent ethanol deposits and inhibit corrosion
- Works with modern gasoline engines such as turbo, direct inject and hybrid vehicles
- Compatible with cap-less gas systems
- DESIGNED TO EXCEED EXPECTATIONS: Red Line complete SI-1 fuel system cleaner treatment for cleaning and preventing corrosion in fuel systems
- PERFORM AND PROTECT: Fuel additive cleans injectors, carburetors, valve and combustion chamber deposits with a powerful, concentrated blend of high-temp and low-temp detergents
- EFFICIENT FUEL BURN: Gas treatment that enhances gasoline stability, while reducing the build up of gum and varnish formation
- EASY TO USE: Use one bottle per tank for most effective treatment, additive cleans nearly 100% efficiency in one treatment
- One 15 Ounce Bottle
- Upgraded Universal Fuel Injector Tester and Cleaner Tool Kit---Operates injectors individually to diagnose fuel delivery problems on petrol vehicles with electronic fuel injection, such as blockage, leakage, damage, and burnout of the injectors. The included 8-size cleaning adapters combined with the tester pulse mode can quickly clean the injectors
- 【Test for 2 Injectors Simultaneously & Ultra-long Power Cord】Come with two pairs of output terminals, allowing you to test for two injectors or for one injector at once. The tester power cord is up to 40inch and the test lead is up to 20 inches for convenient testing. The wires are made of superior silica gel, allowing the tester to work at high and low temperatures. (To make it perform better, it is recommended to work at normal temperatures.)
- 【8 Size Adapters Cleaning Tool & Universal Fit】Our cleaner small and large size adapters are compatible with most 12V EFI and GDI vehicle models' injectors. We also offer two additional specialized adapters for the BMW Audi, one is suitable for models such as V.W, Audi, etc. and another one with threaded hole is exclusively for BMW N series such as N14/N18/N20/N26/N53/N54/N55/N63/S63.
- 【8 Pulse Modes & LCD Display】The fuel injector tester kit is designed with 8 pulse modes, which are composed of 4 pulse signal output modes and 2 output voltage levels: Short/ Medium/ Long/ Continuous pulse modes + High/Low(12V/5V) power drive modes. This tester has a wide variety of pulse modes, providing a large testing space to accurately and quickly diagnose and repair petrol vehicle injectors' fuel delivery problems. The LCD displays the mode you are in.
- 【Polarity Reverse Connection Protection & Short Circuit Protection】Deigned with power input reverse connection protection and output short circuit protection function. In the case damaged or a short circuit of the pulse output terminal, the power indicator light of the fuel injector cleaner tool kit will flash to prompt you.
Last update on 2025-05-10 / Affiliate links / Images from Amazon Product Advertising API
This product presentation was made with AAWP plugin.
