
NHTSA ID Number: 10204042
Manufacturer Communication Number: 20B45
Summary
Certain 2020 Model Year Super Duty Vehicles with XL Trim and SYNC 3 Instrument Panel Cluster Replacement In some of the affected vehicles, a coding error may have caused a 2.3″ display screen instrument panel cluster (IPC) to be installed in place of the 4.2″ display screen IPC, as intended with the optional SYNC 3 package. While the display screen size is smaller and appearance differences are noticeable, there is no functional effect on the smaller display screen IPC.
4 Affected Products
Vehicles
| MAKE | MODEL | YEAR |
| FORD | F-250 SD | 2020 |
| FORD | F-350 SD | 2020 |
| FORD | F-450 SD | 2020 |
| FORD | F-550 SD | 2020 |
PROGRAM TERMS
This program will be in effect through November 30, 2022. There is no mileage limit for this program.
AFFECTED VEHICLES
| Vehicle | Model Year | Assembly Plant | Build Dates |
| Super Duty | 2020 | Kentucky Truck | August 12, 2019 through March 19, 2020 |
REASON FOR THIS PROGRAM
NOTE: This program is only applicable to the original purchaser or lessee of the vehicle, regardless of whether they still own the vehicle or not.
In some of the affected vehicles, a coding error may have caused a 2.3” display screen instrument panel cluster (IPC) to be installed in place of the 4.2” display screen IPC, as intended with the optional SYNC 3 package. While the display screen size is smaller and appearance differences are noticeable, there is no functional effect on the smaller display screen IPC.
SERVICE ACTION
Before delivering any new in-stock vehicles involved in this program, dealers are to replace the IPC and program using the Ford Diagnostic and Repair System (FDRS). Follow Attachment III for specific directions on how to submit required contacts to the SSSC to order a replacement IPC. Information will need to be provided to ensure the correct part number IPC is ordered and the asbuilt data required to complete the repair is properly updated.
NOTE: Customers that are the original owners of sold units will have the option of receiving financial compensation in lieu of IPC replacement. A voucher with instructions explaining how to receive the new IPC or the financial offer will accompany the owner letter. If IPC replacement is selected, this service must be performed at no charge to the vehicle owner.
OWNER NOTIFICATION AND MAILING SCHEDULE
Owner letters are expected to be mailed by December 10, 2021. Dealers should only repair affected vehicles that arrive at their dealerships for customers that have opted for IPC replacement.
PARTS
| Part Number | Description | Order Quantity | Claim Quantity |
| Base Part 10849 | IPC – Submit VIN-specific Module Update contact to the SSSC to obtain the correct part number to order. | 1 | 1 |
CERTAIN 2020 MODEL YEAR SUPER DUTY VEHICLES – INSTRUMENT PANEL CLUSTER
UNIQUE REQUIREMENTS – MULTIPLE CONTACTS REQUIRED
Prior to scheduling customer appointments or beginning repairs, submit a Special Service Support Center (SSSC) Module Update type contact for parts ordering information and to initiate the as-built data change request. Do not submit an 1878 part order using the vehicle’s HVBoM. The SSSC will provide the correct IPC part number to order. Processing this request is expected to take 2-4 days. Therefore, proceed with customer appointments or repairs ONLY AFTER receiving confirmation via a follow up response from the SSSC.
Removal Procedure
IMPORTANT: DO NOT connect a diagnostic scan tool to the vehicle as this may cause the new
module configuration data to be deleted.
NOTE: DO NOT connect a scan tool to the vehicle at this time.
NOTE: Push button start vehicle shown, all others similar.
1. Lower the steering column opening trim panel. See Figure 1.
2. Fully extend and lower the steering column. See Figure 2.
3. Remove the 2 bolts, release the clips and remove Instrument Panel Cluster (IPC) trim panel.
• Detach the gap hider from the upper steering column shroud. See Figure 3.
• Torque: 22 lb.in (2.5 Nm)
4. Remove the 4 bolts and the IPC. See Figure 4.
• Disconnect the electrical connector.
•Torque: 21 lb.in (2.4 Nm)
5.Install the new IPC by reversing the removal procedure.
Module Programming
IMPORTANT: ONLY proceed if you have received the confirmation from SSSC.
IMPORTANT: DO NOT allow the diagnostic scan tool to read the Vehicle Identification Number (VIN) automatically, MANUALLY enter the VIN ONLY.
1. Connect a battery charger to the 12V battery.
NOTE: Verify that the negative cable of the charger is installed on a chassis or engine ground, and not the 12 volt battery negative terminal to prevent the battery saver mode from activating on the vehicle.
2. Log into Ford Diagnostic and Repair System (FDRS).
NOTE: DO NOT allow the diagnostic scan tool to read the VIN automatically, MANUALLY enter the VIN ONLY.
3. Manually enter the VIN and then select “Go”.
4. When prompted with “Vehicle Communication Device not detected” Select continue. See Figure 5.
5. Select Toolbox tab.
6. From the list on the Left Hand (LH) side of the screen, select the IPC.
7. From the list on the Right Hand (RH) side of the screen, locate IPC – Instrument Panel Cluster (IPC) Programmable Module Installation and click “Download”.
8. Connect the Vehicle Communication Module II (VCM II ). See Figure 6.
a. Plug the VCM II into the diagnostic scan tool and into the vehicles Data Link Connector (DLC).
b. Click the red icon of the vehicle communication device in the bottom right hand of the screen.
c. Select “Ok”.
• The vehicle communication device icon (b) will turn green once the VCM II is connected.
9. Click “RUN” on the IPC – Instrument Panel Cluster (IPC) Programmable Module Installation. Follow all on-screen instructions carefully.
10. When prompted with the question ” is the original module installed?” select “No”. See Figure 7.
11. Continue to follow the on-screen instructions carefully.
12. From the list on the RH side of the screen, select Self-Test and click RUN.
13. Click the Run Selected Tests button in the lower right.
14. Click the Clear & Retest button at the top of the screen to clear DTC’s in all modules.
15. Disconnect the battery charger from the 12V battery once the programming has completed.
Important Information for Module Programming
NOTE: When programming a module, use the following basic checks to ensure programming completes
without errors.
• Make sure the 12V battery is fully charged before carrying out the programming steps and connect FDRS/scan tool to a power source.
NOTE: A good internet connection is necessary to identify the vehicle and to load the diagnostic software.
• Inspect VCM II/Vehicle Communication and Measurement Module (VCMM) and cables for any damage. Make sure scan tool connections are not interrupted during programming.
• A hardwired connection is strongly recommended.
• Turn off all unnecessary accessories (radio, heated/cooled seats, headlamps, interior lamps, HVAC system, etc.) and close doors.
• Disconnect/depower any aftermarket accessories (remote start, alarm, power inverter, CB radio, etc.).
• Follow all scan tool on-screen instructions carefully.
• Disable FDRS/scan tool sleep mode, screensaver, hibernation modes.
• Create all sessions Key On Engine Off (KOEO). Starting the vehicle before creating a session will cause errors within the programming inhale process.
Recovering a module when programming has resulted in a blank module
a. Disconnect the VCMII or VCMM from the DLC and from the diagnostic scan tool.
b. After ten seconds, reconnect the VCMII/VCMM to the DLC and diagnostic scan tool. Launch FDRS. The VCMII/VCMM icon should turn green in the bottom right corner of the screen. If it does not, troubleshoot the FDRS to VCM connection.
c. If you are using the same FDRS as the initial programming attempt, select the appropriate VIN from the Vehicle Identification menu. If you are using a different FDRS, select “Read VIN from Vehicle” and proceed through the Network Test.
d. In the Toolbox menu, navigate to the failed module and Download/Run Programmable Module Installation (PMI). Follow the on-screen prompts. When asked if the original module is installed, select “No” and continue through the installation application.
e. Once programming has completed, a screen may list additional steps required to complete the programming process. Make sure all applicable steps are followed in order.
IMPORTANT NOTE: Federal law prohibits selling motor vehicle parts or components that are under safety, compliance, or emissions recall. Unless a part is requested to be returned to Ford, all parts replaced under this FSA must be scrapped in accordance with all applicable local, state and federal environmental protection and hazardous material regulations. Refer to the Parts Retention, Return, & Scrapping section of the FSA dealer bulletin for further information.
SEOCONTENT-START
© Copyright 2021 Ford Motor Company
David J. Johnson Ford Motor Company
Director P. O. Box 1904
Service Engineering Operations Dearborn, Michigan 48121
Ford Customer Service Division
November 23, 2021
TO: All U.S. Ford and Lincoln Dealers
SUBJECT: NEW VEHICLE DELIVERY HOLD
Customer Satisfaction Program 20B45
Certain 2020 Model Year Super Duty Vehicles with XL Trim and SYNC 3
Instrument Panel Cluster Replacement
PROGRAM TERMS
This program will be in effect through November 30, 2022. There is no mileage limit for this
program.
AFFECTED VEHICLES
Vehicle Model Year Assembly Plant Build Dates
Super Duty 2020 Kentucky Truck August 12, 2019 through March 19, 2020
Affected vehicles are identified in OASIS and FSA VIN Lists.
REASON FOR THIS PROGRAM
NOTE: This program is only applicable to the original purchaser or lessee of the vehicle,
regardless of whether they still own the vehicle or not.
In some of the affected vehicles, a coding error may have caused a 2.3” display screen instrument
panel cluster (IPC) to be installed in place of the 4.2” display screen IPC, as intended with the
optional SYNC 3 package. While the display screen size is smaller and appearance differences are
noticeable, there is no functional effect on the smaller display screen IPC.
SERVICE ACTION
Before delivering any new in-stock vehicles involved in this program, dealers are to replace the IPC
and program using the Ford Diagnostic and Repair System (FDRS). Follow Attachment III for
specific directions on how to submit required contacts to the SSSC to order a replacement IPC.
Information will need to be provided to ensure the correct part number IPC is ordered and the asbuilt
data required to complete the repair is properly updated.
NOTE: Customers that are the original owners of sold units will have the option of receiving
financial compensation in lieu of IPC replacement. A voucher with instructions explaining how to
receive the new IPC or the financial offer will accompany the owner letter. If IPC replacement is
selected, this service must be performed at no charge to the vehicle owner.
OWNER NOTIFICATION MAILING SCHEDULE
Owner letters are expected to be mailed by December 10, 2021. Dealers should only repair
affected vehicles that arrive at their dealerships for customers that have opted for IPC
replacement.
ATTACHMENTS
Attachment I: Administrative Information
Attachment II: Labor Allowances and Parts Ordering Information
Attachment III: Technical Information
Owner Notification Letter
© Copyright 2021 Ford Motor Company
QUESTIONS & ASSISTANCE
For questions and assistance, contact the Special Service Support Center (SSSC) via the SSSC
Web Contact Site. The SSSC Web Contact Site can be accessed through the Professional
Technician Society (PTS) website using the SSSC link listed at the bottom of the OASIS VIN report
screen or listed under the SSSC tab.
Sincerely,
David J. Johnson
© Copyright 2021 Ford Motor Company
ATTACHMENT I
Page 1 of 2
NEW VEHICLE DEMONSTRATION / DELIVERY HOLD
Customer Satisfaction Program 20B45
Certain 2020 Model Year Super Duty Vehicles with XL Trim and SYNC 3
Instrument Panel Cluster Replacement
Incorrect Instrument Cluster OASIS ACTIVATION
OASIS will be activated on November 23, 2021.
FSA VIN LISTS ACTIVATION
FSA VIN Lists will be available through https://web.fsavinlists.dealerconnection.com on November
23, 2021. Owner names and addresses will be available by December 17, 2021.
NOTE: Your FSA VIN Lists may contain owner names and addresses obtained from motor vehicle
registration records. The use of such motor vehicle registration data for any purpose other than in
connection with this program is a violation of law in several states, provinces, and countries.
Accordingly, you must limit the use of this listing to the follow-up necessary to complete this service
action.
SOLD VEHICLES
Original owner customers of sold units will receive a voucher form to complete and return to Ford,
advising of their decision of IPC replacement or financial compensation. If they choose the financial
compensation, a check will be processed and mailed to the qualifying original owner customer.
STOCK VEHICLES
Correct all affected new/unsold units in your new vehicle inventory before delivery.
TITLE BRANDED / SALVAGED VEHICLES
Affected title branded and salvaged vehicles are eligible for financial compensation.
OWNER REFUNDS
Refunds are not approved for this program.
RENTAL VEHICLES
For customers choosing IPC replacement, due to the new IPC needing to be configured with the
vehicle’s current mileage and engine hours, federal odometer regulations mandate the vehicle will
need to remain at the dealer while waiting for the new IPC and as-built data configuration.
Dealers are pre-approved for up to 4 days for a rental vehicle. Follow Extended Service Plan (ESP)
guidelines for dollar amounts. Rentals will only be reimbursed for the days the vehicle is at the
dealership for part replacement. Prior approval for more than 4 rental days is required from the
SSSC via the SSSC Web Contact Site.
If you have a unique owner circumstance which may require an extended rental vehicle, please
contact the SSSC via the SSSC Web Contact Site for consideration.
ADDITIONAL REPAIR (LABOR TIME AND/OR PARTS)
Additional repairs identified as necessary to complete the FSA should be managed as follows:
• For related damage and access time requirements, refer to the Warranty and Policy Manual
/ Section 6 – Ford & Lincoln Program Policies / General Information & Special
Circumstances for FSA’s / Related Damage.
© Copyright 2021 Ford Motor Company
ATTACHMENT I
Page 2 of 2
NEW VEHICLE DEMONSTRATION / DELIVERY HOLD
Customer Satisfaction Program 20B45
Certain 2020 Model Year Super Duty Vehicles with XL Trim and SYNC 3
Instrument Panel Cluster Replacement
ADDITIONAL REPAIR (LABOR TIME AND/OR PARTS) continued
• For vehicles within new vehicle bumper-to-bumper warranty coverage, no SSSC approval is
required, although related damage must be on a separate repair line with the “Related
Damage” radio button checked.
o Ford vehicles – 3 years or 36,000 miles
• For vehicles outside new vehicle bumper-to-bumper warranty coverage, submit an Approval
Request to the SSSC Web Contact Site prior to completing the repair.
CLAIMS PREPARATION AND SUBMISSION
• Claim Entry: Enter claims using Dealer Management System (DMS) or One Warranty
Solution (OWS) online.
o When entering claims:
▪ Claim type 31: Field Service Action. The FSA number 20B45 is the sub
code.
▪ Customer Concern Code (CCC): G32 – Inst. cluster/message center
▪ Condition Code (CC): 12 – Improper Assembly
▪ Causal Part Number: 10849
▪ Part Quantity: 0
o For additional claims preparation and submission information, refer to the Recall
and Customer Satisfaction Program (CSP) Repairs in the OWS User Guide.
• Related Damage/Additional labor and/or parts: Must be claimed as Related Damage on
a separate repair line from the FSA with same claim type and sub code as described in
Claim Entry above.
IMPORTANT: Click the Related Damage Indicator radio button.
• Rentals: For rental vehicle claiming, follow Extended Service Plan (ESP) guidelines for
dollar amounts. Enter the total amount of the rental expense under Miscellaneous Expense
code RENTAL.
© Copyright 2021 Ford Motor Company
ATTACHMENT II
Page 1 of 2
NEW VEHICLE DEMONSTRATION / DELIVERY HOLD
Customer Satisfaction Program 20B45
Certain 2020 Model Year Super Duty Vehicles with XL Trim and SYNC 3
Instrument Panel Cluster Replacement
LABOR ALLOWANCES
Description Labor Operation Labor Time
Replace IPC and update as-built data using FDRS
(includes time to submit SSSC request for correct part
number ordering information, as well as the follow up
submission for As-Built change request)
20B45B 0.7 Hours
PARTS REQUIREMENTS / ORDERING INFORMATION
SSSC Web Contact Site:
To request revised IPC part number order, submit a VIN-specific Module Update contact via the
SSSC Web Contact Site.
NOTE: HVBOM and E-Cat do not contain the correct replacement part numbers to properly
complete this FSA repair procedure and therefore should not be used to order a new IPC.
Part Number Description
Order
Quantity
Claim
Quantity
Base Part 10849
IPC – Submit VIN-specific Module Update contact to
the SSSC to obtain the correct part number to order.
1 1
DEALER PRICE
For latest prices, refer to DOES II.
PARTS RETENTION, RETURN, & SCRAPPING
Follow the provisions of the Warranty and Policy Manual, Section 1 – WARRANTY PARTS
RETENTION AND RETURN POLICIES. If a replaced part receives a scrap disposition, the part
must be scrapped in accordance with all applicable local, state, and federal environmental
protection and hazardous material regulations. Federal law prohibits selling motor vehicle parts or
components that are under safety, compliance, or emissions recall.
EXCESS STOCK RETURN
Excess stock returned for credit must have been purchased from Ford Customer Service Division
in accordance with Policy Procedure Bulletin 4000.
REPLACED FSA PARTS INSPECTION AND SIGN OFF
Effective March 1st, 2021 all parts replaced as part of an FSA repair with a repair order open date
of March 1st, 2021 or later must be inspected and signed off on the repair order by a member of
your dealers fixed operations management team or an employee the task has been delegated to. If
the task is to be delegated to a non-management employee, the employee needs to be someone
other than the technician who completed the repair and needs to understand the importance of
completing this task consistently and accurately.
© Copyright 2021 Ford Motor Company
ATTACHMENT II
Page 2 of 2
NEW VEHICLE DEMONSTRATION / DELIVERY HOLD
Customer Satisfaction Program 20B45
Certain 2020 Model Year Super Duty Vehicles with XL Trim and SYNC 3
Instrument Panel Cluster Replacement
REPLACED FSA PARTS INSPECTION AND SIGN OFF (continued)
• All parts replaced as part of an FSA repair should be returned to the parts department
following the Warranty Parts Retention and Return Policies.
• Inspect the replaced parts to verify the FSA repair was completed.
• If the FSA repair is found to be complete, the designated employee signs the repair order
line or parts return stamp area (electronic or hand signed) for the FSA repair indicating the
parts were inspected and validated to have been replaced.
• After the parts have been inspected, they should be handled based on the guidance in the
parts status report in the Online Warranty System (Hold, Return, CORE, Scrap, etc.).
• This process is subject to review during warranty audits for FSA repairs with a repair order
open date of March 1st, 2021 or later. Any eligible FSA claims requiring parts replacement,
found not to have been inspected and signed off during a warranty audit will be subject to
chargeback and consideration for enrollment into the Dealer Incomplete Recall Repair
Process.
Note: Other approvals (electronic or handwritten) for add-on repair lines, dealer owned vehicle
repairs, and repeat repairs do not qualify as FSA parts inspection approvals. The post repair FSA
parts inspection process (electronic or handwritten) is independent from other warranty approval
requirements. The approval by the designated employee implies that the FSA parts were found to
be replaced and must be able to be clearly identified on the Repair Order. If multiple FSA’s require
approval on a single Repair Order, each applicable occurrence will require individual post repair
approval by the designated employee.
ATTACHMENT III
PAGE 1 OF 7
CUSTOMER SATISFACTION PROGRAM 20B45
CPR © 2021 FORD MOTOR COMPANY
DEARBORN, MICHIGAN 48121
11/2021
CERTAIN 2020 MODEL YEAR SUPER DUTY VEHICLES – INSTRUMENT PANEL
CLUSTER
UNIQUE REQUIREMENTS – MULTIPLE CONTACTS REQUIRED
Prior to scheduling customer appointments or beginning repairs, submit a Special Service
Support Center (SSSC) Module Update type contact for parts ordering information and to initiate
the as-built data change request. Do not submit an 1878 part order using the vehicle’s HVBoM.
The SSSC will provide the correct IPC part number to order. Processing this request is expected to
take 2-4 days. Therefore, proceed with customer appointments or repairs ONLY AFTER receiving
confirmation via a follow up response from the SSSC.
Removal Procedure
IMPORTANT: DO NOT connect a diagnostic scan tool to the vehicle as this may cause the new
module configuration data to be deleted.
NOTE: DO NOT connect a scan tool to the vehicle at this time.
NOTE: Push button start vehicle shown, all others similar.
1. Lower the steering column opening trim panel. See Figure 1.
FIGURE 1
2068A
ATTACHMENT III
PAGE 2 OF 7
CUSTOMER SATISFACTION PROGRAM 20B45
CPR © 2021 FORD MOTOR COMPANY
DEARBORN, MICHIGAN 48121
11/2021
2. Fully extend and lower the steering column. See Figure 2.
FIGURE 2
PLACE COPY HERE
PLACE COPY HERE
PLACE COPY HERE
STUD FOR
MISSING NUT
STUD FOR
MISSING NUT
STUD FOR
MISSING NUT
2068C
ATTACHMENT III
PAGE 3 OF 7
CUSTOMER SATISFACTION PROGRAM 20B45
CPR © 2021 FORD MOTOR COMPANY
DEARBORN, MICHIGAN 48121
11/2021
3. Remove the 2 bolts, release the clips and remove Instrument Panel Cluster (IPC) trim panel.
• Detach the gap hider from the upper steering column shroud. See Figure 3.
• Torque: 22 lb.in (2.5 Nm)
FIGURE 3
x2
x4
x2
PLACE COPY HERE
PLACE COPY HERE
PLACE COPY HERE
STUD FOR
MISSING NUT
STUD FOR
MISSING NUT
STUD FOR
MISSING NUT
2068B
ATTACHMENT III
PAGE 4 OF 7
CUSTOMER SATISFACTION PROGRAM 20B45
CPR © 2021 FORD MOTOR COMPANY
DEARBORN, MICHIGAN 48121
11/2021
4. Remove the 4 bolts and the IPC. See Figure 4.
• Disconnect the electrical connector.
•Torque: 21 lb.in (2.4 Nm)
FIGURE 4
x4
PLACE COPY HERE
PLACE COPY HERE
PLACE COPY HERE
STUD FOR
MISSING NUT
STUD FOR
MISSING NUT
STUD FOR
MISSING NUT
2068D
5.Install the new IPC by reversing the removal procedure.
ATTACHMENT III
PAGE 5 OF 7
CUSTOMER SATISFACTION PROGRAM 20B45
CPR © 2021 FORD MOTOR COMPANY
DEARBORN, MICHIGAN 48121
11/2021
Module Programming
IMPORTANT: ONLY proceed if you have received the confirmation from SSSC.
IMPORTANT: DO NOT allow the diagnostic scan tool to read the Vehicle Identification Number
(VIN) automatically, MANUALLY enter the VIN ONLY.
1. Connect a battery charger to the 12V battery.
NOTE: Verify that the negative cable of the charger is installed on a chassis or engine ground, and not
the 12 volt battery negative terminal to prevent the battery saver mode from activating on the
vehicle.
2. Log into Ford Diagnostic and Repair System (FDRS).
NOTE: DO NOT allow the diagnostic scan tool to read the VIN automatically, MANUALLY enter the
VIN ONLY.
3. Manually enter the VIN and then select “Go”.
4. When prompted with “Vehicle Communication Device not detected” Select continue. See Figure 5.
FIGURE 5
STUD FOR
MISSING NUT
STUD FOR
MISSING NUT
2068E
5. Select Toolbox tab.
6. From the list on the Left Hand (LH) side of the screen, select the IPC.
7. From the list on the Right Hand (RH) side of the screen, locate IPC – Instrument Panel Cluster (IPC)
Programmable Module Installation and click “Download”.
ATTACHMENT III
PAGE 6 OF 7
CUSTOMER SATISFACTION PROGRAM 20B45
CPR © 2021 FORD MOTOR COMPANY
DEARBORN, MICHIGAN 48121
11/2021
FIGURE 6
PLACE COPY HERE
PLACE COPY HERE
PLACE COPY HERE
STUD FOR
MISSING NUT
STUD FOR
MISSING NUT
STUD FOR
MISSING NUT
2068F
b
c
8. Connect the Vehicle Communication Module II (VCM II). See Figure 6.
a. Plug the VCM II into the diagnostic scan tool and into the vehicles Data Link Connector (DLC).
b. Click the red icon of the vehicle communication device in the bottom right hand of the screen.
c. Select “Ok”.
• The vehicle communication device icon (b) will turn green once the VCM II is connected.
9. Click “RUN” on the IPC – Instrument Panel Cluster (IPC) Programmable Module Installation. Follow all
on-screen instructions carefully.
10. When prompted with the question ” is the original module installed?” select “No”. See Figure 7.
FIGURE 7
2068G
ATTACHMENT III
PAGE 7 OF 7
CUSTOMER SATISFACTION PROGRAM 20B45
CPR © 2021 FORD MOTOR COMPANY
DEARBORN, MICHIGAN 48121
11/2021
11. Continue to follow the on-screen instructions carefully.
12. From the list on the RH side of the screen, select Self-Test and click RUN.
13. Click the Run Selected Tests button in the lower right.
14. Click the Clear & Retest button at the top of the screen to clear DTC’s in all modules.
15. Disconnect the battery charger from the 12V battery once the programming has completed.
Important Information for Module Programming
NOTE: When programming a module, use the following basic checks to ensure programming completes
without errors.
• Make sure the 12V battery is fully charged before carrying out the programming steps and connect
FDRS/scan tool to a power source.
NOTE: A good internet connection is necessary to identify the vehicle and to load the diagnostic software.
• Inspect VCM II/Vehicle Communication and Measurement Module (VCMM) and cables for any damage.
Make sure scan tool connections are not interrupted during programming.
• A hardwired connection is strongly recommended.
• Turn off all unnecessary accessories (radio, heated/cooled seats, headlamps, interior lamps, HVAC
system, etc.) and close doors.
• Disconnect/depower any aftermarket accessories (remote start, alarm, power inverter, CB radio,etc.).
• Follow all scan tool on-screen instructions carefully.
• Disable FDRS/scan tool sleep mode, screensaver, hibernation modes.
• Create all sessions Key On Engine Off (KOEO). Starting the vehicle before creating a session will cause
errors within the programming inhale process.
Recovering a module when programming has resulted in a blank module
a. Disconnect the VCMII or VCMM from the DLC and from the diagnostic scan tool.
b. After ten seconds, reconnect the VCMII/VCMM to the DLC and diagnostic scan tool. Launch FDRS. The
VCMII/VCMM icon should turn green in the bottom right corner of the screen. If it does not,
troubleshoot the FDRS to VCM connection.
c. If you are using the same FDRS as the initial programming attempt, select the appropriate VIN from
the Vehicle Identification menu. If you are using a different FDRS, select “Read VIN from Vehicle”
and proceed through the Network Test.
d. In the Toolbox menu, navigate to the failed module and Download/Run Programmable Module
Installation (PMI). Follow the on-screen prompts. When asked if the original module is installed,
select “No” and continue through the installation application.
e. Once programming has completed, a screen may list additional steps required to complete the
programming process. Make sure all applicable steps are followed in order.
IMPORTANT NOTE: Federal law prohibits selling motor vehicle parts or components that are
under safety, compliance, or emissions recall. Unless a part is requested to be returned to Ford, all
parts replaced under this FSA must be scrapped in accordance with all applicable local, state and
federal environmental protection and hazardous material regulations. Refer to the Parts Retention,
Return, & Scrapping section of the FSA dealer bulletin for further information.
© Copyright 2021 Ford Motor Company
Ford Motor Company
Ford Customer Service Division
P. O. Box 1904
Dearborn, Michigan 48121
December 2021
Customer Satisfaction Program 20B45
Mr. John Sample
123 Main Street
Anywhere, USA 12345
Your Vehicle Identification Number (VIN): 12345678901234567
At Ford Motor Company, we are committed not only to building high quality, dependable products, but
also to building a community of happy, satisfied customers. To demonstrate that commitment, we are
providing a no-charge Customer Satisfaction Program for your vehicle with the VIN shown above.
Why are you receiving
this notice?
A 2.3″ instrument panel cluster display screen is installed in your vehicle
instead of the 4.2″ display screen that was ordered.
What is the effect? While the display screen size is noticeable, there is not a functional effect on
the instrument panel cluster.
What will Ford and
your dealer do?
In the interest of customer satisfaction, Ford Motor Company has authorized
two options for your choosing. You can choose only one of the two options.
First Option: Compensation for the equivalent value of the vehicle
specification originally ordered. See Customer Waiver at the bottom of this
letter for more information.
Second Option: Your dealer will modify your vehicle by replacing the
instrument panel with the 2.3″ display screen with an instrument panel
cluster with a 4.2″ display screen, free of charge (parts and labor) under the
terms of this program.
This Customer Satisfaction Program will be in effect until November 30,
2022 regardless of mileage. Coverage is only for the original owner or
lessee of the vehicle and will not be transferred to subsequent owners.
How long will it take? The time needed for the instrument panel cluster replacement is less than
one-half day. However, federal odometer regulations require the new
instrument panel cluster to be configured with the current mileage and
engine hours which may require the vehicle to remain at the dealer for
several days or weeks, depending on part availability.
What should you do?
Please check the box for the option of your choosing on the voucher below,
and return using the included self-addressed stamped envelope. If you are
choosing the instrument panel cluster replacement, call your dealer without
delay to schedule a service appointment for Customer Satisfaction Program
20B45. Provide the dealer with your VIN, which is printed near your name at
the beginning of this letter.
© Copyright 2021 Ford Motor Company
What should you do?
(Continued)
If you are choosing the financial compensation, a refund check will be mailed
back to you at the address on the voucher in approximately 2-3 weeks of
receipt.
If you do not already have a servicing dealer, you can access
owner.ford.com for dealer addresses, maps, and driving instructions.
Ford Motor Company wants you to have this service action completed on
your vehicle. The vehicle owner is responsible for making arrangements to
have the work completed.
NOTE: You can receive information about Recalls and Customer
Satisfaction Programs through our FordPass App. The app can be
downloaded through the App Store or Google Play. In addition, there are
other features such as reserving and paying for parking in certain locations
and controlling certain functions on your vehicle (lock or unlock doors,
remote start) if it is equipped to allow control.
COVID-19
(CORONAVIRUS)
Ford dealerships have implemented enhanced protocols to ensure both your
safety and the safety of dealership employees. This includes specific
procedures for cleaning and disinfecting customer vehicles before and after
each vehicle is serviced. In most places, vehicle service has been deemed a
critical service. Please contact your local dealer to confirm current service
hours. For more information on how Ford and your local dealer are working
hard to keep you on the road during these challenging times, please visit
owner.ford.com.
What if you are not the
original owner of this
vehicle?
NOTE: This program is only applicable to the original purchaser or
lessee of the vehicle, regardless of whether they still own the vehicle
or not.
If you are not the original owner of this vehicle, and have an address for the
original owner, please forward this letter to the original owner.
You received this notice because our records, which are based primarily on
state registration and title data, indicate that you are the original owner.
Can we assist you
further?
If you have difficulties getting your vehicle repaired promptly and without
charge, please contact your dealership’s Service Manager for assistance.
RETAIL OWNERS: If you have questions or concerns, please contact our
Ford Customer Relationship Center at 1-866-436-7332 and one of our
representatives will be happy to assist you. If you wish to contact us through
the Internet, our address is: owner.ford.com
For the hearing impaired call 1-800-232-5952 (TDD). Representatives are
available Monday through Friday: 8:00AM – 8:00PM (Eastern Time).
FLEET OWNERS: If you have questions or concerns, please contact our
Fleet Customer Information Center at 1-800-34-FLEET, choose Option
#3, and one of our representatives will be happy to assist you. If you wish to
contact us through the Internet, our address is: fleet.ford.com.
Representatives are available Monday through Friday: 8:00AM – 8:00PM
(Eastern Time).
Thank you for your attention to this important matter.
© Copyright 2021 Ford Motor Company
Please select your preferred option below, sign the voucher and return in the postage prepaid
envelope included with this letter:
Replacement IPC Financial Compensation of $200
NOT A CHECK
OWNER INFORMATION WAIVER – CUSTOMER SATISFACTION PROGRAM 20B45
As an alternative to IPC replacement, Ford Motor Company is offering the vehicle’s original owner $200 in a
cash check.
If you are the original owner of the vehicle, please make your selection on the voucher, fill in the name and
address, sign your full name, and mail it back using the self-addressed stamped envelope included with this
letter.
You are confirming your selection of either a replacement IPC or the financial compensation of $200, the
equivalent value of the vehicle specification originally ordered.
By choosing the financial compensation, you will waive your eligibility to receive the 4.2” display IPC.
REQUEST CHECK IN THE $200 Hundred Dollars or Request IPC Replacement from Dealer
AMOUNT OF:
ORIGINAL OWNER/LESSEE: _________________________________________
MAIL CHECK TO: ADDRESS: _________________________________________
CITY/STATE: ______________________________________________
ZIP: _________________________________________
Printed Vehicle Owner Name
12345678901234567
TEST OWNER NAME
12345 TEST STREET
TEST CITY, XX 12345
ORIGINAL VEHICLE OWNER SIGNATURE
SEOCONTENT-END
1 Associated Document
Manufacturer Communications
Customer Satisfaction Program 20B45
November 23, 2021
MC-10204042-0001.pdf 1865.841KB

- 【LATEST A15 NAVIGATION SD CARD UPDATE】Stay ahead with the newest 2026 A15 navigation SD card that updates all previous versions including A14 and earlier, providing the most comprehensive map coverage for the entire United States and Canada with millions of updated points of interest such as gas stations, hotels, restaurants and newly added highways, ensuring reliable guidance for both city driving and cross-country adventures.
- 【WIDE COMPATIBILITY WITH FORD MODELS】This navigation SD card part number GM5T-19H449-AJ is designed to fit Ford vehicles including F-150 2013-2015, Explorer 2011-2016, Fusion 2013-2016, Expedition 2015, Escape 2013-2015, Edge 2011-2015, Focus 2012-2015, C-MAX 2013-2015, Escape Hybrid 2013-2015, Expedition XT 2015, Fiesta 2014-2015, Flex 2013-2015, Mustang 2015, Super Duty F-250/F-350/F-450 2013-2016, Taurus 2013-2015, Transit 2013-2015, Transit Connect 2014-2016.
- 【WIDE COMPATIBILITY WITH LINCOLN MODELS】 This navigation SD card compatible with Lincoln Accessories Fits Lincoln MKZ (2013 - 2016), MKX (2011 - 2016), MKC (2015), MKS (2013 - 2015), MKT (2013 - 2015), NAVIGATOR (2015). Reliable Lincoln navigation accessories that update your vehicle’s SYNC 2 system for accurate routing across USA & Canada.
- 【EASY PLUG AND PLAY INSTALLATION】You need to check if the CCPU of Ford/Lincoln SYNC system is compatible or needs to be updated first, check the product image corresponding to the CCPU version. To install: 1. Turn engine OFF 20+ mins. 2. Locate the SD card slot and remove the old navigation card. 3. Insert the new Navigation SD Card untll it clicks. 4.Start the engine to ensure, the “Navigation” icon should appear in the top-right corner (Auto-updates in 10-20 mins Never interrupt the process!).
- 【RELIABLE OFFLINE GPS NAVIGATION】Unlike smartphone navigation apps that depend on cellular data signals this Lincoln/Ford navigation SD card stores all map data directly on the card providing uninterrupted turn-by-turn directions even in remote areas mountains or deserts with no internet connection, perfect for long road trips across the United States and Canada with no data usage no signal issues and no roaming charges ensuring you always find your way regardless of your location.

- 2026 Latest Navigation GPS Maps sd Card A15 newest updated includes New Roads USA and Canada
- Compatible with Ford Navigation: f150 (2013-2015), Super Duty f250/350/450 (2013-2016), Explorer (2011-2016), Escape (2013-2015),FOCUS 2012 - 2015,FUSION 2013 - 2016
- Compatible with Ford Navigation: Expedition (2015), Mustang (2015), Transit (2013-2015), TRANSIT CONNECT (2014 - 2016),Taurus (2013-2015)
- Compatible with Lincoln Navigation MKC 2015, MKS (2013-2015), MKT (2013-2015), MKX (2011-2016,) MKZ (2013-2016),NAVIGATOR (2015)
- Compatible with C-MAX 2013 - 2015, EDGE 2011 - 2015,ESCAPE 2013 - 2015,ESCAPE HYBRID 2013 - 2015,EXPEDITION XT 2015,FIESTA 2014 - 2015,FLEX 2013 - 2015

- Note: Navigation sd card for database version A15 map library coverage for the United States and Canada. Note, please refer to the system version description in the attached picture to confirm that your car with Sync2 systems that use the embedded SD card
- Suitable Vehicles: The GPS navigation SD card is OEM GM5T-19H449-AJ, compatible with Ford 2013-2015 C-Max, 2013-2016 Fusion, compatible with Lincoln 2013-2015 MKS, and more. Please refer to the details page for more specific information on the fit models
- Clear Navigation: Our truck gps navigation SD card encompassing detailed map data and comprehensive road information, has undergone recent updates to incorporate the most current map database, enables you to arrive at your destination swiftly
- Easy to Install: Simply turn off the vehicle power, identify the SD card slot, typically positioned in the central console or concealed behind a dashboard access panel, eject the existing SD card and insert the new SD card until you hear the slot clic
- Usage Guidelines: When the latest version navigation SD card fault message is displayed, firstly eject the SD card and inspect it for breakage, if not perform a system factory reset or master reset according to the instructions in the detailed description
- [Precautions purchase]:Please contact and tell us your car's model, year and VIN number before or after you place order, and we will provide "free pre-programming" based on your vehicle's VIN.
- [Fitment]:Sync 3 Upgrade Kit Fits for Ford 2011-2016 F150, F250, F350, F450, F550, Edge, C-MAX, Escape, Expedition, Flex, Explorers, Focus, Fusion, Mustang, Super Duty, Taurus, Transit, Transit Connect; Fits for Lincoln MKC, MKS, MKT, MKX, MKZ, Navigator. (Specifically judged by VIN)
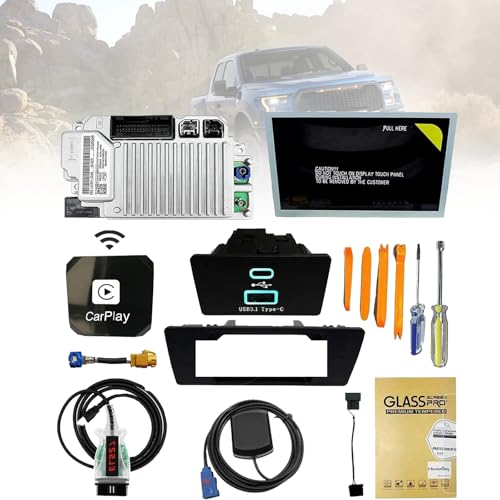
- [Retain all]:Sync 2 to sync 3 upgrade kit retaining all factory features (audio radio, rear camera, climate control, steering wheel controls, heated and cooled seats, etc.) With the latest map version na220.Support Wireless CarPlay.
- [Kit Includes]:1.Ford SYNC3 APIM module 2.Genuine Ford 8" Capacitive Touchscreen 3.Screen to module cable 4.GPS antenna 5.USB-A HUB 6.USB power harness 7.USB bracket 8.ELM27 blinker 9.Replacement tools
- [Easy Installation]:The perfect design of SYNC 2 to SYNC 3 is rigorously tested before leaving the factory to ensure that there are no product defects and to provide you with better service.
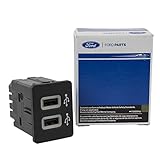
- OEM Genuine Ford Parts only at Rod Baker Ford!
- Requires Updating Sync 3 to the Latest Compatible Version!
- Required for Upgrading Sync 3 to unlock Carplay Feature
- SEE Description for Compatible Models!!!
- If you are unsure about fitment, please contact us with your VIN to confirm!
This product presentation was made with AAWP plugin.