
NHTSA ID Number: 10199479
Manufacturer Communication Number: 20N11-S3
Summary
On some of the affected vehicles, the roof rack covers may become detached from the vehicle.
4 Affected Products
Vehicle
| MAKE | MODEL | YEAR |
| FORD | EXPLORER | 2016-2019 |
PROGRAM TERMS
This program provides a one-time repair for the roof rail covers and retaining clips to 10 years of service or 150,000 miles from the warranty start date of the vehicle, whichever occurs first. This is a one-time repair program. Both roof rail covers should be serviced at time of repair.
If a vehicle has already exceeded either the time or mileage limits, this extended warranty coverage will last through June 30, 2021.
Coverage is automatically transferred to subsequent owners.
VEHICLES COVERED BY THIS PROGRAM
| Vehicle | Model Year | Assembly Plant | Build Dates |
| Explorer | 2016-2019 | Chicago | September 19, 2014 through March 3, 2019 |
REASON FOR PROVIDING EXTENDED WARRANTY COVERAGE
On some of the affected vehicles, the roof rack covers may become detached from the vehicle.
SERVICE ACTION
If an affected vehicle exhibits this condition, dealers are to replace any broken roof rail clips and loose or damaged roof rail covers. Dealers are to secure roof rail covers with two-part epoxy as described in the technical instructions. This service must be performed at no charge to the vehicle owner.
NOTE: Both roof rail covers should be serviced at time of repair.
OWNER NOTIFICATION AND MAILING SCHEDULE
Owner Letters are expected to be mailed the week of January 11, 2021. Dealers should repair any affected vehicles that experience roof rail cover detachment, whether or not the customer has received a letter.
TITLE BRANDED / SALVAGED VEHICLES
Vehicles with cancelled warranties are not eligible for this service action.
OWNER REFUNDS
- Ford
 Motor Company is offering a refund for owner-paid repairs covered by this program if the repair was performed before the date of the Owner Notification Letter. This refund offer expires June 30, 2021.
 - Dealers are also pre-approved to refund owner-paid emergency repairs that were performed away from an authorized servicing dealer after the date of the Owner Notification Letter. Non-covered repairs, or those judged by Ford to be excessive, will not be reimbursed.
- Refunds will only be provided for the cost associated with roof rail cover or retaining clip replacement.
RENTAL VEHICLES
The use of rental vehicles is not approved for this program.
Part shortages do not qualify for rental vehicles with this program.
PARTS REQUIREMENTS
| Part Number | Description | Order Quantity |
| -78551A46- | RH Roof Rail Cover
(part number varies by vehicle – use Ford | As Needed |
| -78551A47- | LH Roof Rail Cover
(part number varies by vehicle – use Ford | As Needed |
| Part Number | Description | Order Quantity | Claim Quantity |
| FB5Z-7851050-A | Retaining Clips (inserted in Roof Rack Base) (1 per package, 7 each side, 14 possible)Note: Replacing all 14 clips is not required unless they are broken and is considered over repairing a vehicle. | As Required 0 to 14 | |
| Part Number | Description | Order Quantity | Claim Quantity |
| W709002-SS3GA | Christmas Tree Retainer Pin (to be drilled into roof rack cover) (4 per package, 4 per side, 8 required | 2 | 8 |
CERTAIN 2016-2019 MODEL YEAR EXPLORER VEHICLES EQUIPPED WITH SATIN OR CHROME PLATED ROOF RACK COVERS— ROOF RACK COVER INSPECTION/REPAIR
Table Of Contents
Inspection – 4
Pass / Fail – 6
Cleaning – 11
Drilling and securing – 12
Appendix A – Picture Requirement – 17
OVERVIEW
Most customers can be serviced in one dealer visit by completing the following:
• Inspection procedure, all parts are reusable.
• Clean Off Adhesive from prior repair.
• Drilling and Push Pin installation.
• No SSSC contact necessary.
• No photos required.
Review the videos below before starting this repair procedure:


Removing Retaining Clips with Epoxy

Correct Procedure to Measure, Drill and Install Push Pin
Materials List
| 2mm Feeler Gauge | Sharp 15/64 Drill Bit | Painters Tape |
| Paint Stick or Marker | Tape Measure | Cardboard |
SERVICE PROCEDURE
NOTE: Perform this repair on both sides of the vehicle.
NOTE: Most customers should be serviced in one visit with the push pin retainers and do not require parts or photos.
Identify all the parts that require replacement, and take digital images.
Part orders can be expedited by successfully completing the following:
a. Complete each step of this inspection procedure.
b. Identify and clearly highlight location of damage.
c. Obtain digital images, label RH or LH side.
A loose or lifted roof rack cover in the front or rear does not indicate the need for parts to be replaced, the root cause needs to be identified in the inspection procedure. See Figures 1, 2 and 3.
NOTE: The roof rack base front end caps do not need to be replaced if the roof rack passes inspection.
Only replace the roof rack base front end caps if damage has occurred during transfer of parts.
NOTE: The roof rack base rear gutter molding does not need to be replaced if the roof rack passes inspection. Only replace the roof rack base rear gutter molding if damage has occurred during transfer of parts.
Inspection Procedure
NOTE: This inspection is to be performed on both sides.
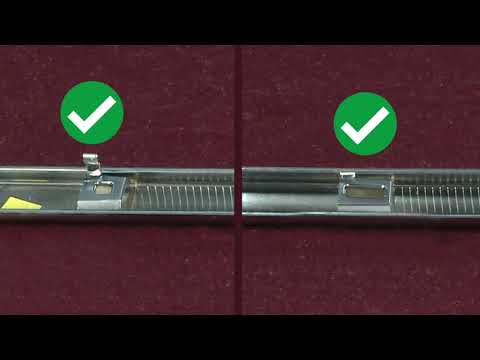
1. Using a 2 mm feeler gauge, check the spacing on the front and rear of both the RH and LH roof rack covers. See Figure 4. If the feeler gauge fits between the roof rack cover and the roof rack base then it fails inspection. Does the roof rack covers pass or fail?
NOTE: A failing roof rack cover does not require replacement at this time, further investigation is required.
If FAIL – For RH roof rack cover, take a picture of the feeler gauge in position of the failing roof rack cover, then Proceed to Step 2.
– For LH roof rack cover, take a picture of the feeler gauge in position of the failing roof rack cover, Proceed to Step 2.
If PASS – For RH roof rack cover, Proceed to Drilling and Securing procedure on Page 12.
– For LH roof rack cover, Proceed to Drilling and Securing procedure on Page 12.
2. Inspect the affected roof rack cover(s), roof rack base, retaining clips (seven each side), and roof rack retaining towers (seven each side).
a. Remove the affected roof rack cover(s). See Figure 5.
NOTE: Roof rack base removed from vehicle for clarity.
NOTE: A broken roof rack base hook does not need to be replaced.
b. Inspect the affected roof rack base. See Figure 6.
i. If broken, take photos of roof rack base for both the RH and LH.
1. Photos must be clearly labeled RH or LH.
2. Damaged roof rack bases must be clearly identified with a bright highlighter or similar.
c. Inspect the retaining clips (7 per side) on the affected side without removing them from the roof rack base. See Figures 7, 8 and 9.
i. Clips that are reusable:
• Different colors.
• Different styles.
• No major damage identified.
ii. Clips that cannot be reused:
• Missing.
• All or partial of the top missing from the clip base.
• Broken retaining tang.
• Covered in epoxy from a previous repair.
d. Inspect the retaining towers (7 each side) on the interior or underside of the affected roof rack cover(s). See Figure 9.
i. Broken tangs do not require replacement.
ii. If broken, take photos of retaining towers on the roof rack covers.
1. Photos must be clearly labeled RH or LH.
2. Broken retaining towers must be clearly identified with a bright highlighter or similar.
e. Inspect for any other damage preventing the roof rack cover from being fully seated on the roof rack base.
i. Take photos of any other damage for both the RH and LH.
1. Photos must be clearly labeled RH or LH.
2. Damage must be clearly identified with a bright highlighter or similar.
ii. Take photo showing vehicle mileage. See Figure 10.
3. In steps a through e – if no damage identified then proceed to the cleaning procedure on Page 11.
4. In steps a through e – if damage is identified on the roof rack covers, roof rail base, retaining clips (seven each side), and roof rack retaining towers (7 each side) – then proceed to photo requirements on Page 18.
Cleaning
1. If Technical Service bulletin (TSB) 19-2364 or 20-2154 was performed, evidence of RTV or expoxy will be seen on the roof rack cover and or roof rack contact patch. Inspect the roof rack cover retaining tower and roof rack contact patch for signs of RTV or epoxy adhesive. See Figure 11. Was evidence of RTV or epoxy found?
If YES – Replace all the roof rack clips on the affected side, then proceed to Step 2 on Page 11.
If NO – Proceed to Step 2 on Page 11.
2. Reinstall the roof rack cover by reversing the removal procedure. See Figure 5 on Page 5.
Drilling and Securing
1. At the rear of the vehicle, apply painters tape to the inboard end of the roof rack cover. See Figure 12.
2. From the first screw from the rear, measure 150 mm (6 in) from the screw towards the rear of the vehicle and up 20 mm (.75 in) from the top of the roof rack base. Mark the measurement on the tape. See Figure 13.
3. From the first mark, measure 100 mm (4 in) towards the rear of the vehicle and up 18 mm (.70 in) from the top of the roof rack base. Mark the measurement on the tape. See Figure 14.
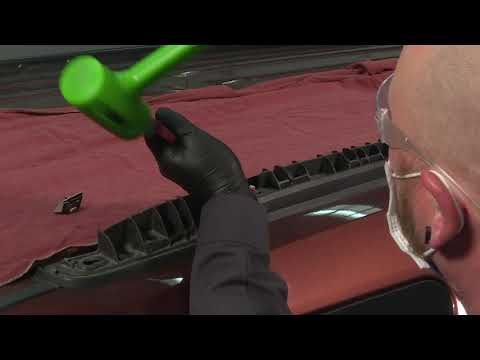
4. Set a depth gauge on the 15/64 drill bit at 25 mm (1 in). Having a second person apply downward pressure, drill out both marks. See Figure 15.
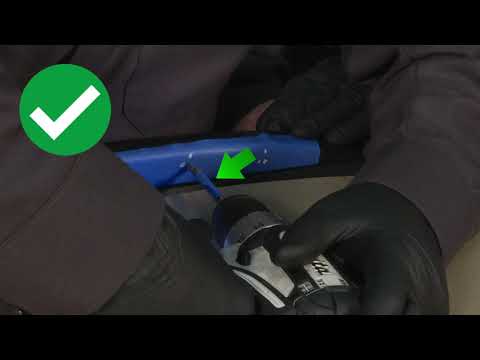
5. Remove the painters tape and install the push pin retainers. See Figure 16.
6. At the front of the vehicle, apply painters tape to the inboard end of the roof rack cover. See Figure 17.
7. From the first screw from the front, measure 348 mm (13.75 in) from the screw towards the front of the vehicle and up 13 mm (.5 in) from the top of the roof rack base. Mark the measurement on the tape. See Figure 18.
8. From the first mark, measure 63 mm (2.5 in) towards the front of the vehicle and up 9 mm (.25 in) from the top of the roof rack base. Mark the measurement on the tape. See Figure 19.
9. Having a second person apply downward pressure, drill out both marks. See Figure 20.
10. Remove the painters tape and install the push pin retainers. See Figure 21.
SEOCONTENT-START
Copyright 2021 Ford![]() Motor Company
Motor Company
David J. Johnson Ford![]() Motor Company
Motor Company
Director P. O. Box 1904
Service Engineering Operations Dearborn, Michigan 48121
Ford![]() Customer Service Division
Customer Service Division
July 12, 2021
TO: All U.S. Ford![]() and Lincoln
and Lincoln![]() Dealers
Dealers
SUBJECT: Customer Satisfaction Program 20N11 – Supplement #3
Certain 2016 – 2019 Model Year Explorer Vehicles equipped with Satin or Chrome Plated Roof
Rack Covers
Roof Rack Cover Inspection/Repair
REF: Technical Service Bulletins 19-2364 and 20-2154
2016-2019 Explorer – Roof Rack Covers Loose
REF: NEW VEHICLE DEMONSTRATION / DELIVERY HOLD –
Safety Recall 21S22
Certain 2016 – 2019 Model Year Explorer Vehicles equipped with Painted Roof Rack Covers
Roof Rack Cover Inspection/Repair
New! REASON FOR THIS SUPPLEMENT
• Certain 2016 – 2019 model year Explorer vehicles equipped with painted roof rack covers were removed
from the 20N11 customer satisfaction program when 21S22 was published.
o Vehicles equipped with satin or chrome plated roof rack covers will remain in 20N11.
o Vehicles previously repaired under 20N11 will not be moved to 21S22.
• Technical instructions are updated with a new inspection procedure and photo requirements.
o Parts should not be ordered before the inspection procedure is completed, damage is identified,
and digital images obtained.
o If SSSC call agents can easily determine if part is RH or LH, and where the part is damaged, then
the part order will be expedited.
o New labor operation codes for inspection procedures with pass/fail requirements.
• New videos are available to supplement the technical instructions.
• Epoxy will no longer be used as part of repair.
• New part number W709002-SS3GA – Christmas tree retaining pin will be used to secure roof rack
covers, parts will be available via seed stock.
PROGRAM TERMS
This program provides a one-time repair for the roof rack covers and retaining clips to 10 years of service or
150,000 miles from the warranty start date of the vehicle, whichever occurs first.
This is a one-time repair program. Both roof rack covers should be serviced at time of repair.
If a vehicle has already exceeded either the time or mileage limits, this extended warranty coverage will last
through June 30, 2021.
Coverage is automatically transferred to subsequent owners.
VEHICLES COVERED BY THIS PROGRAM
Vehicle Model Year Assembly Plant Build Dates
Explorer 2016-2019 Chicago September 19, 2014 through March 3, 2019
Affected vehicles are identified in OASIS.
REASON FOR PROVIDING EXTENDED WARRANTY COVERAGE
On some of the affected vehicles, the roof rack covers may become detached from the vehicle.
Copyright 2021 Ford![]() Motor Company
Motor Company
SERVICE ACTION
If an affected vehicle exhibits this condition, dealers are to inspect and secure both sides of the roof rack covers
as described in the technical instructions and replace only broken roof rack covers and retaining clips. This
service must be performed at no charge to the vehicle owner.
NOTE: Both roof rack covers should be serviced at time of repair.
OWNER NOTIFICATION MAILING SCHEDULE
Owner Letters were mailed the week of January 11, 2021. Dealers should repair any affected vehicles that
experience roof rack cover detachment, whether or not the customer has received a letter.
New! ATTACHMENTS
Attachment I: Administrative Information
Attachment II: Labor Allowances and Parts Ordering Information
Attachment III: Technical Information
Owner Notification Letters
QUESTIONS & ASSISTANCE
For questions and assistance, contact the Special Service Support Center (SSSC) via the SSSC Web Contact
Site. The SSSC Web Contact Site can be accessed through the Professional Technician Society (PTS) website
using the SSSC link listed at the bottom of the OASIS VIN report screen or listed under the SSSC tab.
Sincerely,
David J. Johnson
Copyright 2021 Ford![]() Motor Company
Motor Company
ATTACHMENT I
Page 1 of 2
Customer Satisfaction Program 20N11 – Supplement #3
Certain 2016 – 2019 Model Year Explorer Vehicles equipped with Satin or Chrome Plated Roof Rack Covers
Roof Rack Cover Inspection/Repair
OASIS ACTIVATION
OASIS was activated on December 8, 2020.
FSA VIN LISTS ACTIVATION
FSA VIN Lists will not be activated for this service action.
SOLD VEHICLES
• Only owners with affected vehicles that exhibit the covered condition will be directed to dealers for repairs.
• Dealers are to prioritize repairs of customer vehicles over repairs of new and used vehicle inventory.
STOCK VEHICLES
• Do not perform this program unless the affected vehicle exhibits the covered condition.
TITLE BRANDED / SALVAGED VEHICLES
Vehicles with cancelled warranties are not eligible for this service action.
OWNER REFUNDS
• Ford![]() Motor Company is offering a refund for owner-paid repairs covered by this program if the repair was
Motor Company is offering a refund for owner-paid repairs covered by this program if the repair was
performed before the date of the Owner Notification Letter. This refund offer expires June 30, 2021.
• Dealers are also pre-approved to refund owner-paid emergency repairs that were performed away from an
authorized servicing dealer after the date of the Owner Notification Letter. Non-covered repairs, or those
judged by Ford![]() to be excessive, will not be reimbursed.
to be excessive, will not be reimbursed.
• Refunds will only be provided for the cost associated with roof rack cover or retaining clip replacement.
RENTAL VEHICLES
The use of rental vehicles is not approved for this program.
Part shortages do not qualify for rental vehicles with this program.
Copyright 2021 Ford![]() Motor Company
Motor Company
ATTACHMENT I
Page 2 of 2
Customer Satisfaction Program 20N11 – Supplement #3
Certain 2016 – 2019 Model Year Explorer Vehicles equipped with Satin or Chrome Plated Roof Rack Covers
Roof Rack Cover Inspection/Repair
ADDITIONAL REPAIR (LABOR TIME AND/OR PARTS)
Additional repairs identified as necessary to complete the FSA should be managed as follows:
• For related damage and access time requirements, refer to the Warranty and Policy Manual – Section 6 –
Ford![]() & Lincoln
& Lincoln![]() Program Policies / General Information & Special Circumstances for FSA’s / Related
Program Policies / General Information & Special Circumstances for FSA’s / Related
Damage.
• For vehicles within new vehicle bumper-to-bumper warranty coverage, no SSSC approval is required,
although related damage must be on a separate repair line with the Related Damage radio button
checked.
o Ford![]() vehicles – 3 years or 36,000 miles
vehicles – 3 years or 36,000 miles
• For vehicles outside new vehicle bumper-to-bumper warranty coverage, submit an Approval Request to
the SSSC Web Contact Site prior to completing the repair.
CLAIMS PREPARATION AND SUBMISSION
• Claim Entry: Enter claims using Dealer Management System (DMS) or One Warranty Solution (OWS)
online.
Description When Entering Claims Enter Value:
Select claim type 31 Field Service Action
Sub Code 20N11
Causal Part Number 78551A46
Customer Concern Code (CCC) B63 – Exterior Trim / Molding Troubles –
Loose/Missing
Condition Code (CC) 33 – Loose Part QTY: 0
• For additional claims preparation and submission information, refer to the Recall and Customer
Satisfaction Program (CSP) Repairs in the OWS User Guide.
• Related Damage/Additional labor and/or parts: Must be claimed as Related Damage on a separate
repair line from the FSA with same claim type and sub code as described in Claim Entry above.
IMPORTANT: Click the Related Damage Indicator radio button.
• Refunds: Submit refunds on a separate repair line.
– Program Code: 20N11 – Misc. Expense: ADMIN
– Misc. Expense: REFUND – Misc. Expense: 0.2 Hrs.
o Multiple refunds should be submitted on one repair line and the invoice details for each repair should
be detailed in the comments section of the claim.
Copyright 2021 Ford![]() Motor Company
Motor Company
ATTACHMENT II
Page 1 of 5
Customer Satisfaction Program 20N11 – Supplement #3
Certain 2016 – 2019 Model Year Explorer Vehicles equipped with Satin or Chrome Plated Roof Rack Covers
Roof Rack Cover Inspection/Repair
New! LABOR ALLOWANCES
PASS: No Parts Replaced, No Photos Required Labor Operation Labor Time
Inspect both covers, measure and drill 8 holes and install 8
plastic fasteners in both covers. 20N11J 0.5 Hours
FAIL: Parts Replaced, Photos Required Labor Operation Labor Time
Inspect both covers, one fails – remove cover to inspect for
damage, replace damaged retainers, install cover, both
covers – measure and drill 8 holes and install 8 plastic
fasteners
Replace one roof rack cover
Refer to Technical Instructions for Pass/Fail
requirements and acceptable/unacceptable photos
20N11K 0.5 Hours
Inspect both covers, both fail – remove both covers to
inspect for damage, replace damaged retainers, install
covers, both covers – measure and drill 8 holes and install 8
plastic fasteners
Replace both roof rack covers
Refer to Technical Instructions for Pass/Fail
requirements and acceptable/unacceptable photos
20N11L 0.6 Hours
SSSC Image Submission*:
Additional time to submit five or more images of roof rack
covers via SSSC VIN specific part request (Can be claimed
with labor operation K and L only)
20N11ZZ 0.2 Hours
Copyright 2021 Ford![]() Motor Company
Motor Company
ATTACHMENT II
Page 2 of 5
Customer Satisfaction Program 20N11 – Supplement #3
Certain 2016 – 2019 Model Year Explorer Vehicles equipped with Satin or Chrome Plated Roof Rack Covers
Roof Rack Cover Inspection/Repair
New! LABOR ALLOWANCES (continued)
FAIL – TSB 19-2364 or 20-2154 PREVIOUSLY
COMPLETED
Extra cleaning time to remove RTV or epoxy.
• SSSC approval code is required to claim this labor
operation code.
• Must include previous OWS claim number of TSB repair
to claim this labor operation code in SSSC approval
request.
• If customer paid for repair, previous repair order or
customer receipts must be attached to approval request.
Labor Operation Labor Time
Inspect both covers, one fails – remove cover to inspect for
damage, replace all retainers that are epoxied on, install
cover, both covers – measure and drill 8 holes and install 8
plastic fasteners
20N11M 0.7 Hours
Inspect both covers, both fail – remove both covers to
inspect for damage, replace all retainers that are epoxied on,
install covers, both covers – measure and drill 8 holes and
install 8 plastic fasteners
20N11N 0.9 Hours
Copyright 2021 Ford![]() Motor Company
Motor Company
ATTACHMENT II
Page 3 of 5
Customer Satisfaction Program 20N11 – Supplement #3
Certain 2016 – 2019 Model Year Explorer Vehicles equipped with Satin or Chrome Plated Roof Rack Covers
Roof Rack Cover Inspection/Repair
New! PARTS REQUIREMENTS / ORDERING INFORMATION
Video Instruction:
Review the following video clips before ordering parts or attempting to repair a vehicle (Ctrl + Click to follow link):
Roof Rack Cover Inspection with 2mm Feeler Gauge
Roof Rack Cover Removal
Roof Rack Cover Inspection – Checking Interior of Cover for Damage
Retaining Clips Inspection
Roof Rack Base Inspection
TSB Previously Performed, Removing Retaining Clips with Epoxy
Incorrect Drilling Method
Correct Procedure to Measure Drill and Install Push Pins
SSSC Web Contact Site:
Roof rack covers are not available to repair all vehicles, which require replacement.
To place an order for a roof rack cover, submit a VIN-specific Part Order contact via the SSSC Web Contact Site,
along with VIN-specific photos (see digital image requirements below).
• If agents can easily determine if part is RH or LH, and where the part is damaged then the part order can be
expedited.
• Photos should have correct focus, proper lighting, and correct photo orientation.
Photos not required:
• Multiple photos of the vehicle
• Roof racks on top of the vehicle
• Roof racks showing nothing wrong
• Door labels and vehicle license plates
• Front/rear of loose roof rack covers loose/sticking up
Photos are required:
1. RH Roof rack Cover – Base Part Number -78551A46-
a. Photo must be labeled which side RH or LH with sticky note
b. Two photos required for each part number ordered
c. Show 2mm feeler gauge against roof rack cover as shown in video clip
d. Show why it needs to be replaced and clearly highlighted
2. LH Roof Rack Cover – Base Part Number -78551A47-
a. Photo must be labeled which side RH or LH with sticky note
b. Two photos required for each part number ordered
c. Show 2mm feeler gauge against roof rack cover as shown in video clip
d. Show why it needs to be replaced and clearly highlighted
3. Roof Rack Base – Base Part Number – 7855114 (RH) or 7855115 (LF)
a. Photo must be labeled which side RH or LH
b. Show why it needs to be replaced and clearly highlighted
Copyright 2021 Ford![]() Motor Company
Motor Company
ATTACHMENT II
Page 4 of 5
Customer Satisfaction Program 20N11 – Supplement #3
Certain 2016 – 2019 Model Year Explorer Vehicles equipped with Satin or Chrome Plated Roof Rack Covers
Roof Rack Cover Inspection/Repair
PARTS REQUIREMENTS / ORDERING INFORMATION (continued)
See video and photo requirements from previous page before ordering parts.
NOTE: Both roof rack covers should be serviced at time of repair.
Part Number Description Order Quantity
-78551A46- RH Roof Rack Cover
(part number varies by vehicle – use Ford![]() ECat to identify
ECat to identify
the specific part number by VIN)
As Needed
-78551A47- LH Roof Rack Cover
(part number varies by vehicle – use Ford![]() ECat to identify
ECat to identify
the specific part number by VIN)
As Needed
Dealers will be notified via a DOES II communication if circumstances warrant a change in part supply strategy
and when open ordering resumes.
Order the parts below through normal order processing channels:
Part Number Description Order
Quantity
Claim
Quantity
FB5Z-7851050-A
Retaining Clips (inserted in Roof Rack Base)
(1 per package, 7 each side, 14 possible)
Note: Replacing all 14 clips is not required unless
they are broken and is considered over repairing a
vehicle.
As Required
0 to 14
To guarantee the shortest delivery time, an emergency order for parts must be placed.
Seed Stock:
To ensure an equitable distribution of service parts, part number W709002-SS3GA will be seed stocked over the
next 8 weeks (to dealers with 1 or more VINs assigned to their dealership). Every other week July 12, 2021
through August 30, 2021 the quantity shipped will be equal to a percentage of the vehicles assigned to them.
NOTE: Dealers should schedule vehicles for repair after seed stock is received, additional quantities of
W709002-SS3GA cannot be ordered through SSSC until the seed stock program is completed, which is
expected in September 2021.
Part Number Description Order
Quantity
Claim
Quantity
W709002-SS3GA
Christmas Tree Retainer Pin
(to be drilled into roof rack cover)
(4 per package, 4 per side, 8 required
2 8
Dealers will need to access https://web.fsavinlists.dealerconnection.com to determine the total number of affected
vehicles assigned to their dealership.
NOTE: If a dealership wishes to discontinue their seed stock, contact the SSSC via the SSSC Web Contact
Site. Please note that removing a dealership P&A Code from this seed stock program is a permanent action.
Copyright 2021 Ford![]() Motor Company
Motor Company
ATTACHMENT II
Page 5 of 5
Customer Satisfaction Program 20N11 – Supplement #3
Certain 2016 – 2019 Model Year Explorer Vehicles equipped with Satin or Chrome Plated Roof Rack Covers
Roof Rack Cover Inspection/Repair
PARTS REQUIREMENTS / ORDERING INFORMATION (continued)
Dealers will be notified via a DOES II communication if circumstances warrant a change in part supply strategy
and when open ordering resumes.
DEALER PRICE
For latest prices, refer to DOES II.
PARTS RETENTION AND RETURN
Follow the provisions of the Warranty and Policy Manual, Section 1 – WARRANTY PARTS RETENTION AND
RETURN POLICIES. If a replaced part receives a scrap disposition, the part must be scrapped in accordance
with all applicable local, state and federal environmental protection and hazardous material regulations.
EXCESS STOCK RETURN
Excess stock returned for credit must have been purchased from Ford![]() Customer Service Division in accordance
Customer Service Division in accordance
with Policy Procedure Bulletin 4000.
REPLACED FSA PARTS INSPECTION AND SIGN OFF
Effective March 1st 2021 all parts replaced as part of an FSA repair with a repair order open date of March 1st
2021 or later must be inspected and signed off on the repair order by a member of your dealers fixed operations
management team or an employee the task has been delegated to. If the task is to be delegated to a nonmanagement
employee, the employee needs to be someone other than the technician who completed the repair
and needs to understand the importance of completing this task consistently and accurately.
• All parts replaced as part of an FSA repair should be returned to the parts department following the
Warranty Parts Retention and Return Policies.
• Inspect the replaced parts to verify the FSA repair was completed.
• If the FSA repair is found to be complete, the designated employee signs the repair order line or parts
return stamp area (electronic or hand signed) for the FSA repair indicating the parts were inspected and
validated to have been replaced.
• After the parts have been inspected, they should be handled based on the guidance in the parts status
report in the Online Warranty System (Hold, Return, CORE, Scrap, etc.).
• This process is subject to review during warranty audits for FSA repairs with a repair order open date of
March 1st 2021 or later. Any eligible FSA claims requiring parts replacement, found not to have been
inspected and signed off during a warranty audit will be subject to chargeback and consideration for
enrollment into the Dealer Incomplete Recall Repair Process.
Note: Other approvals (electronic or handwritten) for add-on repair lines, dealer owned vehicle repairs, and repeat
repairs do not qualify as FSA parts inspection approvals. The post repair FSA parts inspection process (electronic
or handwritten) is independent from other warranty approval requirements. The approval by the designated
employee implies that the FSA parts were found to be replaced and must be able to be clearly identified on the
Repair Order. If multiple FSA’s require approval on a single Repair Order, each applicable occurrence will require
individual post repair approval by the designated employee.
ATTACHMENT III
PAGE 1 OF 18
CUSTOMER SATISFACTION PROGRAM 20N11-S3
CPR © 2021 FORD![]() MOTOR COMPANY
MOTOR COMPANY
DEARBORN, MICHIGAN 48121
07/2021
CERTAIN 2016-2019 MODEL YEAR EXPLORER VEHICLES EQUIPPED WITH SATIN
OR CHROME PLATED ROOF RACK COVERS— ROOF RACK COVER INSPECTION/
REPAIR
Table Of Contents
Inspection……………………………………………………………………………………………….4
Pass / Fail………………………………………………………………………………………………. 6
Cleaning………………………………………………………………………………………………..11
Drilling and securing……………………………………………………………………………..12
Appendix A – Picture Requirement………………………………………………………….17
OVERVIEW
Most customers can be serviced in one dealer visit by completing the following:
• Inspection procedure, all parts are reusable.
• Clean Off Adhesive from prior repair.
• Drilling and Push Pin installation.
• No SSSC contact necessary.
• No photos required.
Review the videos below before starting this repair procedure:
Inspection with Feeler Gauges
Roof Rack Cover Removal
Roof Rack Cover Inspection
Retaining Clips Inspection
Roof Rack Base Inspection
Removing Retaining Clips with Epoxy
Wrong Drilling Method
Correct Procedure to Measure, Drill and Install Push Pins
Materials List
2mm Feeler Gauge Sharp 15/64 Drill Bit Painters Tape
Paint Stick or Marker Tape Measure Cardboard
SERVICE PROCEDURE
NOTE: Perform this repair on both sides of the vehicle.
NOTE: Most customers should be serviced in one visit with the push pin retainers and do not require
parts or photos.
Identify all the parts that require replacement, and take digital images.
ATTACHMENT III
PAGE 2 OF 18
CUSTOMER SATISFACTION PROGRAM 20N11-S3
CPR © 2021 FORD![]() MOTOR COMPANY
MOTOR COMPANY
DEARBORN, MICHIGAN 48121
07/2021
21202B
FRONT OF
VEHICLE
STUD FOR
MISSING NUT
LIFTED ROOF RACK
BASE FRONT END CAP
FIGURE 2
NOTE: The roof rack base front end caps do not need to be replaced if the roof rack passes inspection.
Only replace the roof rack base front end caps if damage has occurred during transfer of parts.
PLACE COPY HERE
PLACE COPY HERE
PLACE COPY HERE
STUD FOR
MISSING NUT
STUD FOR
MISSING NUT
STUD FOR
MISSING NUT
21202A
LIFTED ROOF
RACK COVER
FIGURE 1
Part orders can be expedited by successfully completing the following:
a. Complete each step of this inspection procedure.
b. Identify and clearly highlight location of damage.
c. Obtain digital images, label RH or LH side.
A loose or lifted roof rack cover in the front or rear does not indicate the need for parts to be replaced, the
root cause needs to be identified in the inspection procedure. See Figures 1, 2 and 3.
ATTACHMENT III
PAGE 3 OF 18
CUSTOMER SATISFACTION PROGRAM 20N11-S3
CPR © 2021 FORD![]() MOTOR COMPANY
MOTOR COMPANY
DEARBORN, MICHIGAN 48121
07/2021
PLACE COPY HERE
PLACE COPY HERE
PLACE COPY HERE
STUD FOR
MISSING NUT
STUD FOR
MISSING NUT
STUD FOR
MISSING NUT
21202C
STUD FOR
MISSING NUT
FRONT OF
VEHICLE
LIFTED ROOF RACK BASE
REAR GUTTER MOLDING
FIGURE 3
NOTE: The roof rack base rear gutter molding does not need to be replaced if the roof rack passes
inspection. Only replace the roof rack base rear gutter molding if damage has occurred during
transfer of parts.
ATTACHMENT III
PAGE 4 OF 18
CUSTOMER SATISFACTION PROGRAM 20N11-S3
CPR © 2021 FORD![]() MOTOR COMPANY
MOTOR COMPANY
DEARBORN, MICHIGAN 48121
07/2021
Inspection Procedure
NOTE: This inspection is to be performed on both sides.
1. Using a 2 mm feeler gauge, check the spacing on the front and rear of both the RH and LH roof rack
covers. See Figure 4. If the feeler gauge fits between the roof rack cover and the roof rack base then it
fails inspection. Does the roof rack covers pass or fail?
NOTE: A failing roof rack cover does not require replacement at this time, further investigation is required.
If FAIL – For RH roof rack cover, take a picture of the feeler gauge in position of the failing roof rack
cover, then Proceed to Step 2.
– For LH roof rack cover, take a picture of the feeler gauge in position of the failing roof rack
cover, Proceed to Step 2.
If PASS – For RH roof rack cover, Proceed to Drilling and Securing procedure on Page 12.
– For LH roof rack cover, Proceed to Drilling and Securing procedure on Page 12.
PLACE COPY HERE
STUD FOR
MISSING NUT
STUD FOR
MISSING NUT
STUD FOR
MISSING NUT
21202S
FAIL PASS
FEELER GAUGE FEELER GAUGE
FIGURE 4
ATTACHMENT III
PAGE 5 OF 18
CUSTOMER SATISFACTION PROGRAM 20N11-S3
CPR © 2021 FORD![]() MOTOR COMPANY
MOTOR COMPANY
DEARBORN, MICHIGAN 48121
07/2021
2. Inspect the affected roof rack cover(s), roof rack base, retaining clips (seven each side), and roof rack
retaining towers (seven each side).
a. Remove the affected roof rack cover(s). See Figure 5.
1
2
PLACE COPY HERE
STUD FOR
MISSING NUT
STUD FOR
MISSING NUT
STUD FOR
MISSING NUT
21202D
FIGURE 5
ATTACHMENT III
PAGE 6 OF 18
CUSTOMER SATISFACTION PROGRAM 20N11-S3
CPR © 2021 FORD![]() MOTOR COMPANY
MOTOR COMPANY
DEARBORN, MICHIGAN 48121
07/2021
NOTE: Roof rack base removed from vehicle for clarity.
NOTE: A broken roof rack base hook does not need to be replaced.
b. Inspect the affected roof rack base. See Figure 6.
i. If broken, take photos of roof rack base for both the RH and LH.
1. Photos must be clearly labeled RH or LH.
2. Damaged roof rack bases must be clearly identified with a bright highlighter or
similar.
PLACE COPY HERE
PLACE COPY HERE
STUD FOR
MISSING NUT
STUD FOR
MISSING NUT
STUD FOR
MISSING NUT
21202E
PASS
ROOF RACK
CLIP SOCKET
ROOF RACK FRONT HOOK
FAIL PASS
FRONT OF
ROOF RACK
PASS
FIGURE 6
ATTACHMENT III
PAGE 7 OF 18
CUSTOMER SATISFACTION PROGRAM 20N11-S3
CPR © 2021 FORD![]() MOTOR COMPANY
MOTOR COMPANY
DEARBORN, MICHIGAN 48121
07/2021
c. Inspect the retaining clips (7 per side) on the affected side without removing them from the roof
rack base. See Figures 7, 8 and 9.
i. Clips that are reusable:
• Different colors.
• Different styles.
• No major damage identified.
ii. Clips that cannot be reused:
• Missing.
• All or partial of the top missing from the clip base.
• Broken retaining tang.
• Covered in epoxy from a previous repair.
PLACE COPY HERE
PLACE COPY HERE
PLACE COPY HERE
STUD FOR
MISSING NUT
STUD FOR
MISSING NUT
STUD FOR
MISSING NUT
21202F
TOP OF
RETAINING CLIP
RETAINING CLIP
BASE
BOTTOM OF
RETAINING CLIP
RETAINING CLIP
TANG
FIGURE 7
ATTACHMENT III
PAGE 8 OF 18
CUSTOMER SATISFACTION PROGRAM 20N11-S3
CPR © 2021 FORD![]() MOTOR COMPANY
MOTOR COMPANY
DEARBORN, MICHIGAN 48121
07/2021 PLACE COPY HERE
PLACE COPY HERE
PLACE COPY HERE
STUD FOR
MISSING NUT
STUD FOR
MISSING NUT
STUD FOR
MISSING NUT
MISSING CLIP
BROKEN CLIP
21202G
FAIL
BROKEN TANG
FIGURE 8
21202H
PASS
FIGURE 9
ATTACHMENT III
PAGE 9 OF 18
CUSTOMER SATISFACTION PROGRAM 20N11-S3
CPR © 2021 FORD![]() MOTOR COMPANY
MOTOR COMPANY
DEARBORN, MICHIGAN 48121
07/2021
d. Inspect the retaining towers (7 each side) on the interior or underside of the affected roof rack
cover(s). See Figure 9.
i. Broken tangs do not require replacement.
ii. If broken, take photos of retaining towers on the roof rack covers.
1. Photos must be clearly labeled RH or LH.
2. Broken retaining towers must be clearly identified with a bright highlighter or
similar.
STUD FOR
21202I
x7
FAIL
BROKEN ROOF RACK
RETAINING TOWER
RETAINING TOWER
TANG
ROOF RACK
RETAINING TOWER
PASS
PASS IT IS OK FOR THE FAIL
TANG TO BE BROKEN
OR MISSING
FIGURE 9
ATTACHMENT III
PAGE 10 OF 18
CUSTOMER SATISFACTION PROGRAM 20N11-S3
CPR © 2021 FORD![]() MOTOR COMPANY
MOTOR COMPANY
DEARBORN, MICHIGAN 48121
07/2021
e. Inspect for any other damage preventing the roof rack cover from being fully seated on the roof
rack base.
i. Take photos of any other damage for both the RH and LH.
1. Photos must be clearly labeled RH or LH.
2. Damage must be clearly identified with a bright highlighter or similar.
ii. Take photo showing vehicle mileage. See Figure 10.
3. In steps a through e – if no damage identified then proceed to the cleaning procedure on Page 11.
4. In steps a through e – if damage is identified on the roof rack covers, roof rail base, retaining clips
(seven each side), and roof rack retaining towers (7 each side) – then proceed to
photo requirements on Page 18.
PLACE COPY HERE
PLACE COPY HERE
PLACE COPY HERE
STUD FOR
MISSING NUT
STUD FOR
MISSING NUT
STUD FOR
MISSING NUT
21202J
FIGURE 10
ATTACHMENT III
PAGE 11 OF 18
CUSTOMER SATISFACTION PROGRAM 20N11-S3
CPR © 2021 FORD![]() MOTOR COMPANY
MOTOR COMPANY
DEARBORN, MICHIGAN 48121
07/2021
Cleaning
1. If Technical Service bulletin (TSB) 19-2364 or 20-2154 was performed, evidence of RTV or expoxy will
be seen on the roof rack cover and or roof rack contact patch. Inspect the roof rack cover retaining
tower and roof rack contact patch for signs of RTV or epoxy adhesive. See Figure 11. Was evidence
of RTV or epoxy found?
If YES – Replace all the roof rack clips on the affected side, then proceed to Step 2 on Page 11.
If NO – Proceed to Step 2 on Page 11.
STUD FOR
MISSING NUT
STUD FOR
MISSING NUT
STUD FOR
MISSING NUT
21202K
x7
x7
ROOF RACK COVER
RETAINING TOWER
ROOF RACK
CONTACT PATCH
EPOXY
IT IS OK FOR THE
TANG TO BE BROKEN
OR MISSING
FIGURE 11
2. Reinstall the roof rack cover by reversing the removal procedure. See Figure 5 on Page 5.
ATTACHMENT III
PAGE 12 OF 18
CUSTOMER SATISFACTION PROGRAM 20N11-S3
CPR © 2021 FORD![]() MOTOR COMPANY
MOTOR COMPANY
DEARBORN, MICHIGAN 48121
07/2021
Drilling and Securing
1. At the rear of the vehicle, apply painters tape to the inboard end of the roof rack cover. See Figure 12.
PLACE COPY HERE
PLACE COPY HERE
PLACE COPY HERE
STUD FOR
MISSING NUT
STUD FOR
MISSING NUT
STUD FOR
MISSING NUT
21202N
FRONT OF
VEHICLE
INBOARD SIDE OF
ROOF RACK COVER
APPLY PAINTERS TAPE
FIGURE 12
2. From the first screw from the rear, measure 150 mm (6 in) from the screw towards the rear of the
vehicle and up 20 mm (.75 in) from the top of the roof rack base. Mark the measurement on the tape.
See Figure 13.
STUD FOR
MISSING NUT
21202O
FRONT OF
VEHICLE
FIRST SCREW
FROM THE REAR
20 MM (.75 IN)
150 MM (6 IN)
FIGURE 13
ATTACHMENT III
PAGE 13 OF 18
CUSTOMER SATISFACTION PROGRAM 20N11-S3
CPR © 2021 FORD![]() MOTOR COMPANY
MOTOR COMPANY
DEARBORN, MICHIGAN 48121
07/2021
3. From the first mark, measure 100 mm (4 in) towards the rear of the vehicle and up 18 mm (.70 in) from
the top of the roof rack base. Mark the measurement on the tape. See Figure 14.
PLACE COPY HERE
PLACE COPY HERE
PLACE COPY HERE
STUD FOR
MISSING NUT
STUD FOR
MISSING NUT
STUD FOR
MISSING NUT
21202P
FRONT OF
VEHICLE
18 MM (.70 IN)
100 MM (4 IN)
MARK FROM FIRST
MEASURMENT
FIGURE 14
4. Set a depth gauge on the 15/64 drill bit at 25 mm (1 in). Having a second person apply downward
pressure, drill out both marks. See Figure 15.
STUD FOR
MISSING NUT
STUD FOR
21202Q
FRONT OF
VEHICLE
DRILL BIT
DEPTH MARKER
x2
APPLY DOWNWARD
PRESSURE
FIGURE 15
ATTACHMENT III
PAGE 14 OF 18
CUSTOMER SATISFACTION PROGRAM 20N11-S3
CPR © 2021 FORD![]() MOTOR COMPANY
MOTOR COMPANY
DEARBORN, MICHIGAN 48121
07/2021
5. Remove the painters tape and install the push pin retainers. See Figure 16.
PLACE COPY HERE
PLACE COPY HERE
PLACE COPY HERE
STUD FOR
MISSING NUT
STUD FOR
MISSING NUT
STUD FOR
MISSING NUT
21202R
FRONT OF
VEHICLE
PUSH PINS
FIGURE 16
6. At the front of the vehicle, apply painters tape to the inboard end of the roof rack cover. See Figure 17.
STUD FOR
MISSING NUT
STUD FOR
MISSING NUT
21202T
FRONT OF
APPLY PAINTERS TAPE VEHICLE
INBOARD SIDE OF THE
ROOF RACK COVER
FIGURE 17
ATTACHMENT III
PAGE 15 OF 18
CUSTOMER SATISFACTION PROGRAM 20N11-S3
CPR © 2021 FORD![]() MOTOR COMPANY
MOTOR COMPANY
DEARBORN, MICHIGAN 48121
07/2021
7. From the first screw from the front, measure 348 mm (13.75 in) from the screw towards the front of the
vehicle and up 13 mm (.5 in) from the top of the roof rack base. Mark the measurement on the tape.
See Figure 18.
PLACE COPY HERE
PLACE COPY HERE
PLACE COPY HERE
STUD FOR
MISSING NUT
STUD FOR
MISSING NUT
STUD FOR
MISSING NUT
21202U
FIRST SCREW
FROM THE FRONT
FRONT OF
VEHICLE
13 MM (1 IN)
348 MM (13.75 IN)
FIGURE 18
8. From the first mark, measure 63 mm (2.5 in) towards the front of the vehicle and up 9 mm (.25 in) from
the top of the roof rack base. Mark the measurement on the tape. See Figure 19.
STUD FOR
MISSING NUT
21202V
MARK FROM FIRST
MEASUREMENT
FRONT OF
VEHICLE
9 MM (.25 IN)
63 MM (2.5 IN)
FIGURE 19
ATTACHMENT III
PAGE 16 OF 18
CUSTOMER SATISFACTION PROGRAM 20N11-S3
CPR © 2021 FORD![]() MOTOR COMPANY
MOTOR COMPANY
DEARBORN, MICHIGAN 48121
07/2021
9. Having a second person apply downward pressure, drill out both marks. See Figure 20.
PLACE COPY HERE
PLACE COPY HERE
PLACE COPY HERE
STUD FOR
MISSING NUT
STUD FOR
MISSING NUT
STUD FOR
MISSING NUT
21202W
MARK FRONT OF
VEHICLE
x2
APPLY DOWNWARD
PRESSURE
FIGURE 20
10. Remove the painters tape and install the push pin retainers. See Figure 21.
STUD FOR
MISSING NUT
STUD FOR
MISSING NUT
21202X
FRONT OF
PUSH PINS VEHICLE
FIGURE 21
ATTACHMENT III
PAGE 17 OF 18
CUSTOMER SATISFACTION PROGRAM 20N11-S3
CPR © 2021 FORD![]() MOTOR COMPANY
MOTOR COMPANY
DEARBORN, MICHIGAN 48121
07/2021
PLACE COPY HERE
PLACE COPY HERE
PLACE COPY HERE
STUD FOR
MISSING NUT
STUD FOR
MISSING NUT
STUD FOR
MISSING NUT
2070X
UNACCEPTABLE
PHOTO
FIGURE 22
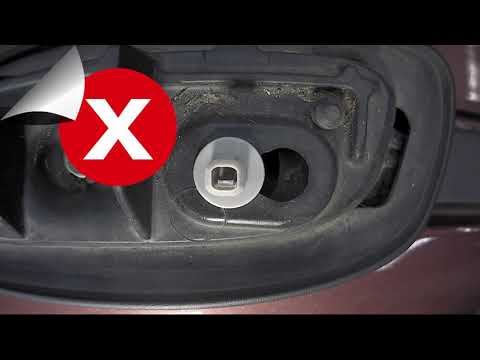
Appendix A – Photo requirements
1. Digital images are now required to be attached to each roof rack cover part order. Before submitting
VIN-specific part order to SSSC, review new digital image submission requirements on page 2 of
Attachment II in the Dealer Bulletin. See Figures 22 through 25 for examples.
STUD FOR
MISSING NUT
STUD FOR
MISSING NUT
2070Z
ACCEPTABLE
PHOTO
Photo shows proper lighting and clear focus but
the loose roof rack cover shows no damage.
FIGURE 23
ATTACHMENT III
PAGE 18 OF 18
CUSTOMER SATISFACTION PROGRAM 20N11-S3
CPR © 2021 FORD![]() MOTOR COMPANY
MOTOR COMPANY
DEARBORN, MICHIGAN 48121
07/2021
PLACE COPY HERE
PLACE COPY HERE
PLACE COPY HERE
STUD FOR
MISSING NUT
STUD FOR
MISSING NUT
STUD FOR
MISSING NUT
2070AA
UNACCEPTABLE
PHOTO
FIGURE 24
PLACE COPY HERE
STUD FOR
MISSING NUT
STUD FOR
MISSING NUT
STUD FOR
MISSING NUT
2070BB
ACCEPTABLE
PHOTO
RETAINING TOWER IS SEPERATED
FROM THE ROOF RACK COVER AND
REQUIRES THE ROOF RACK COVER
TO BE REPLACED
FIGURE 25
******************************************************************************************************************
Ford![]() Motor Company
Motor Company
Ford![]() Customer Service Division
Customer Service Division
P. O. Box 1904
Dearborn, Michigan 48121
Customer Satisfaction Program 20N11
Mr. John Sample
123 Main Street
Anywhere, USA 12345
January 2021
Your Vehicle Identification Number (VIN): 12345678901234567
At Ford![]() Motor Company, we are committed not only to building high quality, dependable products, but
Motor Company, we are committed not only to building high quality, dependable products, but
also to building a community of happy, satisfied customers. To demonstrate that commitment, we are
providing a no-charge Customer Satisfaction Program for your vehicle with the VIN shown above.
Why are you
receiving this notice?
On your vehicle, it may be possible for the roof rail covers to become loose
or detach from the vehicle.
For your peace of mind, Ford![]() Motor Company is providing a one-time repair
Motor Company is providing a one-time repair
on the roof rail covers and attaching clips for 10 years or 150,000 miles,
whichever occurs first.
What is the effect? The roof rail covers may exhibit the following conditions:
• Loose/warped (which can lead to a visible gap between the cover
and roof rail base assembly)
• Squeak and rattle
• Wind noise
• Missing (potential detachment)
If your vehicle has already exceeded either time or mileage limits listed
above, this extended warranty coverage will last through June 30, 2021.
Coverage is automatically transferred to subsequent owners.
What will Ford![]() and
and
your dealer do?
If your vehicle’s roof rail covers requires repair or replacement due to the
symptoms listed above, and your vehicle is within the indicated time/mileage
limitations, Ford![]() Motor Company has authorized your dealer to replace
Motor Company has authorized your dealer to replace
damaged or missing roof rail covers and attaching clips, and secure roof rail
covers with two-part epoxy free of charge (parts and labor). This is a onetime repair program. Both roof rail covers will be serviced at time of repair.
How long will it take? If the component mentioned above requires repair or replacement, the time
needed for this repair is less than one-half day. However, due to service
scheduling requirements, your dealer may need your vehicle for a longer
period of time. In addition, your vehicle will require an inspection to
determine if parts need to be ordered.
What should you do?
COVID-19
(CORONAVIRUS)
You do not need to return to your dealer for this repair unless you have
loose or damaged roof rail covers. Please keep this letter as a reminder of
the one-time repair for your roof rail covers. If the roof rail covers requires
replacement, and your vehicle is within the indicated time/mileage
limitations, contact your dealer to schedule a service appointment. Provide
the dealer with the VIN of your vehicle to schedule a service appointment for
Customer Satisfaction Program 20N11. The VIN is printed near your name
at the beginning of this letter. Your dealer will replace the part at no charge.
If you do not already have a servicing dealer, you can access
www.Fordowner.com for dealer addresses, maps, and driving instructions.
NOTE: You can receive information about Recalls and Customer
Satisfaction Programs through our FordPass App. The app can be
downloaded through the App Store or Google Play. In addition, there are
other features such as reserving and paying for parking in certain locations
and controlling certain functions on your vehicle (lock or unlock doors,
remote start) if it is equipped to allow control.
Ford![]() dealerships have implemented enhanced protocols to ensure both
dealerships have implemented enhanced protocols to ensure both
your safety and the safety of dealership employees. This includes specific
procedures for cleaning and disinfecting customer vehicles before and after
each vehicle is serviced. In most places, vehicle service has been deemed
a critical service. Please contact your local dealer to confirm current service
hours. For more information on how Ford![]() and your local dealer are working
and your local dealer are working
hard to keep you on the road during these challenging times, please visit
owner.ford![]() .com.
.com.
Have you previously
paid for this repair?
If you paid to have this service done before the date of this letter, you may
be eligible for a refund. Refunds will only be provided for service related to
repair description. To verify eligibility and expedite reimbursement, give your
paid original receipt to your dealer before June 30, 2021. To avoid delays,
do not send receipts to Ford![]() Motor Company.
Motor Company.
What if you no longer
own this vehicle?
If you no longer own this vehicle, and have an address for the current
owner, please forward this letter to the new owner. You received this notice
because our records indicate that you are the current owner.
Can we assist you
further?
If you have difficulties getting your vehicle repaired promptly and without
charge, please contact your dealership’s Service Manager for assistance.
RETAIL OWNERS: If you have questions or concerns, please contact our
Ford![]() Customer Relationship Center at 1-866-436-7332 and one of our
Customer Relationship Center at 1-866-436-7332 and one of our
representatives will be happy to assist you. If you wish to contact us through
the Internet, our address is: www.Fordowner.com.
For the hearing-impaired call 1-800-232-5952 (TDD). Representatives are
available Monday through Friday: 8:00AM – 8:00PM (Eastern Time).
FLEET OWNERS: If you have questions or concerns, please contact our
Fleet Customer Information Center at 1-800-34-FLEET, choose Option
#3, and one of our representatives will be happy to assist you. If you wish to
contact us through the Internet, our address is: www.fleet.ford![]() .com.
.com.
Representatives are available Monday through Friday: 8:00AM – 8:00PM
(Eastern Time).
As part of the Ford![]() community, we appreciate your attention to this important matter and your
community, we appreciate your attention to this important matter and your
continued loyalty.
Ford![]() Customer Service Division
Customer Service Division
SEOCONTENT-END
1 Associated Document
Manufacturer Communications
Customer Satisfaction Program 20N11 – Supplement #3
July 12, 2021
MC-10199479-0001.pdf 4637.871KB
NHTSA ID Number: 10189754
Manufacturer Communication Number: 20N11-S2
Summary
Certain 2016 – 2019 Model Year Explorer Vehicles equipped with a Roof Rail Roof Rail Cover Detachment
On some of the affected vehicles, the roof rail covers can become loose, which can lead to a visible gap between the cover and roof rail base assembly, rattling, and potential detachment
1 Associated Document
Manufacturer Communications
Customer Satisfaction Program 20N11 – Supplement #2
March 25, 2021
MC-10189754-0001.pdf 5748.38KB
NHTSA ID Number: 10187726
Manufacturer Communication Number: 20N11-S1
Summary
A new 3M adhesive is now available, allowing a longer working time, along with mixing nozzles and applicator. 3M Universal Adhesive Black Part Number 08223, 3M Static Mixing Nozzles Part Number 08193
This program provides a one-time repair for the roof rail covers and retaining clips to 10 years of service or 150,000 miles from the warranty start date of the vehicle, whichever occurs first. This is a one-time repair program. Both roof rail covers should be serviced at time of repair. If a vehicle has already exceeded either the time or mileage limits, this extended warranty coverage will last through June 30, 2021. Coverage is automatically transferred to subsequent owners.
1 Associated Document
Manufacturer Communications
Customer Satisfaction Program 20N11 – Supplement #1
February 1, 2021
MC-10187726-0001.pdf 3444.716KB
NHTSA ID Number: 10184654
Manufacturer Communication Number: 20N11
Summary
On some of the affected vehicles, the roof rail covers can become loose, which can lead to a visible gap between the cover and roof rail base assembly, rattling, and potential detachment.
1 Associated Document
Manufacturer Communications
Customer Satisfaction Program 20N11
December 8, 2020
MC-10184654-0001.pdf 3460.98KB

- Plasticbonder: Is A Quick-Set, 2 Part, Urethane Adhesive System That Provides Strong, Lasting Repairs And Works On Thermoset, Carbon Fiber Composites, Thermoplastics, Coated Metals, Concrete & More.
- Count On Us: For More Than 40 Years, Our Products Have Earned A Loyal Following From People Who Take Pride In Their Work. With Each Product We Innovate, We Continue To Provide The World'S Strongest Bond For Your Projects.
- Simple To Use: J-B Plasticbonder Has A 1:1 Mixing Ratio, Sets In 15 Minutes And Can Be Sanded After 30 Minutes. With A Tensile Strength Of 3770 Psi, Plasticbonder Cures To A Hard, Permanent Bond.
- Versatile And Dependable: Perfect For Indoor Or Outdoor Use, Epoxy & Adhesives, Plastic, Composite, Pvc, And More. Plastic Bonder Makes A Great Gap Filler And Dries Black In Color.

- J-B Weld Plasticweld: A Hand Mixable Two Part Epoxy Putty Stick That Is Formulated To Repair And Rebuild Various Plastic Compounds And Surfaces. J-B Weld Plasticweld Is Designed For Diy Plastic Repairs On Abs, Pvc & Cpvc Pipes And Plastics, Auto Bumpers And More! Plasticweld Is Certified By The Nsf And Is Safe For Contact With Potable Water
- Cure And Set Time: After Kneading The Two Part Formula Together By Hand, Plasticweld Takes 25 Minutes To Set And Cures In 3 Hours. J-B Weld Plasticweld Set And Cure Color Is Off White
- Product Features And Strength: J-B Weld Plasticweld Has Lap Shear Strength Of 600 Psi. Plasticweld Can Withstand Continuous Temperatures Up To 250Of (121Oc) And Intermittent Temperatures Up To 300Of (148Oc) When Fully Cured. Plasticweld Does Not Shrink And Can Be Molded, Shaped, Sanded, Drilled And Cut
- Applications: Abs, Pvc & Cpvc Pipes And Plastics, Auto Bumpers And Trim, Vinyl Surfaces And Siding, Marine Repairs & Fiberglass Parts, Plastic Water Tanks, And Plumbing
- Repair and rebuild any rigid and semi-flexible plastic including ABS, PVC and CPVC

- DURABLE YET FLEXIBLE: For automotive plastic panel repair and for matching OEM seam sealers
- TWO-PART EPOXY: Adhesive is automatically metered for proper ratio
- EASILY SANDABLE: Ready to sand in 15 minutes for a smooth finish without rework
- QUICKLY PAINTABLE: Ready in as little as 30 minutes for increased vehicle throughput
- PART OF A COMPLETE REPAIR SYSTEM: Works with 3M applicator guns and adhesion promoters

- UNIQUE FORMULA: A two part urethane adhesive that provides a quick setup and the internal strength needed for reinforcing and bonding plastic parts
- QUICK AND EFFICIENT: Fast-curing urethane chemistry helps keep the job moving
- STRONG: Adhesive reinforces two-sided repairs
- LONG LASTING: Creates a lasting bond with its high-performance adhesive
- EASY TO USE: Dual-syringe cartridge system makes for easy application on plastic, fiberglass, ceramic, metal and most substrates

- BONDING POWER: Engineered to provide a high-performance instant fix for both everyday household repairs and heavy-duty industrial tasks.
- 300% MORE CONTENT: Stop overpaying for tiny tubes; our massive 50g professional supply outlasts standard adhesive brands for your largest DIY projects.
- RAPID DRYING FORMULA: Reaches maximum handling durability in seconds with a crystal-clear finish that remains invisible on intricate crafts.
- AIRTIGHT PRECISION TIP: Designed with an anti-clogging safety cap to ensure a consistent flow and prevent dry-outs for long-term storage.
- Invisible finish, no residue: Dries clear on most materials – perfect for visible areas, decorative items or surfaces that must remain clean and seamless.
Last update on 2026-06-18 / Affiliate links / Images from Amazon Product Advertising API
This product presentation was made with AAWP plugin.