
NHTSA ID Number: 10233580
Manufacturer Communication Number: TSB 23-2014
Summary
This article supersedes TSB 22-2355 to update the vehicle model years affected. Some 2021-2023 Mustang Mach-E, 2022-2023 e-Transit and F-150 Lightning vehicles may experience inoperative level 3 charging with an illuminated Charger Service Required indicator in the instrument panel cluster (IPC) and diagnostic trouble codes (DTCs) P0D93:00, P0D94:00, P0D98:00, P0D9E:00 and/or P0DA0:00 in the secondary on-board diagnostic module (SOBDM). If the charging cord is removed from the charge port without the lock/release button fully pressed, this can damage the charge port locking pin actuator and disable level 3 charging for the next charging session. To correct the condition, follow the Service Procedure to replace only the charge port lock actuator.
This bulletin supersedes 22-2355.
Model:
| Ford
2022-2023 e-Transit |
| 2022-2023 F-150 Lightning |
| 2021-2023 Mustang Mach-E |
Summary
This article supersedes TSB 22-2355 to update the vehicle model years affected.
Issue: Some 2021-2023 Mustang Mach-E, 2022-2023 e-Transit/F-150 Lightning vehicles may experience inoperative level 3 charging with an illuminated Charger Service Required indicator in the instrument panel cluster (IPC) and diagnostic trouble codes (DTCs) P0D93:00, P0D94:00, P0D98:00, P0D9E:00 and/or P0DA0:00 in the secondary on-board diagnostic module (SOBDM). If the charging cord is removed from the charge port without the lock/release button fully pressed, this can damage the charge port locking pin actuator and disable level 3 charging for the next charging session. To correct the condition, follow the Service Procedure to replace only the charge port lock actuator.
Action: Follow the Service Procedure to correct the condition on vehicles that meet all of the following criteria:
- One of the following vehicles:
- 2021-2023 Mustang Mach-E
- 2022-2023 e-Transit
- 2022-2023 F-150 Lightning
- Level 3 charging inoperative
- Illuminated Charger Service Required indicator
- Charge port lock actuator pin broken and/or missing
- At least one of the following DTCs:
- P0D93:00
- P0D94:00
- P0D98:00
- P0D9E:00
- P0DA0:00
Parts
| Service Part Number | Quantity | Description |
| LJ9Z-10D737-A | 1 | Actuator Assembly |
Service Procedure
NOTE: To prevent repeat concerns with the charge port lock actuator, fully press the charge port lock/release button before disconnecting the charge cord. (Figure 1) The charge port lock actuator may also be released through the vehicle’s center display screen or pressing the release button located on the level 3 direct current (DC) fast charger.
Figure 1
- For Mustang Mach-E vehicles, refer to the Digital Owner’s Manual located in the vehicle’s center display screen by selecting Features > Owner’s Manual > Charging Your Vehicle > DC Charging > Stopping Charging.
- For e-Transit vehicles, refer to the Digital Owner’s Manual located in the vehicle’s center display screen by selecting Features > Owner’s Manual > Charging Your Vehicle – Electric Motor > DC Charging > Stopping Charging.
- For F-150 Lightning vehicles, refer to the Lightning Digital Owner’s Manual located in the vehicle’s center display screen by selecting Features > Owner’s Manual > Charging Your Vehicle > DC Charging > Stopping Charging.
1. Inspect the charge port lock actuator pin. (Figure 2) Is the charge port lock actuator pin missing or loose?
Figure 2
(1). Yes – proceed to Step 2.
(2). No – this article does not apply. Refer to Workshop Manual (WSM), Section 414-03B High Voltage Battery Charging System.
2. De-energize the high voltage system. Refer to WSM, Section 414-03A High Voltage Battery > Mounting and Cable > General Procedures.
3. Gain access to the charging port.
(1). For e-Transit vehicles, remove the front bumper cover. Refer to WSM, Section 501-19 Front Bumper Cover > Bumpers > Disassembly and Assembly.
- Remove the retainers and the charge port cover. (Figure 3)
Figure 3
(2). For Mustang Mach-E and F-150 Lightning vehicles, remove the following components:
- Left front wheel. Refer to WSM, Section 204-04A Wheels and Tires.
- Fender splash shield. Refer to WSM, Section 501-02 Front End Body Panels > Removal and Installation.
- Charge status indicator (CSI) housing assembly. Refer to WSM, Section 414-03B High Voltage Battery Charging System > Removal and Installation.
4. Disconnect the charge cord lock release cable and 4-way electrical connector to the lock actuator. (Figure 4)
Figure 4
5. Remove the 4 bolts holding the charge port to the body bracket. (Figure 5)
Figure 5
6. Release the 2 snap features and slide the charge port downward along the guide track until there is enough space to remove and discard the 2 actuator bolts and the actuator. (Figure 6)
Figure 6
7. Install a new actuator and 2 new actuator bolts. Tighten to 1.2 nm (10.6 lb-in).
8. Align the charge port guides with the bracket. Slide the bracket back into position until the snap features engage, holding the bracket in place with all four holes lined up.
9. Install the 4 charge port bolts. Tighten to 10.5 Nm (93 lb-in).
10. Install the charge cord lock release cable and 4-way electrical connector to the lock actuator. (Figure 4)
11. Install the accessibility components.
(1). For e-Transit vehicles, install the retainers and the charge port cover. (Figure 3)
- Reinstall the front bumper cover. Refer to WSM, Section 501-19 Front Bumper Cover > Bumpers > Disassembly and Assembly.
(2). For Mustang Mach-E and F-150 Lightning vehicles, install the following components:
- Left front wheel. Refer to WSM, Section 204-04A Wheels and Tires.
- Fender splash shield. Refer to WSM, Section 501-02 Front End Body Panels > Removal and Installation.
- CSI housing assembly. Refer to WSM, Section 414-03B High Voltage Battery Charging System > Removal and Installation.
8 Affected Products
Vehicles
| MAKE | MODEL | YEAR |
| FORD | E-TRANSIT | 2023 |
| FORD | F-150 LIGHTNING | 2022-2023 |
| FORD | MUSTANG MACH E | 2021-2023 |
| FORD | TRANSIT | 2023 |
| FORD | TRANSIT BEV | 2022 |
1 Associated Document
Manufacturer Communications
23-2014
01 March 2023
MC-10233580-0001.pdf 690.824KB
NHTSA ID Number: 10222189
Manufacturer Communication Number: TSB 22-2355
Summary
Some 2021-2022 Mach-E, 2022 Transit BEV and F-150 Lightning vehicles may experience inoperative level 3 charging with an illuminated Charger Service Required indicator in the instrument panel cluster (IPC) and diagnostic trouble codes (DTCs) P0D93:00, P0D94:00, P0D98:00, P0D9E:00 and/or P0DA0:00 in the secondary on-board diagnostic module (SOBDM). If the charging cord is removed from the charge port without the lock/release button fully depressed, this can damage the charge port locking pin actuator and disable level 3 charging for the next charging session. To correct the condition, follow the Service Procedure to replace only the charge port lock actuator.
1 Associated Document
Manufacturer Communications
22-2355
19 September 2022
MC-10222189-0001.pdf 260.673KB
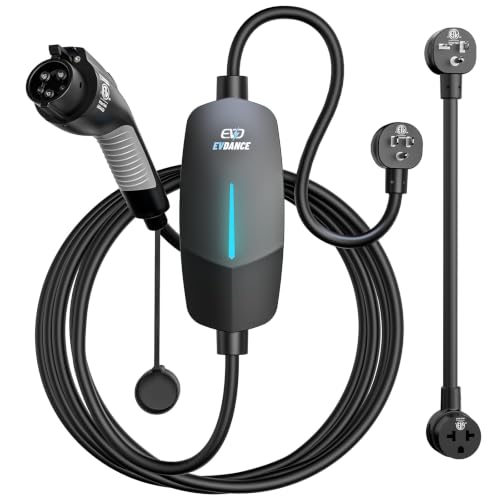
- Flex Level 1 EV Charger - The EVDANCE Level 1 electric car charger is compatible with J1772 electric vehicles and plug-in hybrid vehicles (North American Standard). *Tesla requires a SAE J1772 adapter.
- Convenient to Use - This charger has both NEMA 6-20 plug for 16A 240V charging (3.68kW, 10-12 mi/h) and a NEMA 6-20 to 5-15 plug adapter for 12A 120V charging (1.44kW, 2-5 mi/h). The included bag makes it easier to carry on the go. It also has a 25ft cable length, you can use it flexibly from anywhere in the garage or driveway.
- Check Your Outlet Type -This charger works with standard 120V NEMA 5-15/5-20 outlets (2-5 mph charging speed) and 240V NEMA 6-20 outlets (10-12 mph) . It's not compatible with NEMA 6-15/10-30/14-30/14-50/6-50 outlets – you'll need a NEMA 14-50/14-30/10-30/6-50 to 6-20 adapter (sold separately) to connect.
- Compatible EV Models -This EV charger works with most major electric vehicles, including Ford, Chevrolet, Hyundai, Audi, Nissan Ariya, Rivian R1S, Kia, and others. However, it's not compatible with Mini Cooper Electric Hardtop,Toyota Prus Prime/Z4X/RAV4Prime, Porsche Taycan Base/4S/Turbo/Turbo S or Tesla models (Tesla requires a J1772 to Tesla Adapter, sold separately). For a full list of compatible models, check out the Full Compatibility List on our product page.
- Indication Displays - LED display that can tell you the status as well as indicate errors while charging your electric vehicle.
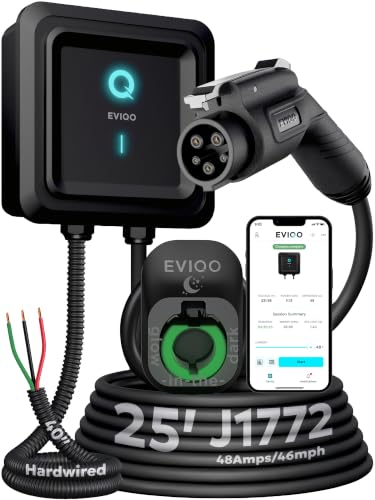
- WORKS WITH EVERY NON-TESLA EV: Standard J1772 connector plugs straight into Ford, Chevrolet, Hyundai, Kia, Nissan, BMW, Volkswagen, Audi, Rivian, Lucid and every other EV or plug-in hybrid sold with a J1772 port - no adapter needed. Tesla drivers can charge too, using the J1772 adapter that comes with the car. The extra-long 25 ft cable easily reaches across a garage or driveway.
- HARDWIRED - PROFESSIONAL INSTALL: This Level 2 charger is hardwired (not plug-in), so a licensed electrician installs it per National Electrical Code. It delivers up to 48A on a dedicated 60A, 240V circuit - enough to charge most EVs fully overnight. Want more speed? You can set DIP switches 4 and 5 to unlock 50A on a dedicated 70A circuit. Before ordering, check your car's port type and that your electrical panel can support the circuit.
- CONTROL FROM YOUR PHONE: A stronger built-in antenna keeps the charger online even in a garage or basement. Use the free app to start and stop charging, set the charging speed (6-48A), get reminders, and track how much energy and money each charge uses. Requires a 2.4 GHz home WiFi network.
- SAFETY-CERTIFIED & WEATHERPROOF: Independently tested and certified (UL, ETL, FCC, Energy Star). A fully sealed IP66 / NEMA 4 housing stands up to rain, snow, heat and dust indoors or out, and internal steel shielding protects the electronics for years of reliable use.
- GLOW-IN-THE-DARK HOLSTER: The included high-visibility holster glows in the dark so you can find and dock the plug easily at night. Holds the connector securely when not in use.

- Fast & Adjustable Charging: Up to 9.6 kW (37 mph), 7x faster than Level 1, with 5 current levels (16/20/24/32/40A) to match home capacity, plus 1–12H timing delay for off-peak charging, reducing costs and easing range anxiety
- Plug & Extended Reach: NEMA 14-50 plug fits 240V outlets for true plug-and-play use, while the 25FT cable offers flexible reach across garages and driveways, eliminating the need to reposition vehicles for easier daily charging
- ETL Certified & ELEGRP PBE Protection: Fully ETL certified, ELEGRP’s exclusive PBE technology combines full-link overheat protection with a triple-layer safety system, ensuring safer, more efficient charging. Includes a 2-year warranty
- All-Weather Indoor & Outdoor Use: IP67-rated for durability in rain, snow, and extreme temps (-21°F to 121°F), with a portable design that supports home, travel, and outdoor charging, delivering reliable performance anywhere
- Universal Compatibility: Works seamlessly with Mercedes, Chevy, Ford, Mustang Mach-E, Cadillac, Hyundai Ioniq, Kia EV6/EV9, Nissan Leaf, Chevy Bolt, Chrysler Pacifica Hybrid, and all PHEV/BEV. Tesla compatible with NACS adapter (sold separately)

- WORKS WITH EVERY NON-TESLA EV: Standard J1772 connector plugs straight into Ford, Chevrolet, Hyundai, Kia, Nissan, BMW, Volkswagen, Audi, Rivian, Lucid and every other EV or plug-in hybrid sold with a J1772 port - no adapter needed. Tesla drivers can charge too, using the J1772 adapter that comes with the car.
- PLUG IN, NO HARDWIRING: Level 2 charger delivers up to 40A to fully charge most EVs overnight. Plugs into a 240V, 4-prong NEMA 14-50 outlet (the RV/range type - NOT a dryer outlet) on a dedicated 50A circuit. The extra-long 25 ft cable easily reaches across a garage or driveway. Before ordering, check your car's port type and that you have the right outlet.
- CONTROL & SAVE FROM YOUR PHONE: A stronger built-in antenna keeps the charger online even in a garage or basement. Use the free app to start/stop charging, set speed (6-40A), get reminders, and track energy use and cost. Schedule off-peak overnight charging to cut your electric bill. Requires 2.4 GHz WiFi.
- SAFETY-CERTIFIED & WEATHERPROOF: Independently tested and certified (UL, ETL, FCC, Energy Star). A fully sealed IP66 / NEMA 4 housing stands up to rain, snow, heat and dust indoors or out, and internal steel shielding protects the electronics for years of reliable use.
- GLOW-IN-THE-DARK HOLSTER: The included high-visibility holster glows in the dark so you can find and dock the plug easily at night. Holds the connector securely when not in use.

- Charge with Confidence: ChargePoint builds reliable, flexible EV charging stations for home, business, and fleets. Get 24/7 support and access to hundreds of thousands of North American charging locations
- Charge Smart: With the user-friendly ChargePoint Mobile App, you can control your electric car charger, manage reminders, connect to smart home devices, find stations, get data and charging info, and access the latest features
- Vast Network: Wherever you go, ChargePoint’s network includes 274k+ stations across North America and Europe and 565k+ roaming partner stations
- Safe & Durable: Rely on this UL-certified EV charger for safe home charging. It can be installed indoors or outdoors by an electrician and includes a cold-resistant cable
- Fast & Powerful: This EV charger charges 9× faster than a 120V outlet, delivering up to 45 mi/hr., dependent upon your vehicle. It features a J1772 connector for all non-Tesla EVs and plugs into a 240V outlet with a 14-50 receptacle, requiring a 40A or 50A circuit. For Tesla EVs, this will require an adapter
SEOCONTENT-START
3/28/23, 9:06 AM https://www.fordservicecontent.com/Ford_Content/vdirsnet/TSB/EU/~WTSB23-2014/US/EN/~UEmployee/defaul t.aspx?VIN=&ver… https://www.fordservicecontent.com/Ford_Content/vdirsnet/TSB/EU/~WTSB23-2014/US/EN/~UEmployee/defaul t.aspx?VIN=&version=6.0&environme… 1/7 TECHNICAL SERVICE BULLETIN Level 3 Charging, Illuminated Charger Service Required Indicator In The IPC And/Or Multiple DTCs 23-2014 01 March 2023 This bulletin supersedes 22-2355. Model: Ford 2022-2023 e-Transit 2022-2023 F-150 Lightning 2021-2023 Mustang Mach-E Summary This article supersedes TSB 22-2355 to update the vehicle model years affected. Issue: Some 2021-2023 Mustang Mach-E, 2022-2023 e-Transit/F-150 Lightning vehicles may experience inoperative level 3 charging with an illuminated Charger Service Required indicator in the instrument panel cluster (IPC) and diagnostic trouble codes (DTCs) P0D93:00, P0D94:00, P0D98:00, P0D9E:00 and/or P0DA0:00 in the secondary on-board diagnostic module (SOBDM). If the charging cord is removed from the charge port without the lock/release button fully pressed, this can damage the charge port locking pin actuator and disable level 3 charging for the next charging session. To correct the condition, follow the Service Procedure to replace only the charge port lock actuator. Action: Follow the Service Procedure to correct the condition on vehicles that meet all of the following criteria: • One of the following vehicles: – 2021-2023 Mustang Mach-E – 2022-2023 e-Transit – 2022-2023 F-150 Lightning • Level 3 charging inoperative • Illuminated Charger Service Required indicator • Charge port lock actuator pin broken and/or missing • At least one of the following DTCs: – P0D93:00 – P0D94:00 – P0D98:00 – P0D9E:00 – P0DA0:00 Parts Service Part Number Quantity Description LJ9Z-10D737-A 1 Actuator Assembly Warranty Status: Eligible under provisions of New Vehicle Limited Warranty (NVLW)/Service Part Warranty (SPW)/Special Service Part (SSP)/Extended Service Plan (ESP) coverage. Limits/policies/prior approvals are not altered by a TSB. NVLW/SPW/SSP/ESP coverage limits are determined by the identified causal part and verified using the OASIS part coverage tool. Labor Times Description Operation No. Time 3/28/23, 9:06 AM https://www.fordservicecontent.com/Ford_Content/vdirsnet/TSB/EU/~WTSB23-2014/US/EN/~UEmployee/defaul t.aspx?VIN=&ver… 2022-2023 e-Transit: Inspect And Replace Actuator Following The Service Procedure (Can Be Used With Operation D) (Do Not Use With Any Other Labor Operations Outside Of This Article) 2022-2023 F-150 Lightning: Inspect And Replace Actuator Following The Service Procedure (Do Not Use With Any Other Labor Operations) 2021-2023 Mustang Mach-E: Inspect And Replace Actuator Following The Service Procedure (Do Not Use With Any Other Labor Operations) 2022-2023 e-Transit: Additional Time To Perform 360 Degree Camera Alignment (Can Be Use With Operation A) 232014A 232014B 232014C 232014D 1.7 Hrs. 1.2 Hrs. 1.5 Hrs. 0.7 Hrs. Repair/Claim Coding Causal Part: 10D737 Condition Code: 01 Service Procedure NOTE: To prevent repeat concerns with the charge port lock actuator, fully press the charge port lock/release button before disconnecting the charge cord. (Figure 1) The charge port lock actuator may also be released through the vehicle’s center display screen or pressing the release button located on the level 3 direct current (DC) fast charger. Figure 1 https://www.fordservicecontent.com/Ford_Content/vdirsnet/TSB/EU/~WTSB23-2014/US/EN/~UEmployee/defaul t.aspx?VIN=&version=6.0&environme… 2/7 3/28/23, 9:06 AM https://www.fordservicecontent.com/Ford_Content/vdirsnet/TSB/EU/~WTSB23-2014/US/EN/~UEmployee/defaul t.aspx?VIN=&ver… • For Mustang Mach-E vehicles, refer to the Digital Owner’s Manual located in the vehicle’s center display screen by selecting Features > Owner’s Manual > Charging Your Vehicle > DC Charging > Stopping Charging. • For e-Transit vehicles, refer to the Digital Owner’s Manual located in the vehicle’s center display screen by selecting Features > Owner’s Manual > Charging Your Vehicle – Electric Motor > DC Charging > Stopping Charging. • For F-150 Lightning vehicles, refer to the Lightning Digital Owner’s Manual located in the vehicle’s center display screen by selecting Features > Owner’s Manual > Charging Your Vehicle > DC Charging > Stopping Charging. 1. Inspect the charge port lock actuator pin. (Figure 2) Is the charge port lock actuator pin missing or loose? Figure 2 (1). Yes – proceed to Step 2. (2). No – this article does not apply. Refer to Workshop Manual (WSM), Section 414-03B High Voltage Battery Charging System. 2. De-energize the high voltage system. Refer to WSM, Section 414-03A High Voltage Battery > Mounting and Cable > General Procedures. 3. Gain access to the charging port. (1). For e-Transit vehicles, remove the front bumper cover. Refer to WSM, Section 501-19 Front Bumper Cover > Bumpers > Disassembly and Assembly. • Remove the retainers and the charge port cover. (Figure 3) https://www.fordservicecontent.com/Ford_Content/vdirsnet/TSB/EU/~WTSB23-2014/US/EN/~UEmployee/defaul t.aspx?VIN=&version=6.0&environme… 3/7 3/28/23, 9:06 AM https://www.fordservicecontent.com/Ford_Content/vdirsnet/TSB/EU/~WTSB23-2014/US/EN/~UEmployee/defaul t.aspx?VIN=&ver… Figure 3 (2). For Mustang Mach-E and F-150 Lightning vehicles, remove the following components: • Left front wheel. Refer to WSM, Section 204-04A Wheels and Tires. • Fender splash shield. Refer to WSM, Section 501-02 Front End Body Panels > Removal and Installation. • Charge status indicator (CSI) housing assembly. Refer to WSM, Section 414-03B High Voltage Battery Charging System > Removal and Installation. 4. Disconnect the charge cord lock release cable and 4-way electrical connector to the lock actuator. (Figure 4) Figure 4 5. Remove the 4 bolts holding the charge port to the body bracket. (Figure 5) https://www.fordservicecontent.com/Ford_Content/vdirsnet/TSB/EU/~WTSB23-2014/US/EN/~UEmployee/defaul t.aspx?VIN=&version=6.0&environme… 4/7 3/28/23, 9:06 AM https://www.fordservicecontent.com/Ford_Content/vdirsnet/TSB/EU/~WTSB23-2014/US/EN/~UEmployee/defaul t.aspx?VIN=&ver… Figure 5 6. Release the 2 snap features and slide the charge port downward along the guide track until there is enough space to remove and discard the 2 actuator bolts and the actuator. (Figure 6) Figure 6 https://www.fordservicecontent.com/Ford_Content/vdirsnet/TSB/EU/~WTSB23-2014/US/EN/~UEmployee/defaul t.aspx?VIN=&version=6.0&environme… 5/7 3/28/23, 9:06 AM https://www.fordservicecontent.com/Ford_Content/vdirsnet/TSB/EU/~WTSB23-2014/US/EN/~UEmployee/defaul t.aspx?VIN=&ver… 7. Install a new actuator and 2 new actuator bolts. Tighten to 1.2 nm (10.6 lb-in). 8. Align the charge port guides with the bracket. Slide the bracket back into position until the snap features engage, holding the bracket in place with all four holes lined up. 9. Install the 4 charge port bolts. Tighten to 10.5 Nm (93 lb-in). 10. Install the charge cord lock release cable and 4-way electrical connector to the lock actuator. (Figure 4) 11. Install the accessibility components. (1). For e-Transit vehicles, install the retainers and the charge port cover. (Figure 3) • Reinstall the front bumper cover. Refer to WSM, Section 501-19 Front Bumper Cover > Bumpers > Disassembly and Assembly. (2). For Mustang Mach-E and F-150 Lightning vehicles, install the following components: • Left front wheel. Refer to WSM, Section 204-04A Wheels and Tires. • Fender splash shield. Refer to WSM, Section 501-02 Front End Body Panels > Removal and Installation. • CSI housing assembly. Refer to WSM, Section 414-03B High Voltage Battery Charging System > Removal and Installation. © 2023 Ford Motor Company All rights reserved. NOTE: The information in Technical Service Bulletins is intended for use by trained, professional technicians with the knowledge, tools, and equipment to do the job properly and safely. It informs these technicians of conditions that may occur on some vehicles, or provides information that could assist in proper vehicle service. The procedures should not be performed by “do-it-yourselfers”. Do not assume that a condition https://www.fordservicecontent.com/Ford_Content/vdirsnet/TSB/EU/~WTSB23-2014/US/EN/~UEmployee/defaul t.aspx?VIN=&version=6.0&environme… 6/7 3/28/23, 9:06 AM https://www.fordservicecontent.com/Ford_Content/vdirsnet/TSB/EU/~WTSB23-2014/US/EN/~UEmployee/defaul t.aspx?VIN=&ver… https://www.fordservicecontent.com/Ford_Content/vdirsnet/TSB/EU/~WTSB23-2014/US/EN/~UEmployee/defaul t.aspx?VIN=&version=6.0&environme… 7/7 described affects your car or truck. Contact a Ford or Lincoln dealership to determine whether the Bulletin applies to your vehicle. Warranty Policy and Extended Service Plan documentation determine Warranty and/or Extended Service Plan coverage unless stated otherwise in the TSB article. The information in this Technical Service Bulletin (TSB) was current at the time of printing. Ford Motor Company reserves the right de this information with updates. The most recent information is available through Ford Motor Company’s on-line technical resources.
SEOCONTENT-END
This product presentation was made with AAWP plugin.